User Documentation
Recaf is a modern Java and Android reverse engineering tool. This entails supporting many tasks such as providing an intuitive UI for navigating application logic, simplifying the process of modifying application behavior, and much more. You can read more about all of the other features provided by Recaf by reading the documentation.
Installing
For most users it is recommended that you use the launcher to install and run Recaf. The launcher will automatically download the correct JavaFX artifacts for your system, allow you to pick which installed version of Java to use when running Recaf, and provide easy single-click access to updates.
For technical users that do not wish to use the launcher, you can follow the manual installation guide.
Requirements
Java 22 or higher
Recaf uses features introduced in JDK 22, thus you will need to have JDK 22 or above installed.
You can install JDK 22 or above from a number of OpenJDK distributors:
JavaFX 22 or higher
Recaf uses features introduced in JavaFX 22, thus you will need to have JavaFX 22 or above downloaded. When you use the launcher to run Recaf the latest compatible version of JavaFX will be automatically downloaded for you.
Installation steps will be provided in the following launcher and manual pages.
Installing via the launcher
The latest version of the launcher can be downloaded on the project's releases page. Each release offers both a GUI and CLI.
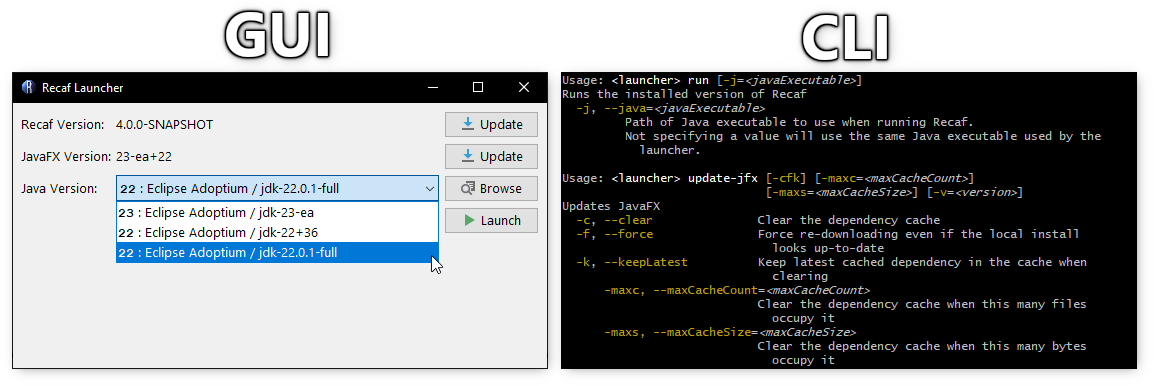
Screenshot of the launcher GUI and CLI in use side-by-side.
Using the GUI
Run the jar file to open the GUI. The first time using the launcher, you will be asked how this launcher should behave.

Welcome screen shown in the launcher the first time you use it.
You have the options of:
- Showing the launcher every time
- Updating and running Recaf (without showing the launcher)
- Just running Recaf without updating (and without showing the launcher)
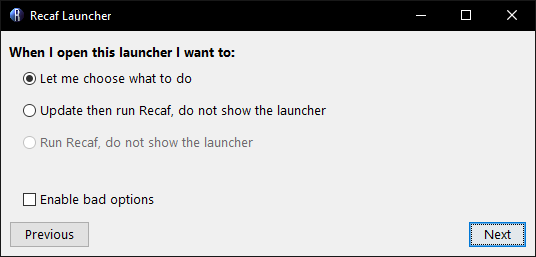
Prompt asking how the launcher should behave on following uses.
If you wish to reset the behavior after picking one of the last two options, delete the %RECAF%/launcher directory where %RECAF% is where Recaf is installed on your system. This location can be different depending on what operating system you use.
| OS | Location |
|---|---|
| Windows | %APPDATA%/Recaf |
| Mac | $HOME/Library/Application Support/Recaf |
| Linux | $XDG_CONFIG_HOME/Recaf or $HOME/.config/Recaf |
If you wish to have Recaf installed in a different location set the RECAF environment variable to the desired directory path.
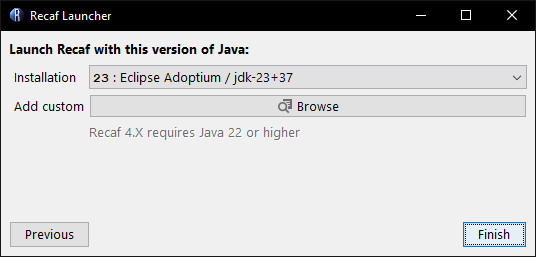
Prompt asking for a Java installation to use Recaf with.
The launcher itself can run with Java 8 or above. It will ask you to pick a version of Java to use for running Recaf that meets the requirements. The launcher will attempt to find existing Java installations on your machine and pre-populate the dropdown menu. If you want to use a different version or the launcher couldn't find where you installed Java you can click the "browser" button to manually pick an installation.
Using the CLI
The following is the list of CLI commands.
Auto
- Checks local system compatibility
- Keeps JavaFX up-to-date
- Keeps Recaf up-to-date
- Runs Recaf
Usage: <launcher> auto
Run
- Runs the currently installed version of Recaf
Usage: <launcher> run
  -j, --java=<javaExecutable>
         Path of Java executable to use when running Recaf.
         Not specifying a value will use the same Java executable used by the
           launcher.
Compatibility
- Checks for a compatible version of Java
- Checks if the current Java runtime includes JavaFX
- Bundling JavaFX can work, but its your responsibility to ensure the bundled version is compatible with Recaf
- Ideally use a JDK that does not bundle JavaFX and let the launcher pull in JavaFX
Usage: <launcher> compatibility [-ifx] [-ss]
      -ifx, --ignoreBundledFx
         Ignore problems with the local system's bundled JavaFX version
      -ss, --skipSuggestions
         Skip solutions to detected problems
Update Recaf
- Keeps Recaf up-to-date
Usage: <launcher> update
If you want to be on the bleeding edge of things there is an alternative command:
Usage: <launcher> update-ci [-b=<branch>]
Installs the latest artifact from CI
  -b, --branch=<branch>   Branch name to pull from.
                          By default, no branch is used.
                          Whatever is found first on the CI will be grabbed.
Update JavaFX
- Keeps Recaf's local JavaFX cache up-to-date with the current release of JavaFX
- Can be configured to use specific versions of JavaFX if desired
- Can be configured to delete old versions of JavaFX in the cache automatically
Usage: <launcher> update-jfx [-cfk] [-maxc=<maxCacheCount>]
                             [-maxs=<maxCacheSize>] [-v=<version>]
  -c, --clear               Clear the dependency cache
  -f, --force               Force re-downloading even if the local install
                              looks up-to-date
  -k, --keepLatest          Keep latest cached dependency in the cache when
                              clearing
      -maxc, --maxCacheCount=<maxCacheCount>
                            Clear the dependency cache when this many files
                              occupy it
      -maxs, --maxCacheSize=<maxCacheSize>
                            Clear the dependency cache when this many bytes
                              occupy it
  -v, --version=<version>   Target JavaFX version to use, instead of whatever
                              is the latest
Check Recaf's version
- Prints out the version of Recaf installed via the launcher
Usage: <launcher> version
Installing manually
To install and launch Recaf 4.X without the launcher here's the process to follow:
Step 1: Download Java 22 or higher
You can get Java 22+ from a variety of vendors. We have a list of recommended vendors in the previous requirements page.
Step 2: Download Recaf
You can grab the official releases from the GitHub releases. You will want to pick the larger JAR file with the -generic.jar suffix as this is the jar file that bundles all transitive dependencies (Except JavaFX since it is platform specific).
NOTE: Once Recaf 4 begins proper releases the statement above will be accurate. But for the time being Recaf 4 is only publishing snapshots under CI.
If you want to try out features and fixes before they get bundled into a release you can also check the CI for nightly artifacts. You will need to be signed into GitHub to access the artifact downloads though.
For the sake of simplicity the file downloaded in this step will be referred to as recaf.jar.
Step 3: Download JavaFX
You will need to download the four JavaFX artifacts suited for your operating system.
How do I get the artifact for my system?
- Pick a version from the displayed table.
- This will take you to a page describing information about that specific version of the dependency.
- The oldest version we would recommend is
22or any of its patch version updates (Like22.0.1). - The newest version you can choose depends on your version of Java installed. JavaFX occasionally updates what version of Java it targets.
- JFX 21 requires Java 17+
- JFX 23 requires Java 21+
- JFX 24 requires Java 22+
- You can check the JFX release notes to see whenever they bump the minimum target JDK version.
- There will be a row labeled
Files. SelectView All.- This will show you the list of each platform-specific release for the given version.
- Pick the appropriate platform for your operating system. You can find a flow-chart helper below.
- Choose
javafx-<name>-<version>-<platform>-<arch>.jar.- This should be one of the larger file variants in the list.
- Do this for each of the dependencies in the list above.
- Put all four artifacts in a directory next to
recaf.jar.- In this example I will name the directory
dependencies.
- In this example I will name the directory
Platform flow-chart:
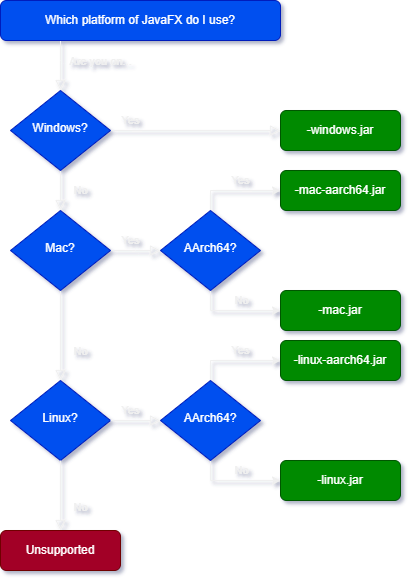
Flow chart/decision tree showing which JFX platform you should pick for your system.
Step 4: Run Recaf with JavaFX in the classpath
Run the command java -cp recaf.jar;dependencies/* software.coley.recaf.Main.
NOTE: On Unix systems you would use
:instead of;as the dependency path separator.
Additional arguments for Recaf are documented in the developer "Running" page.
Why have an external launcher?
There are two main reasons:
- Remove self-dependency injection of JavaFX in the Recaf app itself.
- In the older iterations of Recaf we would do everything this launcher does in the background. Managing the JavaFX dependency externally ensures that we don't have to do anything nasty or hacky.
- Remove auto-updater behavior from the Recaf app itself.
- Recaf can still tell you that there is an update available, but it won't attempt to automate the process by itself.
- This is more friendly towards environments like Brew/AUR which manage the app (vs the app managing itself).
How was this handled in the past?
If you ran Recaf 2.X with JavaFX on the classpath, nothing special happens. However, if you did not have JavaFX on the classpath...
- Recaf would check for the latest version of JavaFX and then download the artifacts deemed to be the closest fit for your operating system.
- Recaf would then hijack the module system and disable reflection access restrictions
- Recaf can now use unrestricted reflection to grab an instance of the internal application classloader and inject JavaFX into it
- Because the internals moved around a bit between versions, there's some conditional logic to tweak how this is done before and after certain releases
- This loader has a private field
ucpwhich is a wrapper holding qList<URL>pointing to all classpath entries - Normally this list will only hold the standard path + anything given via
-cpbut we want to add JavaFX - Doing
List.addby itself does not notify the runtime of any changes, but thankfully they expose anaddUrl(URL)method- We call that for each of the JavaFX artifacts we downloaded earlier
- If nothing has thrown an exception so far, JavaFX should now magically load when we first reference it later on during execution
But now with a launcher I have an extra layer between me and Recaf
Both the GUI and CLI launchers allow you to immediately run Recaf, making the launcher effectively invisible.
The GUI asks you how it should behave when you first use it. The first option, which is also selected by default, will show the launcher every time you run it. The second option though will attempt to update Recaf and then run it without ever showing the launcher. The third option immediately runs Recaf without ever updating. These last two options result in the launcher immediately opening Recaf, unless there is an update available if you selected the second option.
The CLI launcher offers set-default-action as a command. You can configure the launcher to do auto if you want to always update then run Recaf, or run if you want to run Recaf without ever updating. Once the value is set any use of java -jar launcher.jar will immediately run the specified action (and in turn, open Recaf).
But I really don't want to use a launcher...
Totally understandable, please refer to the prior page "manual installation" on how to grab Recaf for strictly offline usage. Additionally, Recaf is a regular Java project so its relatively easy to clone and build the project from source too.
The launcher exists as a middle ground between the average "end user" and what I will refer to as "power users". Average end users generally don't care how something opens unless it is annoying. The launcher may be a level of indirection, but it provides single click updates without them having to remember to open a web browser, download a new version of Recaf and update their local copy. That sounds simple but most of the time they don't bother to do that, so making it easy to update is ideal (Users can report a bug, and then click it once their ticket / message is addressed). Most of the users of Recaf from my observation fall into this category.
Then there are the "power users". These are generally highly technical users that have use an OS like Arch Linux and desire a very specific setup for their installed software. If your software doesn't align with their desired setup, they either wont use your software or will post a wall of text explaining how it doesn't align with Unix/FOSS princples. Different power users also have different desired setups which. For these users its best to hand them the tools they need and tell them to figure it out themselves, because if you try and figure it out for them, you will do it wrong. Something all power users universally hate though is auto-updating software. That used to be a feature of Recaf where if you would run it, it was capable of updating itself. That is no longer the case and now updating is a task relegated to the launcher.
Topical Information about the JVM
The following pages in this section give an overview about how the JVM operates. Not enough to bore you, but hopefully give you enough basic information about how things work to better understand the content you will be working with inside of Recaf.
JVM Bytecode Instructions
Preface
This is a listing of the Java bytecode instructions grouped roughly into use cases. For instance, ifeq and goto belong to the Control Flow group.
What differentiates this list from the official instruction specification is that the descriptions have been modified to fit how Recaf represents them in the assembler.
Table of Contents
- Constants
- Object Creation
- Arrays
- Variables
- Stack Math
- Stack Manipulation
- Control Flow
- Fields
- Method Calls
- Dynamic Method Calls
- Type Conversion
- Returns
- Miscellaneous
Constants
| Opcode | Stack: [before]→[after] | Description |
|---|---|---|
aconst_null | → null | push a null reference onto the stack |
dconst_0 | → 0.0 | push the constant 0.0 onto the stack |
dconst_1 | → 1.0 | push the constant 1.0 onto the stack |
fconst_0 | → 0.0f | push 0.0f on the stack |
fconst_1 | → 1.0f | push 1.0f on the stack |
fconst_2 | → 2.0f | push 2.0f on the stack |
iconst_m1 | → -1 | load the int value −1 onto the stack |
iconst_0 | → 0 | load the int value 0 onto the stack |
iconst_1 | → 1 | load the int value 1 onto the stack |
iconst_2 | → 2 | load the int value 2 onto the stack |
iconst_3 | → 3 | load the int value 3 onto the stack |
iconst_4 | → 4 | load the int value 4 onto the stack |
iconst_5 | → 5 | load the int value 5 onto the stack |
lconst_0 | → 0L | push long 0L onto the stack |
lconst_1 | → 1L | push long 1L onto the stack |
ldc
| → value | push a constant value (String, int, float, long, double, Class, MethodType, MethodHandle, or ConstantDynamic) onto the stack |
bipush
| → value | push a byte (-128 through 127) onto the stack as an int value |
sipush
| → value | push a short (-32768 through 32767) onto the stack as an int value |
Object Creation
| Opcode | Stack: [before]→[after] | Description |
|---|---|---|
new
| → objectref | create new object of type |
NOTE: After creation of a new object, its constructor must properly be invoked to initialize the object. You will generally see the pattern:
// Given the code:
//   String myString = new String(byteArrayHere);
new java/lang/String
dup
aload byteArrayHere
invokespecial java/lang/String.<init> ([B)V
astore myString
- The
newcreates the initial instance.- The
dupduplicates the reference to the instance on the stack.- The
byte[]parameter to theString(byte[])constructor is loaded on the stack.- The
String(byte[])constructor is invoked, consuming thebyte[]paramter and the duplicatedStringreference off of the stack.- The originally pushed
Stringreference is stored in a variable.
- Since the items from
dupare the same instance this stores theStringvalue after its constructor is called and initialization occurrs.
Arrays
| Opcode | Stack: [before]→[after] | Description | ||||||||||||||||||
|---|---|---|---|---|---|---|---|---|---|---|---|---|---|---|---|---|---|---|---|---|
anewarray
| count → arrayref | create a new array of references of length count and component type identified by type (A full class name such as java/lang/String) | ||||||||||||||||||
newarray
| count → arrayref | create a new array of primitives of length count and component type identified by type
| ||||||||||||||||||
multianewarray
| count1, [count2,...] → arrayref | create a new array of dims dimensions of type identified by desc | ||||||||||||||||||
arraylength | arrayref → length | get the length of an array | ||||||||||||||||||
aaload | arrayref, index → value | load a reference from an array | ||||||||||||||||||
aastore | arrayref, index, value → | store a reference into an array | ||||||||||||||||||
baload | arrayref, index → value | load a byte or boolean from an array | ||||||||||||||||||
bastore | arrayref, index, value → | store a byte or boolean into an array | ||||||||||||||||||
caload | arrayref, index → value | load a char from an array | ||||||||||||||||||
castore | arrayref, index, value → | store a char into an array | ||||||||||||||||||
daload | arrayref, index → value | load a double from an array | ||||||||||||||||||
dastore | arrayref, index, value → | store a double into an array | ||||||||||||||||||
faload | arrayref, index → value | load a float from an array | ||||||||||||||||||
fastore | arrayref, index, value → | store a float in an array | ||||||||||||||||||
iaload | arrayref, index → value | load an int from an array | ||||||||||||||||||
iastore | arrayref, index, value → | store an int into an array | ||||||||||||||||||
laload | arrayref, index → value | load a long from an array | ||||||||||||||||||
lastore | arrayref, index, value → | store a long to an array | ||||||||||||||||||
saload | arrayref, index → value | load short from an array | ||||||||||||||||||
sastore | arrayref, index, value → | store short to array |
Variables
| Opcode | Stack: [before]→[after] | Description |
|---|---|---|
iload
| → value | load an int value from a local variable var |
lload
| → value | load a long value from a local variable var |
fload
| → value | load a float value from a local variable var |
dload
| → value | load a double value from a local variable var |
aload
| → objectref | load a reference onto the stack from a local variable var |
istore
| value → | store int value into variable var |
lstore
| value → | store a long value in a local variable var |
fstore
| value → | store a float value into a local variable var |
dstore
| value → | store a double value into a local variable var |
astore
| objectref → | store a reference into a local variable var |
iinc
| [No change] | increment local variable var by a given amount (byte) |
NOTE: Variables are accessed by index in the class file specification, but Recaf's assembler maps variables to their name as found in the
LocalVariableTable(LVT) attribute. If a method does not have a LVT, or if the LVT contains bogus names that are not valid for use within the assembler, then auto-generated names will be used following the patternv1,v2...vN.
Stack Math
| Opcode | Stack: [before]→[after] | Description | ||||||||||
|---|---|---|---|---|---|---|---|---|---|---|---|---|
dadd | value1, value2 → result | add two double values value2 + value1 | ||||||||||
ddiv | value1, value2 → result | divide two double values value2 / value1 | ||||||||||
dmul | value1, value2 → result | multiply two double values value2 * value1 | ||||||||||
drem | value1, value2 → result | get the remainder from a division between two double values (value2 - ((value1 / value2) * value2)) | ||||||||||
dsub | value1, value2 → result | subtract a double from another value2 - value1 | ||||||||||
fadd | value1, value2 → result | add two float values value2 + value1 | ||||||||||
fdiv | value1, value2 → result | divide two float values value2 / value1 | ||||||||||
fmul | value1, value2 → result | multiply two float values value2 * value1 | ||||||||||
frem | value1, value2 → result | get the remainder from a division between two float values (value2 - ((value1 / value2) * value2)) | ||||||||||
fsub | value1, value2 → result | subtract two float values value2 - value1 | ||||||||||
iadd | value1, value2 → result | add two int values value2 + value1 | ||||||||||
idiv | value1, value2 → result | divide two int values value2 / value1 | ||||||||||
imul | value1, value2 → result | multiply two int values value2 * value1 | ||||||||||
irem | value1, value2 → result | logical int remainder (value2 - ((value1 / value2) * value2)) | ||||||||||
isub | value1, value2 → result | int subtract value2 - value1 | ||||||||||
iand | value1, value2 → result | perform a bitwise AND on two int values value2 & value1 | ||||||||||
ior | value1, value2 → result | bitwise int OR `value2 | ||||||||||
ixor | value1, value2 → result | int xor value2 ^ value1 | ||||||||||
ishl | value1, value2 → result | int shift left value2 << value1 | ||||||||||
ishr | value1, value2 → result | int arithmetic shift right value2 >> value1 | ||||||||||
iushr | value1, value2 → result | int logical shift right value2 >>> value1 | ||||||||||
ladd | value1, value2 → result | add two long values value2 + value1 | ||||||||||
ldiv | value1, value2 → result | divide two long values value2 / value1 | ||||||||||
lmul | value1, value2 → result | multiply two long values value2 * value1 | ||||||||||
lrem | value1, value2 → result | remainder of division of two long values (value2 - ((value1 / value2) * value2)) | ||||||||||
lsub | value1, value2 → result | subtract two long values value2 - value1 | ||||||||||
lshl | value1, value2 → result | bitwise shift left of a long value1 by int value2 positions value2 << value1 | ||||||||||
lshr | value1, value2 → result | bitwise shift right of a long value1 by int value2 positions value2 >> value1 | ||||||||||
lushr | value1, value2 → result | bitwise shift right of a long value1 by int value2 positions, unsigned value2 >>> value1 | ||||||||||
land | value1, value2 → result | bitwise AND of two long values value2 ^ value1 | ||||||||||
lor | value1, value2 → result | bitwise OR of two long values `value2 | ||||||||||
lxor | value1, value2 → result | bitwise XOR of two long values value2 ^ value1 | ||||||||||
dneg | value → result | negate a double -value | ||||||||||
fneg | value → result | negate a float -value | ||||||||||
ineg | value → result | negate int -value | ||||||||||
lneg | value → result | negate a long -value | ||||||||||
dcmpg | value1, value2 → result | compare two double values
| ||||||||||
dcmpl | value1, value2 → result | compare two double values
| ||||||||||
fcmpg | value1, value2 → result | compare two float values
| ||||||||||
fcmpl | value1, value2 → result | compare two float values
| ||||||||||
lcmp | value1, value2 → result | compare two long values
|
Stack Manipulation
| Opcode | Stack: [before]→[after] | Description |
|---|---|---|
dup | value → value, value | duplicate the value on top of the stack |
dup_x1 | value2, value1 → value1, value2, value1 | insert a copy of the top value into the stack two values from the top. value1 and value2 must not be of the type double or long. |
dup_x2 | value3, value2, value1 → value1, value3, value2, value1 | insert a copy of the top value into the stack two (if value2 is double or long it takes up the entry of value3, too) or three values (if value2 is neither double nor long) from the top |
dup2 | {value2, value1} → {value2, value1}, {value2, value1} | duplicate top two stack words (two values, if value1 is not double nor long; a single value, if value1 is double or long) |
dup2_x1 | value3, {value2, value1} → {value2, value1}, value3, {value2, value1} | duplicate two words and insert beneath third word (see explanation above) |
dup2_x2 | {value4, value3}, {value2, value1} → {value2, value1}, {value4, value3}, {value2, value1} | duplicate two words and insert beneath fourth word |
pop | value → | discard the top value on the stack |
pop2 | {value2, value1} → | discard the top two values on the stack (or one value, if it is a double or long) |
swap | value2, value1 → value1, value2 | swaps two top words on the stack (note that value1 and value2 must not be double or long) |
Control Flow
| Opcode | Stack: [before]→[after] | Description |
|---|---|---|
goto
| [no change] | jump to label |
if_acmpeq
| value1, value2 → | if references value1 == value2, jump to label |
if_acmpne
| value1, value2 → | if references value1 != value2, jump to label |
if_icmpeq
| value1, value2 → | if ints value1 == value2, jump to label |
if_icmpge
| value1, value2 → | if ints value1 >= value2, jump to label |
if_icmpgt
| value1, value2 → | if ints value1 > value2, jump to label |
if_icmple
| value1, value2 → | if ints value1 <= value2, jump to label |
if_icmplt
| value1, value2 → | if ints value1 < value2, jump to label |
if_icmpne
| value1, value2 → | if ints value1 != value2, jump to label |
ifeq
| value → | if value == 0, jump to label |
ifge
| value → | if value >= 0, jump to label |
ifgt
| value → | if value > 0, jump to label |
ifle
| value → | if value <= 0, jump to label |
iflt
| value → | if value < 0, jump to label |
ifne
| value → | if value != 0, jump to label |
ifnonnull
| value → | if value != null, jump to label |
ifnull
| value → | if value == null, jump to label |
lookupswitch
| key → | jump to the label associated with the given key, or if no such entry in the table exists jump to the default label |
tableswitch
| index → | jump to the label associated with cases[min-index], or if the computed index of min-index is out of bounds jump to the default label |
athrow | objectref → [empty], objectref | throws an error or exception (notice that the rest of the stack is cleared, leaving only a reference to the Throwable) |
jsr ✝
| value → address | jump to label while also pushing the current code address to the stack (Generally this is immediately stored in a variable at the destination) |
ret ✝
| [no change] | jump to the code offset stored in the variable var |
NOTE:
jsrandretare deprecated instructions and are only present in classes from Java 7 or earlier. They cannot be used in Java 8 or above.
Fields
| Opcode | Stack: [before]→[after] | Description |
|---|---|---|
getfield
| objectref → value | get an instance field defined by the owner class and the field's name and desc |
getstatic
| → value | get a static field defined by the owner class and the field's name and desc |
putfield
| objectref, value → | set an instance field defined by the owner class and the field's name and desc |
putstatic
| value → | set a static field defined by the owner class and the field's name and desc |
Method Calls
| Opcode | Stack: [before]→[after] | Description |
|---|---|---|
invokeinterface
| objectref, [arg1, arg2, ...] → result | invokes an interface method defined by the owner class and the method's name and desc on object objectref and puts the result on the stack (might be void) |
invokespecial
| objectref, [arg1, arg2, ...] → result | invokes an instance method defined by the owner class and the method's name and desc on object objectref and puts the result on the stack (might be void) |
invokestatic
| [arg1, arg2, ...] → result | invokes a static method defined by the owner class and the method's name and desc and puts the result on the stack (might be void) |
invokevirtual
| objectref, [arg1, arg2, ...] → result | invokes a virtual method defined by the owner class and the method's name and desc on object objectref and puts the result on the stack (might be void) |
invokespecialinterface ✝
| objectref, [arg1, arg2, ...] → result | invokes an instance method defined by the owner class and the method's name and desc on object objectref and puts the result on the stack (might be void) |
invokestaticinterface ✝
| [arg1, arg2, ...] → result | invokes a static method defined by the owner class and the method's name and desc and puts the result on the stack (might be void) |
invokevirtualinterface ✝
| objectref, [arg1, arg2, ...] → result | invokes a virtual method defined by the owner class and the method's name and desc on object objectref and puts the result on the stack (might be void) |
NOTE: The ✝ instructions in the table above are abstractions in the Recaf assembler. These
invoke_x_interfaceare variants of their respectiveinvoke_xinstructions with theitfflag set totrue. This is normally not something you will encounter in properly compiled Java applications but has been found in some improperly processed classes in the wild (In particular the forge modding environment).
Dynamic Methods Calls
| Opcode | Stack: [before]→[after] | Description |
|---|---|---|
invokedynamic
| [arg1, arg2 ...] → result | invokes a dynamic method and puts the result on the stack (might be void). The callsite handles the dynamic invocation. |
NOTE: Before Java 9 - JEP 280
Stringconcatenation ("a" + "b") usedStringBuilderto append multiple values together. Afterwards, concatenation was reimplemented to useinvokedynamic. This instruction is the backbone of a lot of useful language features not only in just Java, but also other JVM languages. Decompilers will often understand the specific usages for cases found in the standard Java language, but will often fail for third party languages or within auto-generated / obfuscated code.
Type Conversion
| Opcode | Stack: [before]→[after] | Description |
|---|---|---|
d2f | value → result | convert: double to float |
d2i | value → result | convert: double to int |
d2l | value → result | convert: double to long |
f2d | value → result | convert: float to double |
f2i | value → result | convert: float to int |
f2l | value → result | convert: float to long |
i2b | value → result | convert: int to byte |
i2c | value → result | convert: int to char |
i2d | value → result | convert: int to double |
i2f | value → result | convert: int to float |
i2l | value → result | convert: int to long |
i2s | value → result | convert: int to short |
l2d | value → result | convert: long to double |
l2f | value → result | convert: long to float |
l2i | value → result | convert: long to int |
checkcast
| objectref → objectref | checks whether an objectref is of a certain specified type |
instanceof
| objectref → result | determines if an object objectref is of a given type |
An alternative view for the primitive-to-primitive conversions:
| From → To | int | long | float | double | byte | char | short |
|---|---|---|---|---|---|---|---|
| int | = | i2l | i2f | i2d | i2b | i2c | i2s |
| long | l2i | = | l2f | l2d | ❌ | ❌ | ❌ |
| float | f2i | f2l | = | f2d | ❌ | ❌ | ❌ |
| double | d2i | d2l | d2f | = | ❌ | ❌ | ❌ |
Returns
| Opcode | Stack: [before]→[after] | Description |
|---|---|---|
areturn | objectref → [empty] | return a reference |
dreturn | value → [empty] | return a double |
freturn | value → [empty] | return a float |
ireturn | value → [empty] | return an int |
lreturn | value → [empty] | return a long |
return | → [empty] | return void (nothing) |
Miscellaneous
| Opcode | Stack: [before]→[after] | Description |
|---|---|---|
monitorenter | objectref → | enter monitor for object ("grab the lock" – start of synchronized(objectref) section) |
monitorexit | objectref → | exit monitor for object ("release the lock" – end of synchronized(objectref) section) |
nop | [No change] | do nothing |
line
| [No change] | marker that represents a LineNumberTable entry for the given line, beginning at the first label preceding the marker |
label: | [No change] | marker in bytecode for the beginning of a block of instructions; referenced by jump and switch instructions |
JVM Execution: Stack + Locals
The Java Virtual Machine (JVM) executes method bytecode using a stack-based architecture. Each thread in a Java program has its own private JVM stack, which consists of stack frames. A new stack frame is created and pushed onto the stack every time a method is invoked. When the method completes (normally or via a thrown exception), its frame is popped and discarded. Each stack frame represents the state of a single method invocation and contains:
- Local Variables: An array of variables holding primitive and reference types. Contents are stored and accessed in the array via the variable's index (Recaf's assembler will use the name of variables rather than its index).
- Operand Stack: A Last-In-First-Out (LIFO) structure used as temporary space for intermediate values during computations.
The JVM also maintains a program counter (PC) per thread, which points to the current bytecode instruction being executed in the method. The PC advances sequentially as instructions are processed, unless modified by control flow instructions.
Execution Flow Overview
- When a method is invoked:
- A new frame is created for the invoked method.
- The caller pushes copies of the argument values (primitive values or copies of object references) onto the invoked method's operand stack.
- Execution in the caller is paused at the instruction immediately after the method invocation, ready to resume once the invoked method completes its own execution and (if applicable) pushes a return value onto the caller's operand stack.
- Instructions execute one by one:
- Load constants or variables → push to the operand stack.
- Store result → pop from the stack to a variable.
- Arithmetic/logic → pop operands, compute, push result.
- Control flow → conditionally jump to a label.
- Invoke methods → see above description of method invocation.
- On return:
- The frame is popped, and the value on top of the stack (if any is present) is pushed to the caller's operand stack.
Examples
Local variables and arithmetic
// int two = 2;
iconst_2
istore two

// int ten = 10;
bipush 10
istore ten

// int result = 0;
iconst_0
istore result

// result = ten * ten;
iload ten
dup
imul
istore result

// result -= 98;
iinc result -98

// result -= (int) Math.pow(result, 6);
iload result
iload result
i2d
ldc 6D
invokestatic java/lang/Math.pow (DD)D
d2i
isub
istore result

// return result;
iload result
ireturn
Control flow handling of a for loop
// int sum = 0;
iconst_0
istore sum

// int i = 0;
iconst_0
istore i

// Start of for loop
FOR:
    // if (i >= 0) break;
    iload i
    bipush 100
    if_icmpge EXIT

	// sum += i;
    iload sum
    iload i
    iadd
    istore sum

	// i++;
    iinc i 1
    goto FOR
// End of for loop
EXIT:

// return sum;
iload sum
ireturn
Inputs
As a Java bytecode editor Recaf supports loading a variety of file formats seen in the Java ecosystem. Supported formats include:
.class.jar/.zip/.war/.aar(See: Zip Obfuscation).jmod.apk/.dexmodules(Read-only)
Files are not restricted by their extension. So long as the contents of a file are one of the supported formats the name doesn't matter. Recaf will auto-detect the content type. The following pages will have additional information about loading inputs.
Loading inputs
You can load input files into Recaf in two ways:
- The File menu
- Drag-drop files onto Recaf
File Menu
The file menu has a few different entries in it
Open workspace: Opens a dialog that prompts you to provide files or folders to open.
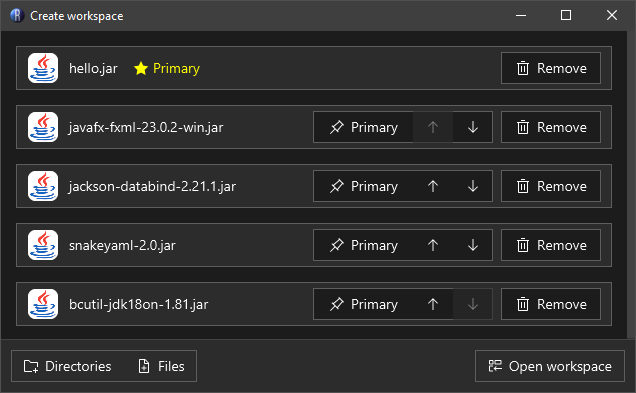
The 'Open workspace' dialog lets you choose any number of inputs. Only the primary file will be editable, the rest are treated as supporting libraries and are read-only. Remember to check which one you have selected as primary!
Add to workspace: If you already have a workspace open, you can add supporting libraries with a similar dialog to "Open workspace".
Recent: This is a dropdown menu containing recent files you have opened with Recaf. Click on an entry to open it again.
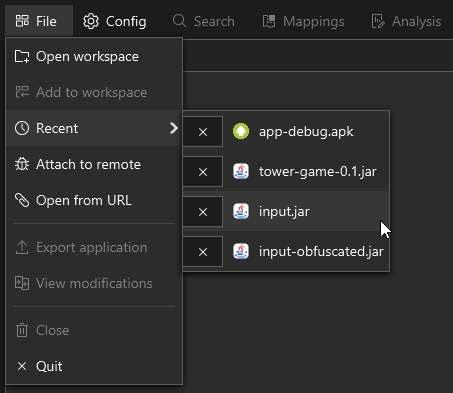
The 'Recent' menu in the 'File' menu tracks the last few files previously opened in Recaf. You can click on them to open them again.
Attach to remote: Opens a dialog that lists currently running Java processes on your computer. You can select one, then press "Connect" to attach to the process and show classes grouped by their classloader.

The 'Attach to remote' dialog lets you read and modify the classes from any compatible Java process on your local machine. Click a process for more info, and then 'Connect' to load it.
Open from URL: Opens a dialog that lets you put in a URL to a remote file. It will be streamed and loaded in-memory.
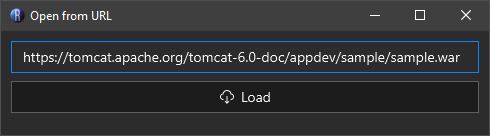
The 'Open from URL' dialog lets you read content from any valid URL you can connect to.
Drag-Drop
When you open Recaf you'll see the home panel with relevant links and recent files. This entire space can receive dropped files. If you already have a workspace open, the workspace panel (tree of all files in the input) behaves in the same way. Drop files here to open them.
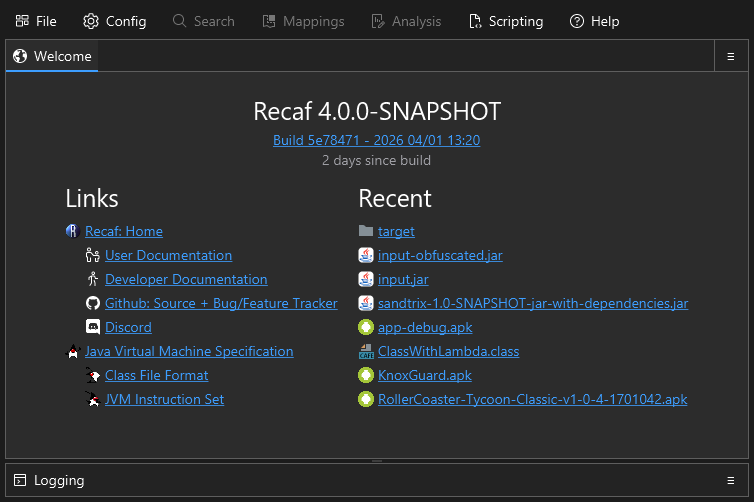
The home panel provides you with easy access to relevant documentation links, single click links to load recent input files, and current version information.
Summarization
After you load a workspace, Recaf will do some basic analysis of its contents and provide you with a summary of what was found. The kind of information supported includes:
-
The number of classes and files
-
The required permissions for Android applications
-
The entry points
- For regular jar files,
public static void main(String[] args) { ... } - For Android applications, listed
Activitysubclasses defined in the application manifest
- For regular jar files,
-
Hash information of the primary resource
- The right side buttons copy the hash value to your clipboard. This can be useful if you want to look up files on services like VirusTotal or AnyRun quickly.
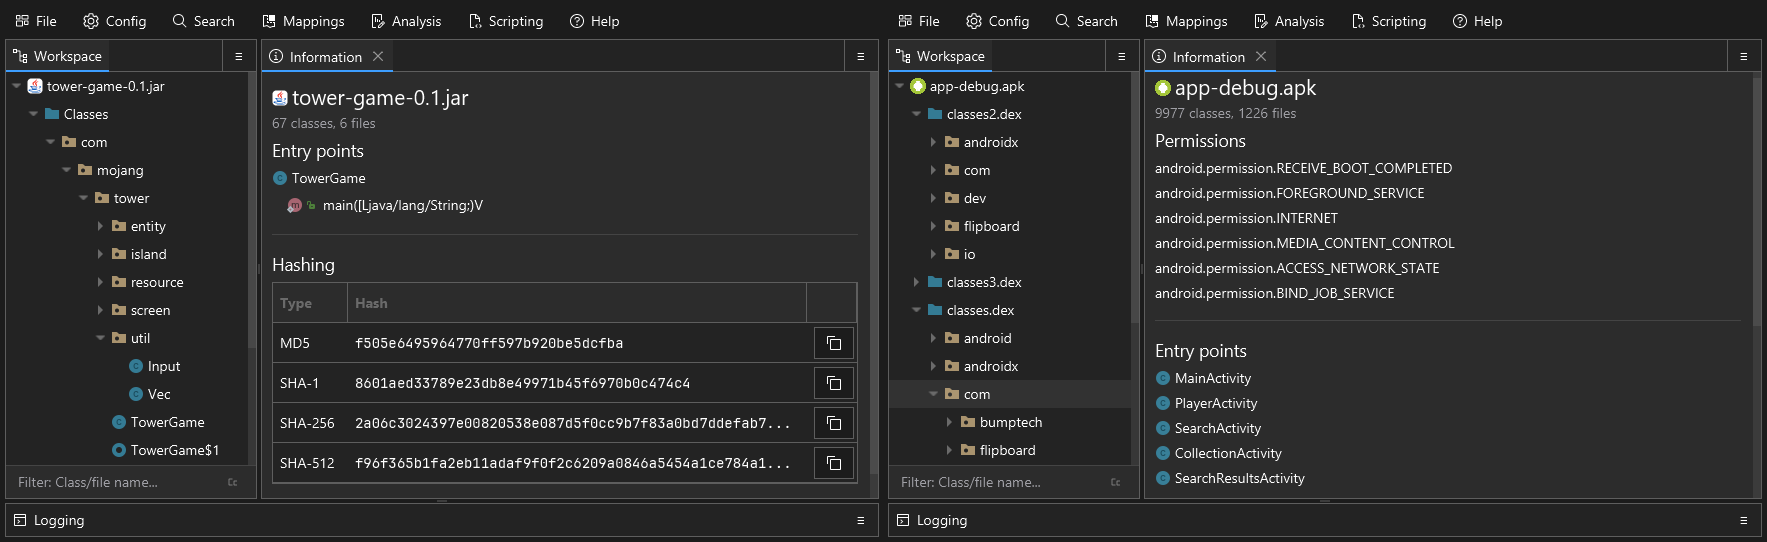
Different kinds of files may have different summary content. In this example we have a side-by-side of a regular Java application and an Android application.
Editing
Recaf offers two ways of editing classes. Recompiling decompiled code and reassembling disassembled code. Each has their own benefits, but generally you should use the assembler approach when possible. You can find out more about each approach in the following pages in this section.
Recompiling
When working with code that is decompiled cleanly, you can modify that decompiled code then save with [Control] + [S] to recompile the class. This works the same as if you were compiling regular Java source code, it uses the same tools but with some additional tooling to make things easier:
- Classes in the workspace are provided as supporting class-path entries
- Classes that are referenced in the current class, but not found in the workspace, will be generated where possible
- Compile errors and warnings are shown in the UI
A simple example showing a bit of clean up in some utility methods. A successful save is indicated by the green border flash.
Features
Virtual Classpath from the workspace
A common issue seen with Java reverse engineering efforts I've seen is that people will try to decompile all the classes and then pass all of them to the Java compiler. The problem with that approach is that if you want to make a change in Foo but Bar didn't decompile properly you have to go and fix Bar first. In Recaf we address this by plugging in our own file manager to the Java compiler interface. The custom file manager provides access to the contents of classes in the workspace. Now the only content you need to address is whatever class you want to make changes in, like Foo.
Generation of missing classes
By default, Recaf will intercept recompile attempts and do a bit of analysis first. Say you're editing an application that depends on some library called Phoenix. The application doesn't bundle any classes from Phoenix and you also don't have access to the library jar. Even in this scenario that you would normally not be able to compile code in (since you are missing a required library) Recaf will try its best to make it possible.
We have the benefit of knowing both the source code we pass to the compiler, and an existing compiled version of the class. The existing compiled version will have references to classes, fields, and methods of the Phoenix library, and we can collect this information to reconstruct classes from the Phoenix library. So long as you don't change the decompiled code to reference some other class, field, or method in the library any existing reference to Phoenix code will remain intact.
Recaf does have a config property to change this behavior. Instead of happening before each recompile the analysis happens when you load a workspace. Additionally, all classes are used for analysis which can result in more complete generation of the missing Phoenix classes. If multiple classes in the application refer to different fields and methods in a single Phoenix class then this would generate the missing class with all of them combined. This can be beneficial but does come with the downside of taking longer for larger workspaces.
Error display
Pretty self explanatory, the errors reported from compilation attempts are visualized back in the UI. You can hover over the red highlighted lines to see what the original error message was. The button in the top right also shows all current errors in the class and lets you quickly jump between them by clicking on them.
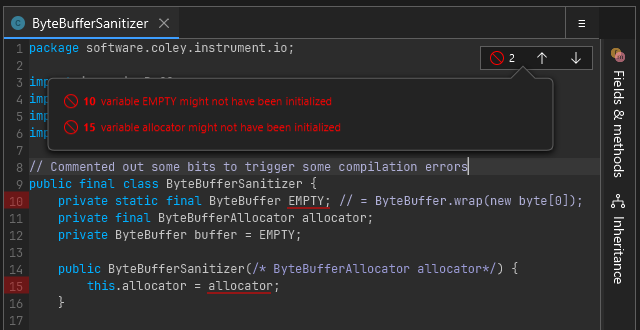
Clicking the top right button displays a list pop-up of all errors in the class.
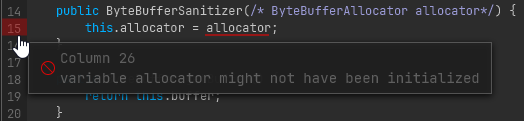
Hovering over a line with an error on it shows the original reported error.
Compiler options
You can modify some compiler options passed during recompilation via the gear button in the bottom right. Currently you can change the target compilation version and whether or not to include debug info (Line numbers, variable names, etc).
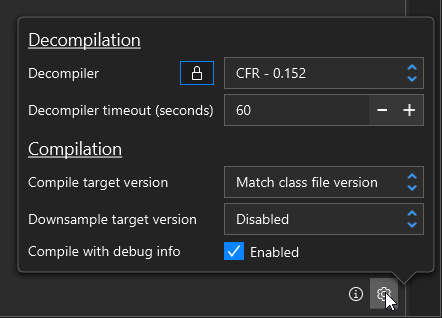
The gear button in the bottom right lets you change the target Java version, and also apply post-processing for things like downsampling
Recaf only can target versions supported by the Java version its being ran with. If you run Recaf with Java 25 (Released September 2025) it will not let you target anything below Java 8 (Released March 2014). That is still a pretty good range for supported versions, but for older classes written in Java 7 or older you will need to use the assembler.
Frequent Questions
I get a red flash when I save, is that bad?
A red flash means there were compiler errors. You need to address any of those before any changes will be accepted.
But I didn't even change anything yet
Recaf is showing you decompiled code of a binary format. This is not the same as the original source code. Decompilers can make mistakes. For most "simple" Java classes the decompiled code will be close enough to the original that it won't matter. But there are always edge cases to consider. If the decompiled output is not perfectly formed Java source code its on you to either fix those mistakes yourself or switch to using the assembler.
With this in mind, lets say you want to edit a specific method in a class, but there's another method that failed to decompile. If you attempt to recompile the class you are compiling the whole class not just the specific method you edited. Be mindful of the entire contents of classes when recompiling code so that you do not unintentionally introduce behavioral changes from faulty decompiler output.
Ok I got a green flash! But when I run my program nothing has changed!
Saving only commits the change to the workspace. The workspace is only kept in-memory. Once you made successful changes you need to export the modified application. Use the file menu and select "Export application" to write any modifications to disk.
In the gear button options, what is the difference between target version and downsample target version?
The target version is what the compiler will expect as input and emit as output. Downsampling is optional post-processing which can turn newer Java constructs into older Java ones. This lets you use new language features introduced in a version like Java 17 but output Java 8 compliant class files. If you use new API's introduced in the Java like list.getFirst() some helper classes and methods will be inserted into the workspace to bridge any gaps with older legacy API's.
Can I recompile obfuscated code?
No, don't even try it. It is not worth the effort, just use the assembler.
Assembler
The assembler lets you edit the bytecode of Java classes in a low level format. It should be used whenever possible as opposed to recompiling decompiled code. Using the assembler is comparable to a surgeon using a scalpel, verses recompiling which is comparable to them using a sledgehammer for the same operation.
A method open in the assembler, showing various method attributes and instructions.
How do I open the assembler?
The assembler for any class, field, or method can be accessed by right clicking on the name of the class, field, or method and selecting "Edit > Edit in assembler". If for some reason right clicking does not work (which can occur when the context parser cannot understand obfuscated code) you can also right click on items in the "Fields & Methods" tab shown on the right hand side of any open class.
A short animation showing how to open the assembler.
Examples of where to click:
//   "Hello" will open the class assembler
//     |
//     V
class Hello {
    //    "message" will open the field assembler
    //       |
    //       V
    String message = "hi";

    // "foo" will open the method assembler
    //   |
    //   V
    void foo() {
        System.out.println(this.message);
    }
}
Additionally, you can right click on the class in the workspace explorer (which is where the tree of classes are on the left) to open the class level assembler.
I don't know much about bytecode, what now?
Ideally you can learn just enough to get by. Here are some relevant pages covering the basics of Java bytecode:
- JVM Bytecode Instructions: A list of all the JVM bytecode instructions and what they do.
- JVM Execution: Stack + Locals: A brief overview of how methods are executed, showing how the stack and local variable slots operate.
After you read over these pages the additional tools and features offered by the assembler should be able to carry you the rest of the way to making your desired changes.
Assembler Features
Java to Bytecode
You can write snippets of Java code and the Java to Bytecode tool will generate the equivalent bytecode. It uses the standard javac compiler behind the scenes, so whatever version of Java you run Recaf with dictates what features you have access to. But this means as long as you can fit your snippet into a continous block of code (no separate method definitions) it'll be supported here. Though, there are other shortcuts included like the ability to add import statements to the top.
Using the 'Java to Bytecode' feature to implement a toString() method.
The editor is tied to whatever context the assembler is open with. For instance, if you open the assembler on a method that returns String (or any Object type) it will expect that your snippet of Java code also eventually returns a String (You can ignore it and keep the default return null if desired).
Another benefit of this context-sensitive compiler is that you can access information in that context. You will always have access to the current class's fields and methods. But when you open a method in the assembler you will also have access to the parameters and defined local variables of the method.
For instance, consider this method:
double combine(double base, double power, double extra) {
	double tmp = Math.pow(base, power);
    return tmp + extra;
}
In this context you not only have access to the parameters base, power, and extra, but you also can access tmp in the Java to Bytecode tool. This means you could write something like return tmp - extra.
Snippets
If you find yourself regularly using the Java to Bytecode feature for the same kind of operation you may want to keep a copy of the results as a snippet. Snippets are just segments of code that you find useful for copy-pasting later.
Using the 'Snippets' feature to get the code for a simple `println`.
Recaf comes with a few example snippets. They have comments in them outlining what the original source code equivalent is and then the bytecode that corresponds to that source:
for (int i = 0; i < 10; i++) someMethod();while (i >= 0) { someMethod(); i--; }if (b) whenTrue(); else whenFalse();System.out.println("Hello");System.out.printf("hello %s\n", name);
When you create your own snippet you are prompted to give it a name and description. Afterwards you can type out our desired code snippet in the editor and then press the save button to keep it.
Analysis of stack/locals
While it is encouraged to read the JVM Bytecode Instructions and execution pages, mentally keeping track of how things move around on the stack and are stored in local variables can be tedious. The Analysis will do all of this for you. Contents of easily computed values (primitives and Strings) will also show their current values based on where your caret/text position is at within the method assembler.
Using the 'Analysis' feature to observe how instructions work.
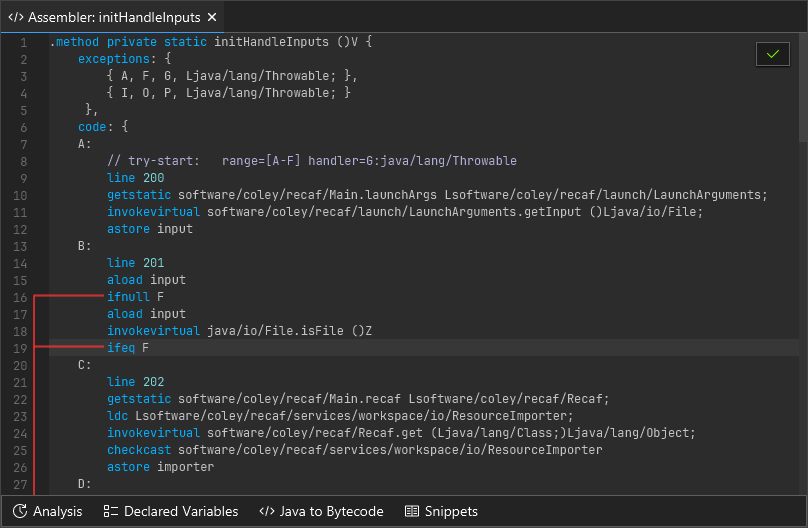
Control flow lines
Some instructions change the control flow of program exection. Remembering what label a jump goes to and scrolling to it (or using Control + F to find it) is tedious. Instead, when you click on any label or any instruction that potentially manipulates control flow you will see where those instructions will lead to. To disambiguate which jumps go where, any time there are multiple control flow lines next to one another they will use a distinct color. Ihe color selection is based on a hue rotation, so something like a large switch statement will generate a rainbow.
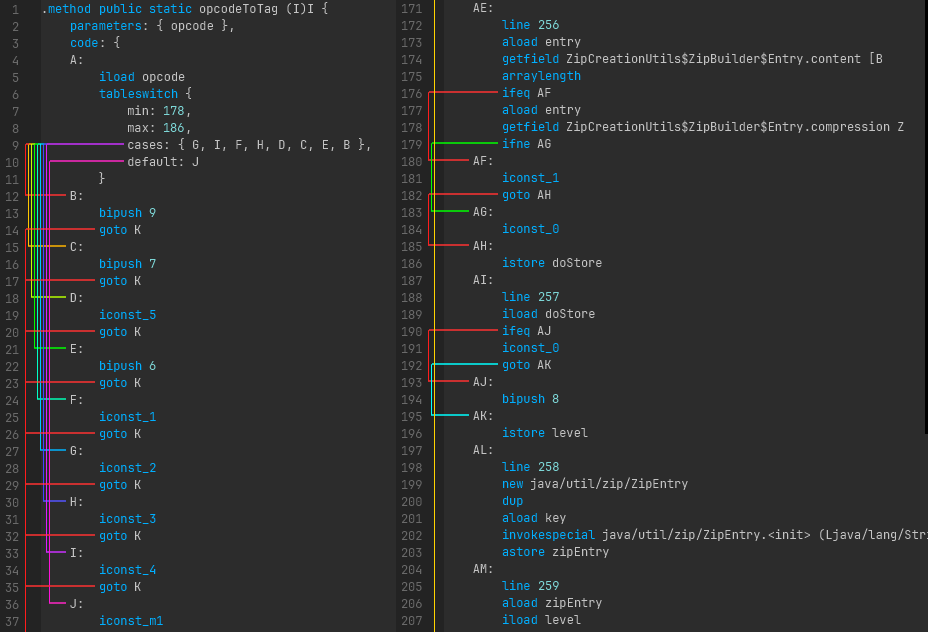
A series of lines between instructions and referenced labels.
Tab completion
The names of instructions and field/method references can be tab completed.
A short animation showing how tab completion can be used to make writing bytecode faster.
Obfuscation
If you're using Recaf to inspect suspected malware, or closed source software, you are more than likely going to encounter obfuscation in some form or another.
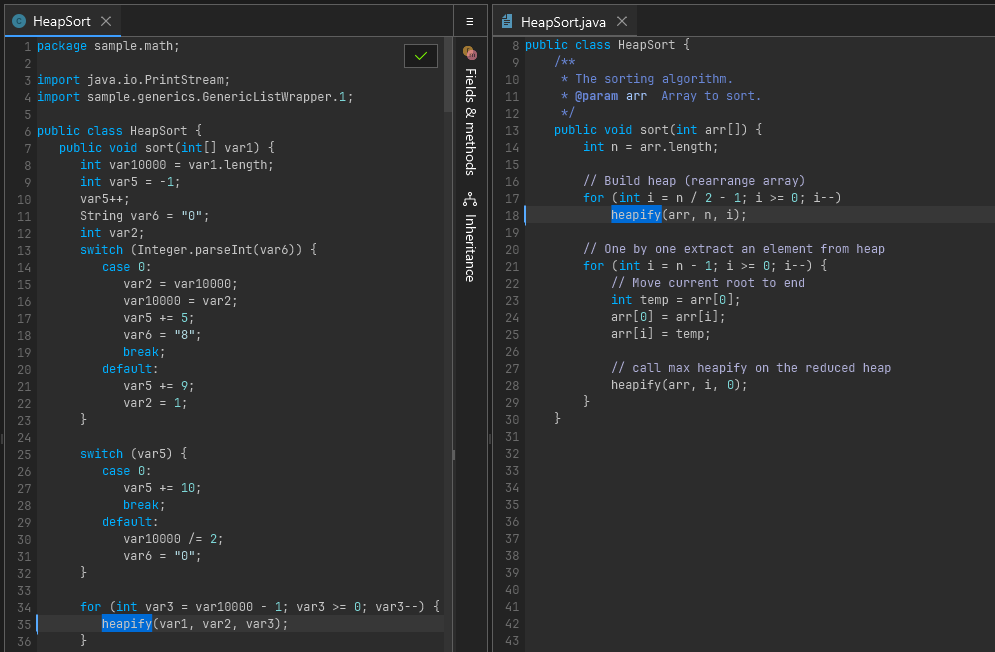
An obfuscated HeapSort algorithm with opaque control flow
What is obfuscation?
Simply put, obfuscation is anything that makes it harder to reverse engineer the logic of an application.
Why do people obfuscate their software?
It depends on who is developing the software and the intended purpose of the software. There are plenty of legitimate reasons to obfuscate software, and also plenty of illegitimate ones.
- Decompiling Java classes with modern decompilers is trivial and generally very accurate. Obfuscation makes it more difficult to recover source code that is easily copy-pastable. It is not foolproof but deters many potential reverse engineers with limited experience.
- A majority of a Java class file is often its constant pool, which includes all the names of referenced classes, fields, and methods. At runtime it is very rare that you need to have this information kept in a meaningful manner (unless the application uses reflection). Some obfuscation can remove or compress this data by renaming these symbols to shorter values, often a single character or two. ProGuard is a great example of a tool that focuses on this direction of obfuscation.
- Some developers assume that obfuscating their software makes it more secure. There can be some truth to this but only in the manner that it slows down bad actors rather than outright preventing them from tampering with the application. If your application has to run on a user's device, that user can, with enough time and knowledge, circumvent any local security measures.
- Malware developers will heavily obfuscate their code to hide malicious behavior. This makes sense at first, but at the same time just brings more suspicion to the application as it is then heavily obfuscated. The main reason why they would do this is to bypass any scan-time detections of anti-malware programs looking for known malware signatures. Again, its a double-edged sword because sometimes anti-malware vendors end up making signatures for the obfuscation itself which leads to any use of the specific obfuscation strategy being flagged even if the application being obfuscated is not malicious in nature.
What can Recaf do about obfuscation?
See the chapters under the deobfuscation section.
Jar / Zip Obfuscation
Jar files are Zip files with the only major difference being the expectation of special paths like contents in the META-INF folder and location of .class files matching the class's name. This is at least the only major difference on paper. In practice the JVM has multiple ways it will parse Jar and Zip files. Here are a few of them:
java -jar example.jarZipFile zip = new ZipFile(new File("example.jar"));ZipInputStream zis = new ZipInputStream(new FileInputStream(new File("example.jar")));FileSystem zipFs = FileSystems.newFileSystem(Paths.get("example.jar"))
Each of these cases uses a different backend for parsing Jar/Zip files. This allows obfuscators to abuse the Zip file format in different ways for each case. To illustrate the problem lets first take a very high-level look at how a Zip file is usually structured.
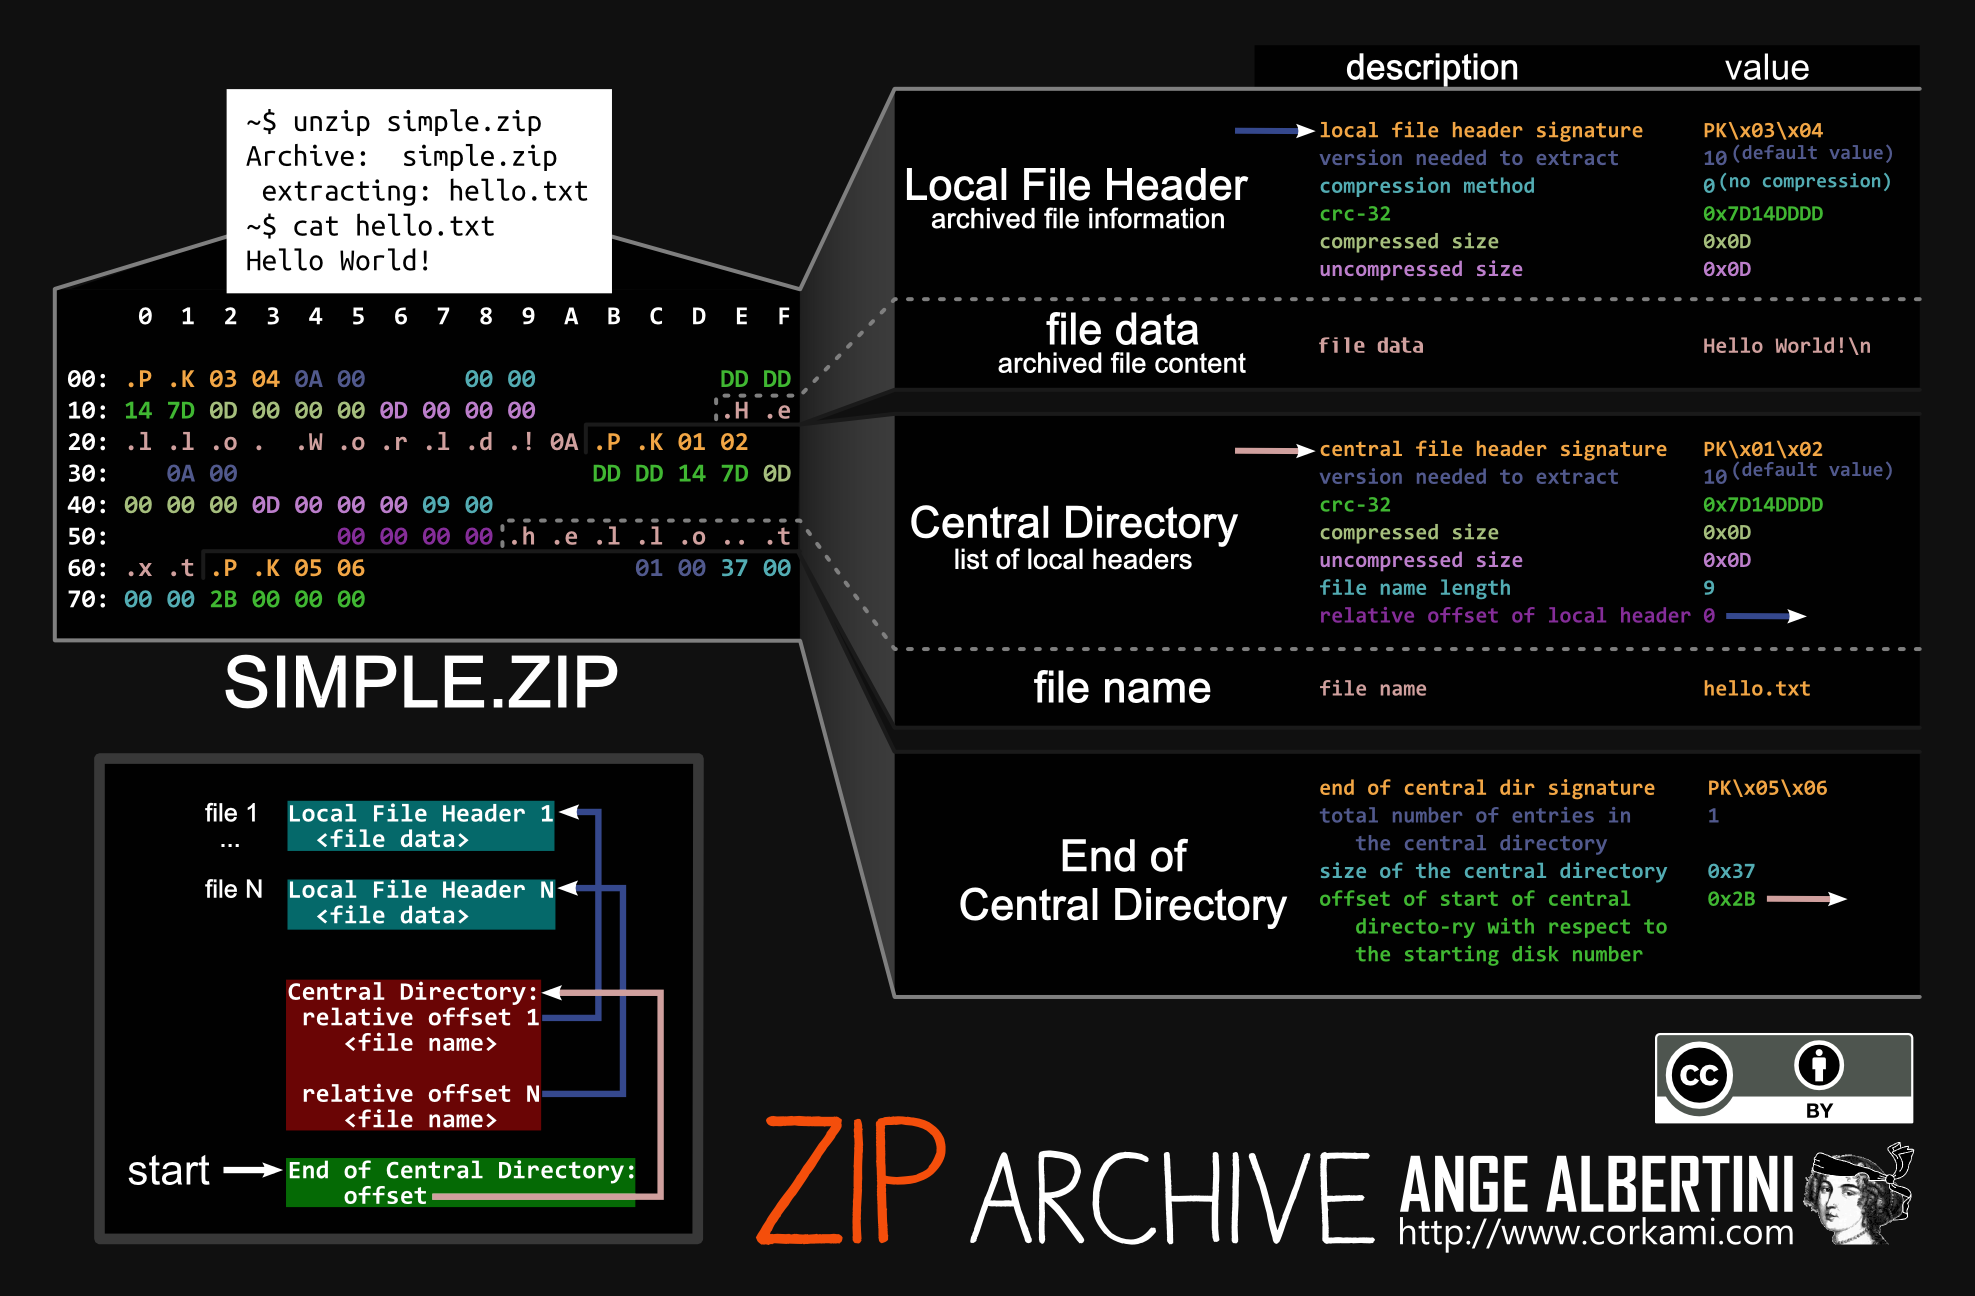
A diagram by Ange Albertini breaking down a small Zip file containing a single text file.
Zip files generally begin with 50 4B 03 04 (Ascii PK..) since this is the header signature of a "Local File Header". These local file headers are where the contents of compressed files in the zip are defined (See "file data"). Going forward in the file you will see the "Central Directory" which has almost identical values to the "Local File Header". Then last section is the "End of Central Directory". Central directories, as described in the graphic, list the available local file headers that are present further to the start of a file. The end of the central directory outlines where these central directory entries begin in the file, and how many of them there are. Zip files are intended to be read backwards. You read the end of the central directory, scan backwards to collect the central directories, and that should give you all the information you need to understand what is contained in the Zip file.
Central directories and local file headers have a lot of the same fields. As described before, the central directories are all you need to understand what is in the Zip file, so the local file header values should match. However in the realm of obfuscation the intended purposes of these structures are thrown out of the window.
Examples of Jar / Zip obfuscation
For the following cases consider experimenting on your own with the following samples:
- hello.jar
- hello-trailing-slash.jar
- hello-trailing-slash-0-length-locals.jar
- hello-only-lfh.jar
- hello-deceptive.jar
To discover more about the structural differences between these files, you should use a hex editor tool like ImHex using the zip pattern. Be aware, the ImHex zip pattern will fail if there is no "End of Central Directory" record since it works backwards from there. You can work around this limitation with a hack something like this:
// Replace the last line of the ImHex zip pattern with this
fn getName(u32 val) {
    if (std::mem::read_unsigned(val, 4, std::mem::Endian::Little) == 0x2014b50) {
        return "CentralDirectoryFileHeader";
    } else if (std::mem::read_unsigned(val, 4, std::mem::Endian::Little) == 0x6054b50) {
        return "EndOfCentralDirectory";
    } else if (std::mem::read_unsigned(val, 4, std::mem::Endian::Little) == 0x4034b50) {
        return "LocalFileHeader";
    }
    return "unknown";
};
struct Wrapper {
    if (std::mem::read_unsigned(addressof(this), 4, std::mem::Endian::Little) == 0x2014b50) {
        CentralDirectoryFileHeader cen;
    } else if (std::mem::read_unsigned(addressof(this), 4, std::mem::Endian::Little) == 0x6054b50) {
        EndOfCentralDirectory eocd;
    } else if (std::mem::read_unsigned(addressof(this), 4, std::mem::Endian::Little) == 0x4034b50) {
        LocalFileHeader loc;
    }
} [[name(getName(addressof(this)))]];

// Only top-level structs can be mapped, so we make an array of wrappers,
// which can mutate to evaulate to each respective kind of Zip structure.
// This approach has a number of problems but works well enough for the provided examples above.
Wrapper entries[while(!std::mem::eof())] @ 0x00 [[inline]];
Obfuscated java -jar cases
When you use java -jar example.jar to run an application, the JVM is using libzip. This implementation reads the Jar file backwards, as intended by the Zip file format. When a "Central Directory" defines a value that is also replicated by the "Local File Header", the "Central Directory" version is always preferred, meaning the "Local File Header" can be filled with mostly junk. This however is not strictly the case for the "compressed size" fields. Neither the "Local File Header" or "Central Directory"* are trusted for the size. The JVM libzip implementation scans from the where the file data is supposed to begin, up to the PK.. header of the next available Zip entry. This means both the local and central values can be something like 0 which makes the file appear empty, but executes fine at runtime. Also, if a class's file name ends with a trailing / that gets silently dropped. This fools most zip tools into displaying the file (because it has all the bytes of the class file) as a folder instead.
So to summarize:
- Class files can have contradictory data between the "Local File Header" and "Central Directory" entries
- Class files can have bogus values for their "(un)compressed size" fields
- Class files can have bogus values for their CRC fields
- Class files can appear as directories by ending their zip file entry path with
/ - Jar files can have leading junk bytes in front of them, such as an image or executable making it a polygot

Download this image and run java -jar hello.png
Obfuscated ZipFile cases
The implementation of ZipFile used to be largely implemented by libzip back in Java 8, but has rewritten in Java 9 to be implemented fully in Java per JDK-8145260. It retains most of the same behaviors due to the nature of this rewrite being a port, but has a few minor differences.
- Trailing slashes in class file path names results in
ZipEntry.isDirectory()beingtruewhich will trick many applications into skipping them.
Obfuscated ZipInputStream cases
Streaming a Jar/Zip file will read from the front. This adds the following conditions:
-
The file cannot have any leading junk bytes. It must start with a "Local File Header".
- This is actually abusable because any "Central Directory" or "End of Central Directory" entries can be excluded. Many applications will not open a Zip file if it does not have these records. But if a Java application is written to use
ZipInputStreamthese "invalid" files are perfectly fine.
- This is actually abusable because any "Central Directory" or "End of Central Directory" entries can be excluded. Many applications will not open a Zip file if it does not have these records. But if a Java application is written to use
-
The fields of the "Local File Header" must be correct, for instance the "(un)compressed size" and "CRC" values must be valid for the data held by the "file data" field.
Obfuscated FileSystem cases
Passing a Path to a Jar/Zip file when creating a FileSystem leads to yet another custom implementation of Zip file parsing. However, it is mostly the same as ZipFile in terms of behavior. The main key difference is that it skips entries where ZipEntry.isDirectory() is true which can lead to skipping over valid class files.
Parsing Jar / Zip files with Recaf
Recaf by default will read Jar/Zip files as if you are reading them via java -jar but this behavior is configurable in the Archive importing section of the config window. The most important value to change is the parsing strategy where:
- "JVM " mirrors
java -jarmechanics - "Standard" mirrors
ZipFilemechanics - but scanning forward from the start of the file rather than backwards - "Naïve" mirrors
ZipInputStreammechanics
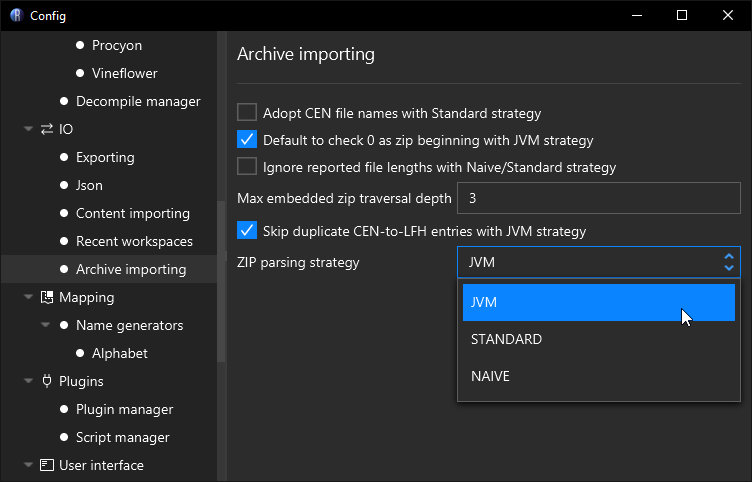
Recaf's archive importing config allows you to change how Jar/Zip files are read
| Option | Description |
|---|---|
| Adopt CEN file names with Standard Strategy | Standard strategy uses names in the "Local File Header" by default, enabling this will use names specified in the "Central Directory" instead. |
| Default to check 0 as zip beginning with JVM strategy | Enabling this allows the JVM strategy to skip some edge case checks when dealing with Jar/Zip files that have multiple Jar/Zip files concatenated together, or embedded in one another. This is enabled by default for a slight performance gain. |
| Ignore reported file lengths with Naïve/Standard strategy | Enabling this will change how the "file data" of "Local File Header" entries are read with Naïve and Standard strategies. By default they trust the "compressed size" field. This changes them to mirror the JVM strategy, where the lengths are interpreted by scanning to the next zip file entry in the file. |
| Max embedded zip traversal depth | Many applications will bundle other Jar/Zip files within themselves. Recaf will display the contents of embedded jars in the workspace tree in the "Embedded" category. It will continue to do this for the number of given levels here. The default value is 3 as most standard applications do not go beyond this level. |
| Skip duplicate CEN-to-LFG entries with JVM strategy | Some obfuscated Jar/Zip files will have multiple "Central Directory" entries point to the same "Local File Header" to make extraction tools extract the same file many times over. This option checks if a "Local File Header" has been parsed already and skips adding duplicate entries to the workspace when enabled. |
| Zip parsing strategy | As outlined above, the strategy selected determines which use case the Jar/Zip is intended to be read with. Most of the time you are generally going to want to stick with the JVM strategy, unless there are no "Central Directory" entries, which then you will need to use the Naïve strategy. |
Name Obfuscation
Obfuscation that changes the names of classes, fields, and methods is commonly referred to as name obfuscation, or identifier renaming. There are plenty of different ways to name things that cause reverse engineering to be more challenging.
Limitations of name obfuscation
JVMS 4.2 defines what characters are not allowed to appear in different kinds of names.
Class and interface names that appear in class file structures are always represented in a fully qualified form known as binary names. For historical reasons, the syntax of binary names that appear in class file structures differs from the syntax of binary names documented in JLS §13.1. In this internal form, the ASCII periods (
.) that normally separate the identifiers which make up the binary name are replaced by ASCII forward slashes (/). The identifiers themselves must be unqualified names.Names of methods, fields, local variables, and formal parameters are stored as unqualified names. An unqualified name must contain at least one Unicode code point and must not contain any of the ASCII characters
. ; [ /(that is, period or semicolon or left square bracket or forward slash).Method names are further constrained so that, with the exception of the special method names
<init>and<clinit>, they must not contain the ASCII characters<or>(that is, left angle bracket or right angle bracket).
Aside from these few restrictions, the sky is the limit.
Examples
The following name obfuscation strategies will target this basic data model class:
public class User {
    private String username;
    private int userId;

    public User(String username, int userId) {
        this.username = username;
        this.userId = userId;
    }

    public void displayUserInfo() {
        System.out.println("User: " + username + ", ID: " + userId);
    }

    public static void main(String[] args) {
        User user = new User("Alice", 12345);
        user.displayUserInfo();
    }
}
Short & overloaded naming
Obfuscators like ProGuard will rename as many things as possible to the same short names. This has two main benefits.
- It makes it difficult to determine what is being referred to when looking at decompiler output since things are only referred to by name.
- It saves space in the constant pool, which makes the class file smaller. Instead of having five separate entries for
User,username,userId,user, anddisplayUserInfoyou now only have one entry fora.
// User --> a
public class a {
	// username + userId --> a
	// As long as the types of multiple fields are unique, they can share the same name
    private String a;
    private int a;

	// Parameters & local variables can be named anything
	// since they are debugger metadata not required for much else at runtime.
    public a(String a, int a) {
    	// Because the types are unique, but names are shared its impossible to tell what is
    	// assigned to what here just by looking at decompiler output
        this.a = a;
        this.a = a;
    }

    public void a() {
    	// If you're lucky the decompiler will hint which field is referenced in ambiguous cases
    	// by casting to the field's type.
        System.out.println("User: " + (String) a + ", ID: " + (int) a);
    }

    public static void main(String[] a) {
        a a = new a("Alice", 12345);
        a.a();
    }
}
Reserved keyword naming
Identifiers can be mapped to reserved keywords such as primitives (int, float, etc), access modifiers (private, public, etc) and other language features such as switch, for, etc. This is generally annoying as it messes with syntax highlighting of tools and confuses Java source code parsers.
Note: In this case, all identifiers are given unique keywords, but the same principle as discussed before can be applied. You could very well name every identifier in the example
voidlike how the prior example named every identifiera.
public class void {
    private String float;
    private int int;

    public void(String short, int byte) {
        this.float = short;
        this.int = byte;
    }

    public void long() {
        System.out.println("User: " + float + ", ID: " + int);
    }

    public static void main(String[] private) {
        void char = new void("Alice", 12345);
        char.long();
    }
}
I and L naming
The letters I and l in some font families look very similar. Some obfuscators take advantage of this by naming identifiers with a series of I and l in the hopes that all identifiers visually look identical. For instance:
IIlIIIlIIllIIlI
With a good font, these will be easily identifiable as separate names.
public class IIlII {
    private String IlIIl;
    private int lIIlI;

    public IIlII(String IlIIl, int lIIlI) {
        this.IlIIl = IlIIl;
        this.lIIlI = lIIlI;
    }

    public void IIIlI() {
        System.out.println("User: " + IlIIl + ", ID: " + lIIlI);
    }

    public static void main(String[] IIIII) {
        IIlII llIll = new IIlII("Alice", 12345);
        llIll.IIIlI();
    }
}
Empty space naming
There are plenty of unicode letters that look like empty spaces. Combining several of these together will let an obfuscator make classes look largely empty.
public class  {
    private String ;
    private int ;

    public (String , int ) {
        this. = ;
        this. = ;
    }

    public void () {
        System.out.println("User: " +  + ", ID: " + );
    }

    public static void main(String[] ) {
          = new ("Alice", 12345);
        .();
    }
}
Windows reserved naming
Name a class CON in any variation of capitalization on a Windows computer and see what happens.
Cleaning up names with Recaf
See the following page: Mapping
Constant Obfuscation
Generally when you write an application, having sensitive data like an API key in the client source code is a bad idea... but sometimes it cannot be avoided. In such cases its a wise idea to use constant obfuscation, which transforms single values like numbers, strings, and other simple values into more obscure forms.
Example: Strings
Strings often contain information that can be used as landmarks in obfuscated code. For instance, you can search for skeleton.hurt in an obfuscated Minecraft jar and it will lead you to the EntitySkeleton.getHurtSound() method in older versions of the game. Normally, the names are obfuscated but it can be a starting point to begin mapping the obfuscated names back to clear names. To prevent this, any form of obfuscation on the string that breaks a simple search will suffice. Here are some examples.
Splitting the string into parts:
new StringBuilder("s").append("kel").append("eto").append("b.hu").append("rt").toString();

"s".concat("kel").concat("eto").concat("b.hu").concat("rt");

"\0.\1".replace("\0", "skeleton").replace("\1", "hurt");
Manipulating character values:
xor("ltzszkpq1wjmk", 0b1111);

static String xor(String in, int i) {
    StringBuilder out = new StringBuilder();
    for (char c : in.toCharArray())
        out.append((char) (c ^ i));
    return out.toString();
}
Breaking into an array or general construction via an array of bytes/characters:
new String(new byte[] {115, 107, 101, 108, 101, 116, 111, 110, 46, 104, 117, 114, 116});
Example: Primitives
Primitives like byte, short, char, int, and long generally don't have as much value for reverse engineers as Strings but it is still common to see these obfuscated. The floating point primitives float and double can be obfuscated but its generally rare to see this. Usually obfuscated primitives are done so locally within method code with a series of mathematical operations such as +, -, *, &, ~, ^, <<, >> and |, but there's nothing stopping you from being a little bit more creative than that.
int width = 800;
int height = 600;

// obfuscated
int width = (1600 >> 2) * (1 << 1);
int height = 18 + (((0b101010100 ^ 0b1100) << 2) % 197) * 3;

// also obfuscated
int width = new Random(411294766).nextInt(10000);
int height = -7 + ("sad".hashCode() & 0b1000000000) + ("cat".hashCode() >> 10);
Cleaning up constant obfuscation with Recaf
See the following page: Transformers
Flow Obfuscation
Flow obfuscation aims to make the logical execution order of the application more confusing.
Example: Opaque predicate
Before:
public void print() {
    System.out.println("A");
}
After:
private static int j;

public void print() {
	if (j != 0) System.out.println(j == 2 << 0x10 ? "B" : "A");
}

static {
    j++;
}
Example: Switch
Before:
public void print() {
    System.out.println("A");
}
After
@Override
public void print() {
    PrintStream ps = System.out;

    int i = -1;
    i++;
    String k = "0";
    while (true) {
        switch (Integer.parseInt(k)) {
            case 0:
                i += 7;
                k = "28";
                break;
            case 7:
                k = "A";
                break;
            default:
                ps.println(k);
                return;
        }
    }
}
Cleaning up flow obfuscation with Recaf
See the following page: Transformers
Reference Obfuscation
In Java there are several instructions related to reading & writing to fields, and several more for invoking methods. These instructions refer to symbols in the constant pool including the name of the class defining the field or method, then the name and type of the field or method. Generally we'll call these "references". A majority of a Java application's logic consists of references (as opposed to other things like math operations on primitives) and thus a majority of the information about what an application does can be understood by analyzing these references.
Naturally, obfuscation aims to prevent reverse engineers from understanding an application, so how can these references be obfuscated? Simple, by swapping out the references with ones containing less valuable information. One way to do this is by abusing the invokedynamic instruction. What does this "abuse" look like though? Lets take a look at a normal use-case first.
// Overcomplicated way to print "hi"
public class Demo {
	public static void main(String[] args) {
		exec(Demo::example);
	}

	// the code we want to run
	static void example() {
		System.out.println("hi");
	}

	// runs a runnable
	static void exec(Runnable r) {
		r.run();
	}
}
Lets disassemble this class and see what it looks like:
.inner public static final {
    name: Lookup,
    inner: java/lang/invoke/MethodHandles$Lookup,
    outer: java/lang/invoke/MethodHandles
}
.super java/lang/Object
.class public Demo {
    .method public static main ([Ljava/lang/String;)V {
        code: {
        A:
            // Creates a "Runnable" via "LambdaMetafactory" with a MethodHandle pointing to 'void example()'
            //  First '()V' before the handle is the 'samType' (SAM is an acronym for single-abstract-method)
            //  MethodHandle = { invokestatic, Demo.example, ()V }
            //   - Outlines the handle dispatch type (mirroring the invoke instruction opcodes)
            //   - Outlines where the method is defined (This Demo class)
            //   - Outlines the method signature (the name and type, example and ()V)
            //  Second '()V' after the handle is the 'instantiatedMethodType' must match 'samType' or have arguments with subtypes
            //   - Example: If you had 'samType = (Ljava/util/Collection;)V' you could use 'instantiatedMethodType = (Ljava/util/List;)V'
            invokedynamic run ()Ljava/lang/Runnable; LambdaMetafactory.metafactory { ()V, { invokestatic, Demo.example, ()V }, ()V }

            // Passes the "Runnable" as a normal parameter
            invokestatic Demo.exec (Ljava/lang/Runnable;)V
            return
        B:
        }
    }

    // The code we want to run
    .method static example ()V {
        code: {
        A:
            getstatic java/lang/System.out Ljava/io/PrintStream;
            ldc "hi"
            invokevirtual java/io/PrintStream.println (Ljava/lang/String;)V
            return
        B:
        }
    }

    .method static exec (Ljava/lang/Runnable;)V {
        parameters: { r },
        code: {
        A:
            // Just run the passed runnable
            aload r
            invokeinterface java/lang/Runnable.run ()V
            return
        B:
        }
    }
}
As you can see in the main method, the invokedynamic instruction can be used to create a new Runnable that is implemented by calling example(). In the source form this comes as a static method reference Demo::example.
But what if we used a lambda instead of a method reference?
When we write exec(() -> example()); the idea still remains the same, but the compiler is now no longer aware that we are just calling example() and thus makes a new generated method to contain the lambda body.
.method public static main ([Ljava/lang/String;)V {
    code: {
    A:
        // Creates a "Runnable" via "metafactory" with a methodhandle pointing to compiler-generated method housing the contents of our lambda body
        //  MethodHandle = { invokestatic, Demo.lambda$main$0, ()V }
        //  - lambda$main$0 is the name of the compiler-generated method that holds our lambda body instructions
        invokedynamic run ()Ljava/lang/Runnable; LambdaMetafactory.metafactory { ()V, { invokestatic, Demo.lambda$main$0, ()V }, ()V }

        // Passes the "Runnable" as a normal parameter
        invokestatic Demo.exec (Ljava/lang/Runnable;)V
        return
    B:
    }
}

// The compiler auto-generates methods for each lambda you define in a source file.
// These generated methods are marked as 'synthetic' to denote the compiler made these.
.method private static synthetic lambda$main$0 ()V {
    code: {
    A:
        invokestatic software/Demo.example ()V
        return
    B:
    }
}
You may be wondering what is this LambdaMetafactory? You can read the full JavaDocs on it here but the gist is that you give it a MethodHandle and a descriptor like ()V and it will implement it the desired functional type provided as a return value such as java/lang/Runnable. Different methods in the class serve different purposes, but each that yields a Callsite is a method usable in the invokedynamic instruction. These methods are called "bootstrap methods". This is a core offering of the Java language, and thus most decompilers are designed to understand this class's purpose. Thus, if you used a modern decompiler with this class it would spit out the Demo::example or () -> example() based on whichever one was used.
Ok but how does an obfuscator make use of any of this if decompilers are so smart?
Compiling a lambda in Java source code will generate an invokedynamic using a bootstrap method specified in LambdaMetafactory but there is nothing stopping an obfuscator from creating its own bootstrap method. In fact, an obfuscator doesn't even need to pass a MethodHandle if it controls the the bootstrap method implementation. As an example, consider we make this change to the main method:
invokedynamic run ()Ljava/lang/Runnable; MyBootstrap.find { "lookup-key" }
We can implement MyObfuscator.find like this:
public class MyBootstrap {
    public static ConstantCallSite find(
            // These first 3 parameters are passed by the JVM and must always exist in a boostrap method definition.
            MethodHandles.Lookup lookup,
            String callerName,
            MethodType callerType,
            // Key value specified as the invokedynamic argument, ie "lookup-key" from the example above.
            String key) {
        ClassLoader loader = MyBootstrap.class.getClassLoader();

        MethodHandle handle = switch (key) {
            // Provide a case for each possible key we want to pass.
            // Our example only has the one..
            case "lookup-key" -> {
                // Create a MethodHandle by using the passed lookup then find our "Demo.example ()V"
                MethodType methodType = MethodType.fromMethodDescriptorString("()V", loader);
                yield lookup.findStatic(Demo.class, "example", methodType);
            }
            default -> null;
        };

        // Wrap the handle in a CallSite and we are done!
        return new ConstantCallSite(handle.asType(callerType));
    }
}
We are no longer using LambdaMetafactory and use a custom implementation that maps a passed String to a MethodHandle. There is no easy way to represent this new scheme as it no longer maps to a source code construct, making this class impossible to decompile back to its original form. Some will try their best to show the intention of the code, but are at the end of the day still wrong. Some examples:
- CFR:
MyBootstrap.find("lookup-key", this); - Procyon:
ProcyonInvokeDynamicHelper_1.invoke(this); - FernFlower:
MyBootstrap.find<"lookup-key">(this);
Another fun fact is that despite the implication of the name MethodType you can also apply this form of reference obfuscation to field accessors. The MethodHandle.Lookup has methods for field reading and writing. You can quite easily create an obfuscator that replaces all of these references with a custom lookup. There's not too much of a concern about performance if you do this since these ConstantCallSite values are resolved once, and then cached.
Can Recaf automatically restore the original form?
It depends, but for now the short answer is going to be "not out of the box". The problem is that there are infinite ways to create a bootstrap method, so it becomes very hard to analyze obfuscated applications in a generic way that lets us determine the original intention. We could create specific transformers that target individual patterns used by specific obfuscators, but we are then in a game of cat-and-mouse. One small change in a new version of that specific obfuscator would break our transformer, and then we also need to support multiple versions of that transformer. This would be a massive time sink for us and also create lots of not so great duplicate code. For this reason, creating transformers for specific obfuscators is a process left to the you and the rest of the Recaf community (Plugins can register their own transformers via TransformationManager). Recaf will provide a host of generic obfuscation transformers and additional services for you to build off of though when creating your own transformer.
Loader Obfuscation
Loaders are mechanisms which take binary input data and transform it into loadable classes at runtime. This prevents easy analysis as class files are kept in an arbitrary format and are not immediately viewable.
Example
JCrypt is a rather straight forward implementation of loader obfuscation. The contents that will be executed by the runtime are found in the stub directory. Here's an overview of how it works:
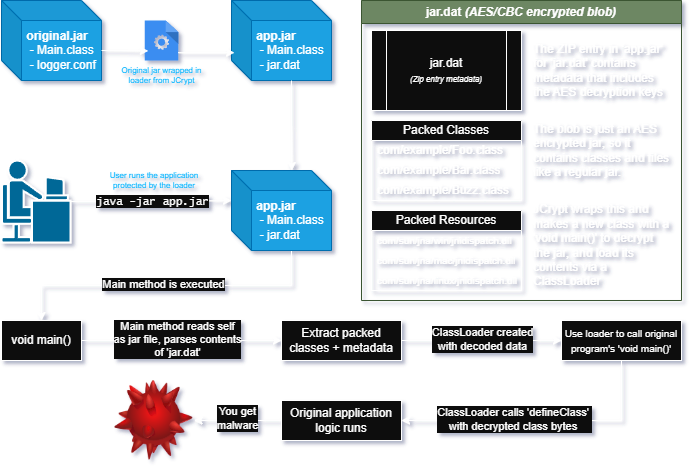
A diagram outlining the control flow of how JCrypt operates.
Dumping loaders statically
Recaf will not automatically unpack the loader for you. There are too many patterns to match to make this a fully automated process, but the general approach is simple.
- Find where the packed data is loaded.
- Usually you will see a call to
getResource("jar.dat")orgetResourceAsStream("jar.dat") - Or finding the current running jar and reading its contents like with JCrypt. Generally done via
getProtectionDomain().getCodeSource().getLocation()on a class in the loader which provides the URI to where the class was loaded from.
- Usually you will see a call to
- Find where the packed data is decrypted.
- Find where the decrypted data is used in a
ClassLoader- Classes in this context are generally loaded via
defineClass(name, bytes, 0, bytes.length)
- Classes in this context are generally loaded via
- Copy the code necessary to load the packed data, decrypt it, then instead of using
defineClasswrite the contents to disk.- Run your modified version that saves the decrypted classes and resources to disk.
Once you've written the decrypted classes to disk, you can open them back up in Recaf.
Dumping loaders dynamically
The other option to dump loader contents is to run the application and then use instrumentation or JVMTI to dump the loaded classes. Some considerations before you take this approach:
- You will generally do this in a Virtual Machine and not your host system.
- When you dump the classes, you are only able to dump what is currently loaded. If there are unloaded classes in the packed data that have not been referenced yet, those will not be included in the dumped output.
Example dumping agents:
- Java Instrumentation based agent
- C++ JVMTI based agent (Requires building it yourself to target your current machine architecture)
- Black magic JVMTI from Java-side (Requires building yourself, setting up usage in target VM to dump)
Class Parsing Library Exploitation
How do you prevent a reverse engineer from looking at your class file? By making a really janky class that violates the specification and/or abuses very niche but supported cases. Most Java class file parsers take the specification at face value and assume that inputs are generally "normal" classes that have been freshly compiled by javac. For instance you probably expect the Code attribute to only appear on methods, right? Well, there's nothing stopping you from putting a Code attribute on a field. And when its on a field, the JVM at runtime will ignore it. But a Java class parser will be expected to parse the class in full, so it will try to read the Code attribute on the field. If this Code attribute has bogus values in it, the class parser can easily be tricked into reading outside of the class file bounds, or casting to an illegal type.
What does Recaf do?
Recaf automatically patches these classes when loading classes into the workspace. We wrote CafeDude (CAFED00D) to read janky classes like this. Its not intended to be used for high level operations like ASM or Javassist are. Instead, its primary purpose is transforming these janky classes into safe classes that can be read by the other high level Java class parsing libraries.
If CafeDude is incapable of patching a class file, Recaf will include the file under the "Files" tree in the workspace explorer. Sometimes this occurs because a file may look like a class at first glance, but is not actually valid. Please report any cases that you believe should be patchable where CafeDude fails and we will take a look.
Java to Native Obfuscation
Reverse engineering Java is easier than reverse engineering native executables in most cases.
Consider the base case of an unobfuscated Java class vs an unobfuscated compiled C program. The Java class can be decompiled into nearly exact source code. When you compile a Java class there is no real "optimization" in the same sense that there is with native compilation via compilers like gcc. As an example, with a switch statement/expression you are either going to emit a lookupswitch or tableswitch depending on the keys used. There are explicit instructions used for using switch in Java, while in C this is not the case. Use a tool like godbolt to compile a switch with different optimization flags (-O0 through -O3) and you'll see there are many ways to represent them. Additionally the Java instruction set (Printing the JVMS chapter on instructions would be about 90 pages) is very simple compared to an instruction set like Intel 64 / IA-32 (Its over 5000 pages long). Simply put, the domain knowledge required to become proficient at Java reverse engineering is much less than for native reversing.
Why does this matter? Obfuscators like JNIC can capitalize on this fact and transpile Java into C. If you can take the logic handling client side application security (such as an offline license check) its going to raise the barrier of entry if you make that logic native. From there you can use more annoying obfuscation techniques on the native side, such as code virtualization via VMP or Themida.
Handling native code in Recaf
Currently Recaf only supports displaying basic information about native executables & libraries. To reverse native code you should extract the respective file and then drop it into IDA or Ghidra.
Deobfuscation
Recaf has a number of features dedicated to defeating common obfuscation strategies. Some of them are always active and run in the background, meaning they do not require any user input to utilize. Others will require you to intentionally use them at your own discretion. The following pages in this section will cover how different Recaf features can be used to address obfuscation.
Mapping
Recaf has multiple ways to clean up name obfuscation. There's automated processes like the mapping generator and applying obfuscation mappings, and then there's manual renaming where you rename items yourself one at a time.
Automatic rule based renaming
When you first open a workspace Recaf does some analysis of the classes within it. If any classes with illegal names (see reserved keywords, whitespace naming above) the option to automatically rename those cases appears in the workspace summary/information display. Clicking the "Illegal names" button under "Anti-Decompilation" will open the mapping generator with the illegal names already pre-populated. You can hit "Apply" to automatically rename the listed classes, fields, and methods.
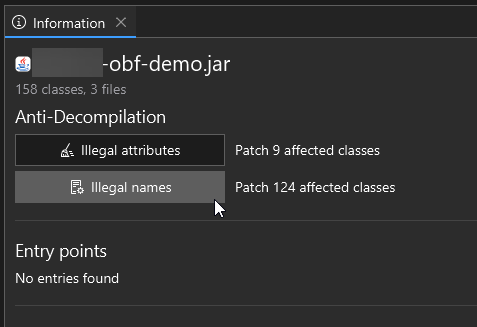
Recaf's workspace summary that displays when opening a file allows you to rename illegal identifiers with a single click
You can also open the mapping generator at any time by selecting 'Mapping > Generate' in the menu bar.
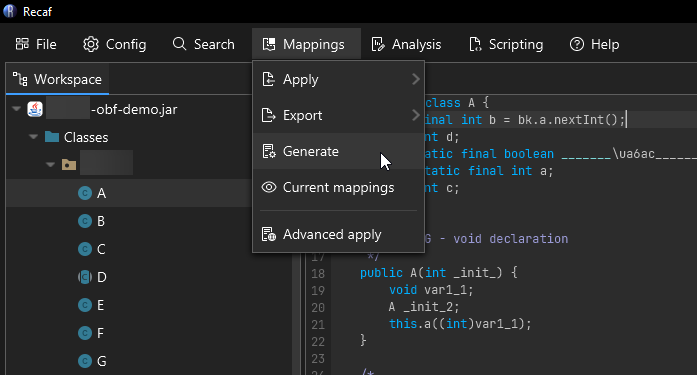
The mapping generator is accessed from 'Mappings > Generate'
The mapping generator allows you to specify a series of rules for names to include and exclude. The following is an example that generally would cover most name obfuscation covered in this page:
- Include long names: 100
- Reason: Most class names (including the package name) aren't actually that long, unless you're looking at something like FizzBuzz Enterprise or obfuscated code that makes very long names.
- Include whitespaces
- Reason: Its impossible for unobfuscated code coming from Java source code to have whitespace characters in names. If any name has whitespace it is certainly something added through obfuscation.
- Include non-ascii
- Reason: Its generally rare to see non-ascii characters in Java source. Its not impossible but given the rarity and how frequent obfuscators tend to use random high codepoint characters for their names, its generally a useful filter to include.
- Include keywords
- Reason: Its impossible for unobfuscated code coming from Java source code to have class, field, or method names that are exact matches of reserved keywords.If any name equals a reserved keyword then it is certainly something added through obfuscation.
- Include names: Matches
\w{1,2}- Reason: This is a regex that matches word (
\w) characters 1 or 2 times. The idea is to match short names that you would see in a common ProGuard config.
- Reason: This is a regex that matches word (
- Include classes: Matches
.*/\w{1,2}- Reason: This is a regex that matches any text up to a package separator (
.*/) and then word (\w) characters 1 or 2 times. The idea is to match short names that you would see in a common ProGuard config, but for classes in any package.
- Reason: This is a regex that matches any text up to a package separator (
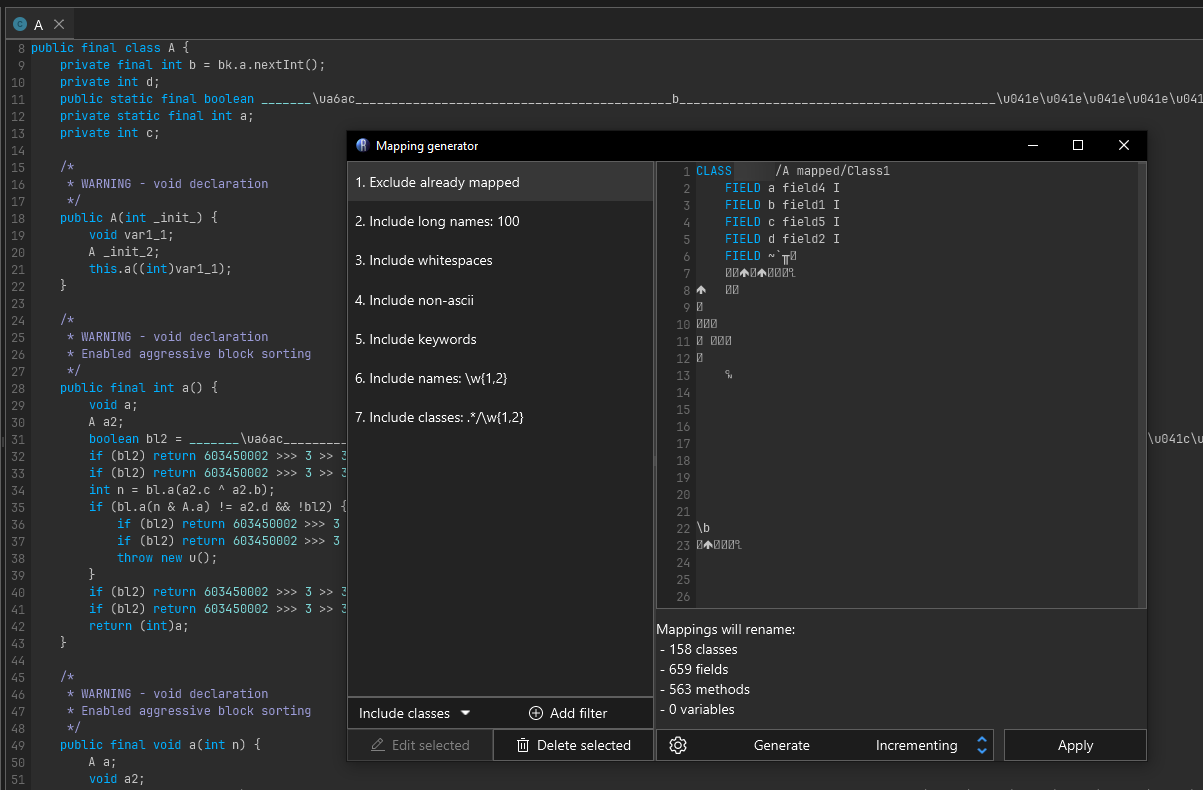
The mapping generator will generically name classes, fields, and methods that match user-provided filters
Manual renaming
Interacting with classes, fields, and methods allows you to rename them. When viewing decompiled code, rename on the name of the declared item. If the context can be resolved a context menu will appear and within this menu is the option to "Rename".
You can also rename classes, fields, and methods via Alt + R when the caret is on the declared item's name. This relies on the same context resolution, but allows you to rename items without using the mouse.
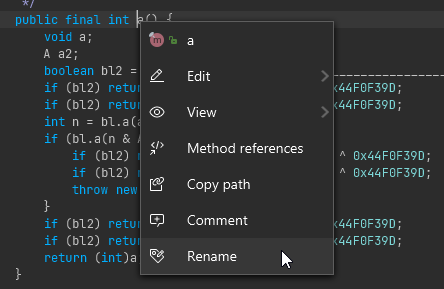
Right clicking on a class, field, or method will allow you to rename it
When context resolution fails (which will happen in some forms of obfuscated code) you can interact with fields and methods via the side panel aptly named "Fields & Methods". In this sample I there is a field which is named a bunch of random characters, some which are not valid identifier characters. In this case the only way to interact with this field in the decompiler view is through this side menu.
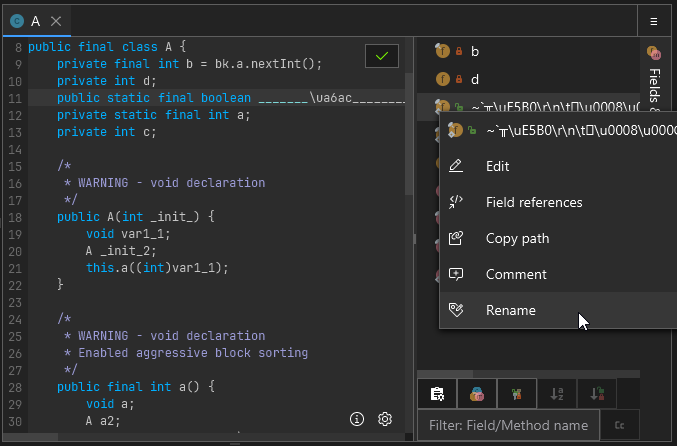
On the right side of a decompiled class, you can also right click on fields and members in this list
Classes in the workspace tree can also be interacted with. Right clicking on them, or using the keybind Alt + R will allow you to rename them.
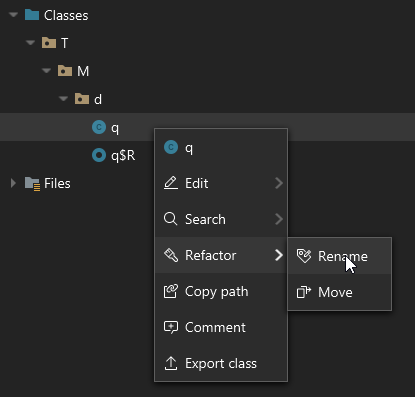
Right clicking on classes in the workspace tree also allows you to rename them
Classes can alternatively be moved. Moving differs slightly from renaming, it allows you to select a package in the workspace to move the class into. Technically at the end of the day it is still renaming, but the UX is more like what you would expect from the move operation in an IDE like IntelliJ.
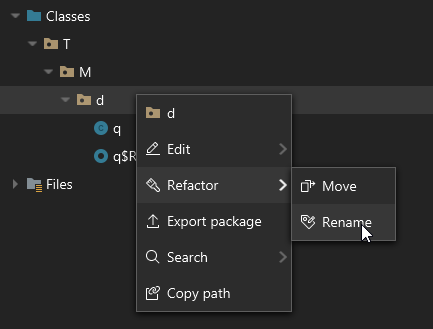
Right clicking on packages lets you rename whole packages at a time
Saving your mappings
After you have mapped classes, fields, or methods from Recaf you can export the aggregate mappings into any of the supported formats from the "Mapping > Export" submenu. This information is lost when you close a workspace so make sure to keep a copy if you want to revisit some obfuscated application later. If you use "File > Export application" with mapped results and load that again later Recaf will have no awareness that there are mappings since from its perspective you've just loaded any regular Java application.
Transformers
Recaf has a tool that matches and "transforms" obfuscated code patterns. It can be accessed via Analysis > Deobfuscation.
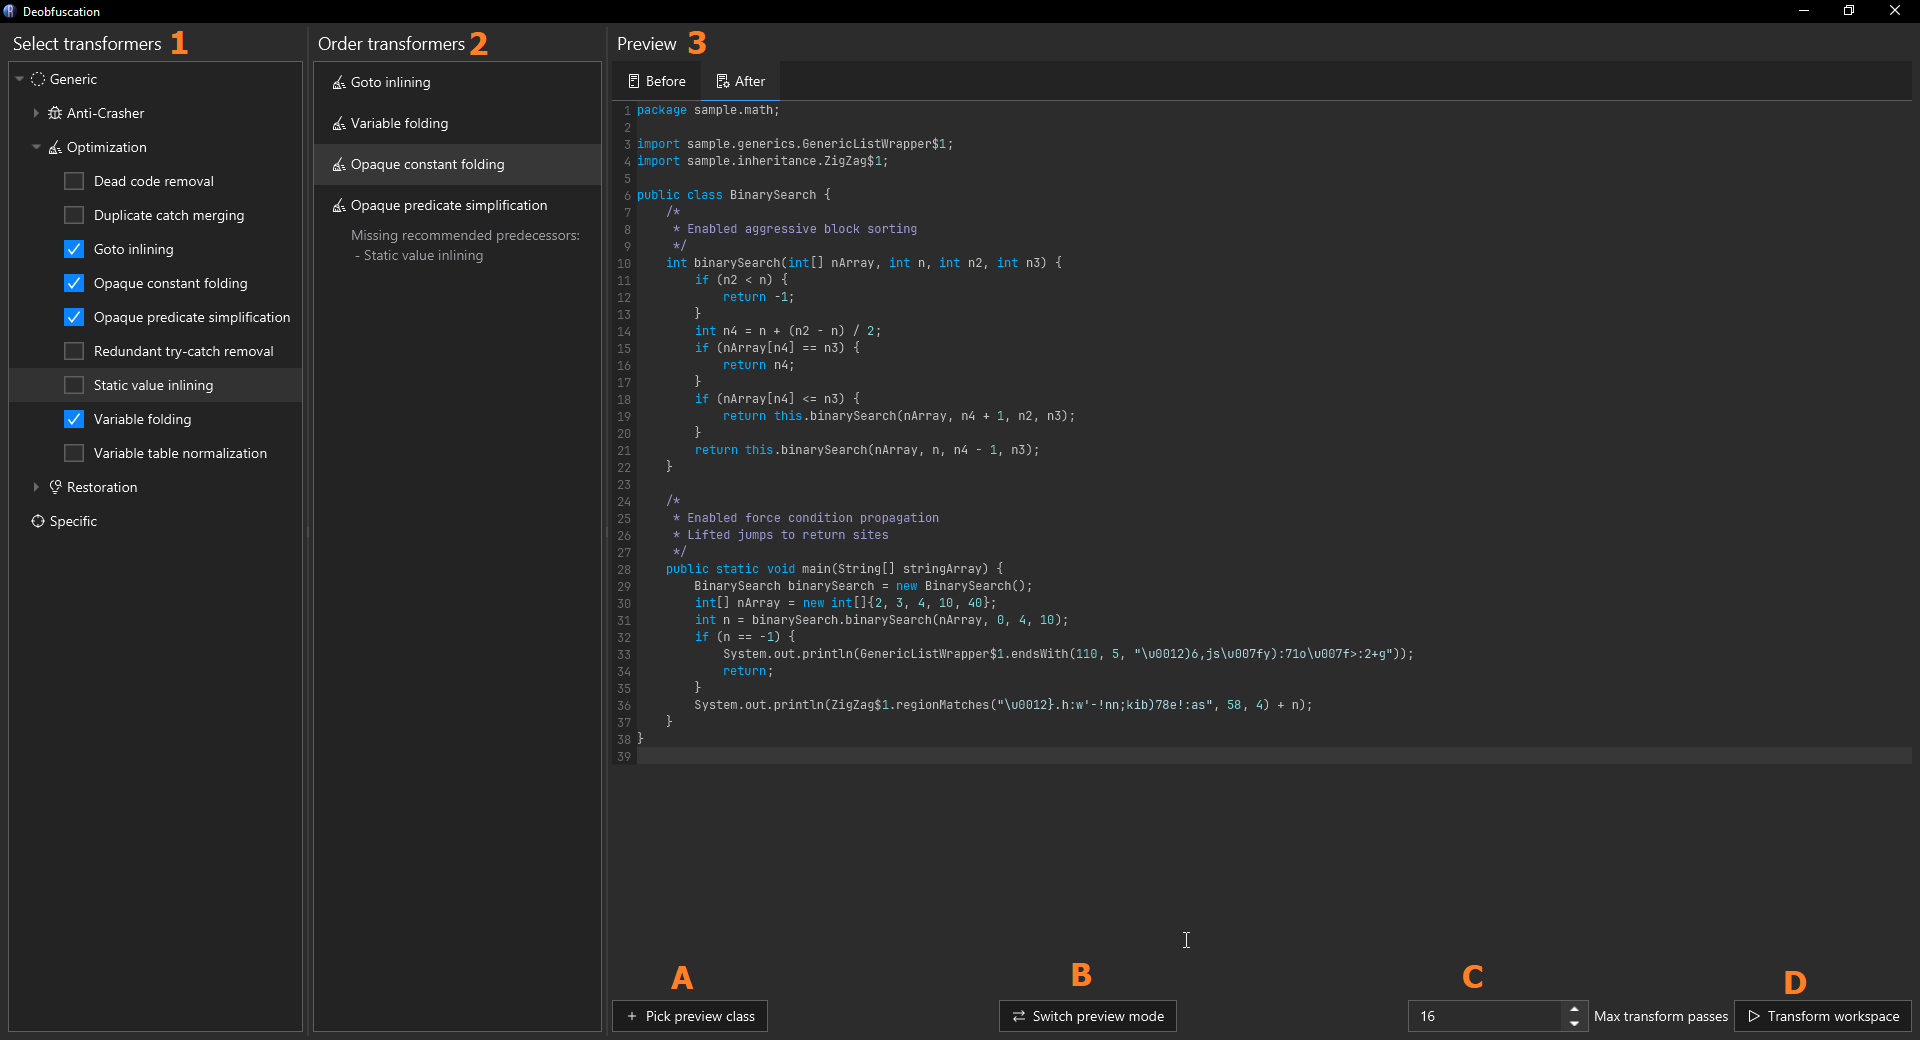
A screenshot of the deobfuscation window, annotated with labels to indicate different regions in the UI
From the image above, there are three columns:
- The transformer selection column
- The transformer order column
- The preview column
The first column outlines the available transformers you can activate. Clicking the checkbox in the tree will activate it, and it will appear in the second column. The second column allows you to click and drag to move the transformers into different orders. Some transformers work best when they have other transformers run before/after them (They will reccomend predecessors/successors when you when you activate them) but getting the order perfect isn't strictly necessary. The last column contains the preview of what your transformers will do.
The preview column has several controls. From the image they are:
- A: The "Pick preview class" button
- When clicked, you are prompted to select a class from the workspace.
- The class you pick will be displayed in the preview space above, initially as decompiled code.
- B: The preview mode toggle button
- When clicked, the output changes from being decompiled code into disassembled bytecode.
- C: The transformer max pass count
- The maximum number of times to run transformers.
- Some transformers like constant folding, when paired with predicate simplification, may require more passes to catch all possible patterns that can be optimized.
- Classes only get processed up to the maximum pass count while transformers observe changes on a class. If the transformers are used on a class, and the class does not change as a result, then it will not be processed any further.
- D: The apply button
- When clicked, the transformers you've selected are applied on every class in the workspace.
As an example, here is a short video detailing how this window can be used on a generic obfuscated input:
Built-in transformers
- Call result inlining: Replaces the calls to static methods with the result of the call if the target method can be emulated and all parameter values are known. For instance:
Math.max(5, 10)will become10androt13("uryyb")will become"hello"if the implementation ofrot13is accessible in the workspace and uses API's supported by emulation.- Some obfuscators with weak String encryption capabilities can be defeated with this transformer without any additional effort. However, there are some obfuscators with String encryption routines that are almost supported, but with a little bit of manual work on your part can become emulated.
- For information on which core Java API's support emulation refer to the
Lookupimplementation classes in the analysis lookup package. - For information on which workspace-defined methods support emulation, refer to the
canEvaluatemethods defined inReEvaluator.
- Cycle class removal: Removes junk classes from the workspace that have cyclic inheritance. For instance:
A extends BandB extends A - Dead code removal: Removes code in control flow paths that cannot ever be taken. For instance the contents of the following block:
if (1 > 2) { ... } - Duplicate annotation removal: Removes duplicate annotation declarations on classes, fields, and methods. This is illegal in Java source code, but valid in Java bytecode.
- Duplicate catch merging: Combines multiple consecutive
catchhandler blocks with duplicate code into a single block. - Enum name restoration: Detects and renames enum keys that are leaked as String constants in the static initializer of
enumclasses.- When String encryption is present, that will have to be cleaned up before this transformer can be used.
- Stack frame removal: Strips all stack frames from methods which will trigger regeneration upon the transformation being completed. Some obfuscators can create junk frames which confuse or break other tools and this allows quick patching for that.
- Goto inlining: Where possible, inlines the target control flow block of
gotoinstructions at the calling location. - Illegal annotation removal: Removes malformed annotations that are created by obfuscators to crash decompilers and other RE tools.
- Illegal name mapping: Renames any class, field, or method which has names not compatible if used in Java source code. For instance, whitespaces, reserved keywords, etc. Essentially a one-click version of the mapping generator.
- Illegal signature removal: Removes malformed generic type signatures that are created by obfuscators to crash decompilers and other RE tools.
- Illegal varargs removal: Removes the
varargsmodifier from methods where it is improperly used. This is used by obfuscators to crash some decompilers. - Kotlin name restoration: Detects and renames classes, fields, and methods with information found in
@Metadataand@JvmNameannotations.- The
@Metadatadata is stored in a protobuf format which does not appear to keep the same declaration order as fields and methods are defined by in the class. This limits which fields and methods can be renamed since we have to prove that only one possible field or method can be mapped to an entry in the protobuf model. If you have three fields of the same type such as anintthen we cannot disambiguate whichintmaps to which entry in the model. But if you had aint,float, anddoublethe types are unique and all three could be remapped.
- The
- Long annotation removal: Removes bogus long annotations. Usually obfuscators will combine stupidly long names with duplicate annotation entries (see above) to slow down decompilers.
- Long exception removal: Removes bogus long types on method
throwsdeclarations. Same idea as long annotations, usually intended to slow down decompilers. - Opaque constant folding: Folds constant operations into single values. For instance:
1 + 1becomes2,x + 0becomesx. - Opaque predicate simplification: Replaces control flow predicates that can be proven to always take a specific path with a single
goto. Generally should be paired with the goto inlining transformer. - Redundant try-catch removal: Removes
catchblocks that can be proven to not throw a given exception type. - Source name restoration: Detects and renames classes which still have a seemingly valid
SourceFileattribute. Has some basic checks to prevent renaming to bogus, but you should generally check a few classes with the assembler or low level view to verify the classes have valid attribute values. - Static value inlining: Emulates static initializers of classes in the workspace to and replaces any references to discovered constant fields with inline constants.
- Unknown attribute removal: Removes any attribute on classes, fields, or methods that is not recognized in the JVM specification.
- Variable folding: Replaces redundant usage of variables with constants, or simpler variable expressions. For instance:
a = 10, b = a, c = b, foo(c)becomesfoo(10) - Variable table normalization: Recreates method local variable tables with a basic pattern of incrementing names for parameters and scoped local variables. Can be useful when methods are filled with junk variable entries to clean up decompiled and disassembled output.
Custom transformers
Plugins can register their own transformers with the TransformationManager.
Developer Documentation
Recaf is a modern Java and Android reverse engineering tool. This entails supporting many tasks such as providing an intuitive UI for navigating application logic, simplifying the process of modifying application behavior, and much more. You can read about the internals of Recaf, how to develop on top of them with plugins and scripts, and more by reading the documentation.
Getting Started
Recaf requires Java 22 or above. If you do not have this version or higher installed, we recommend you install it from Adoptium, an Eclipse Foundation project.
Contributing to Recaf
Some pages you should read up on first:
- Building - This page explains how to build and run Recaf.
- Important Libraries - This page talks about the most relevant libraries you should know about that are used in Recaf.
- Workspace model - This page talks about how the
Workspacemodel works in Recaf. - CDI - This page talks about how injection is used in Recaf, which is used to access features within Recaf.
- Services - This page lists all of the services / features that Recaf provides.
To find things to work on such as bugs and new features, visit the Recaf issue tracker on GitHub (Or search the source code for TODO comments, plenty of those are scattered around and aren't tied to any specific issue).
If you want to contribute documentation, visit the Recaf site project on GitHub.
Plugin development
The Plugins page talks about how to write plugins. A template workspace is linked there for you to work off of.
Architecture
The articles in this section talk about the overall design of Recaf.
Building
Recaf is structured as a multi-module gradle project. You can build an executable jar by running gradlew build in the project's root directory. Once that completes the file is located at ./recaf-ui/build/libs/recaf-ui-{VERSION}-all.jar.
Including/excluding JavaFX in the build artifact
The file recaf-ui-{VERSION}-all.jar generated from the build task bundles JavaFX for the current platform you are building on (IE, Windows / Linux / Mac) and is intended to be ran with java -jar recaf-ui-{VERSION}-all.jar.
If you do not wish to bundle JavaFX for your current platform use gradlew build -Dskip_jfx_bundle=true. When we build Recaf in the Github CI we enable this property so that it becomes the Recaf Launcher's responsibility to fetch the appropriate JavaFX artifacts. This way we can offer a single artifact that is usable by anyone, and if there are JavaFX updates we are not stuck with whatever version we would otherwise have bundled in the release artifact.
Changing which version of Java is used for compiling
By default, Recaf is will attempt to compile and run with JDK 22 if found locally on your system. If you for some reason need to use a newer version of Java, you can set an integer value in the TARGET_VERSION environment to match the desired Java version. For instance, if you are on a Linux distribution that only bundles the JDK 25 since it is a LTS you can set the environment variable to build against Java 25 locally.
Skipping tests when building
Generally, you shouldn't ever skip tests but if you must, you can run gradlew assemble -x compileTestJava. This skips compiling the unit test code and thus running any tests afterwards.
Speeding up builds in IntelliJ
After you build Recaf at least once via gradlew build or gradlew assemble (This step is required to generate the RecafBuildConfig class) you can modify IntelliJ's settings for the project to drastically reduce the build time before running the application. Open your IntelliJ settings once the project is open and navigate to Build, Execution, Deployment | Build Tools | Gradle. Change the "using" options to IDEA instead of Gradle. IntelliJ is usually smarter about recompiling only the necessary classes and thus it has less overhead to go through before running Recaf than using Gradle.
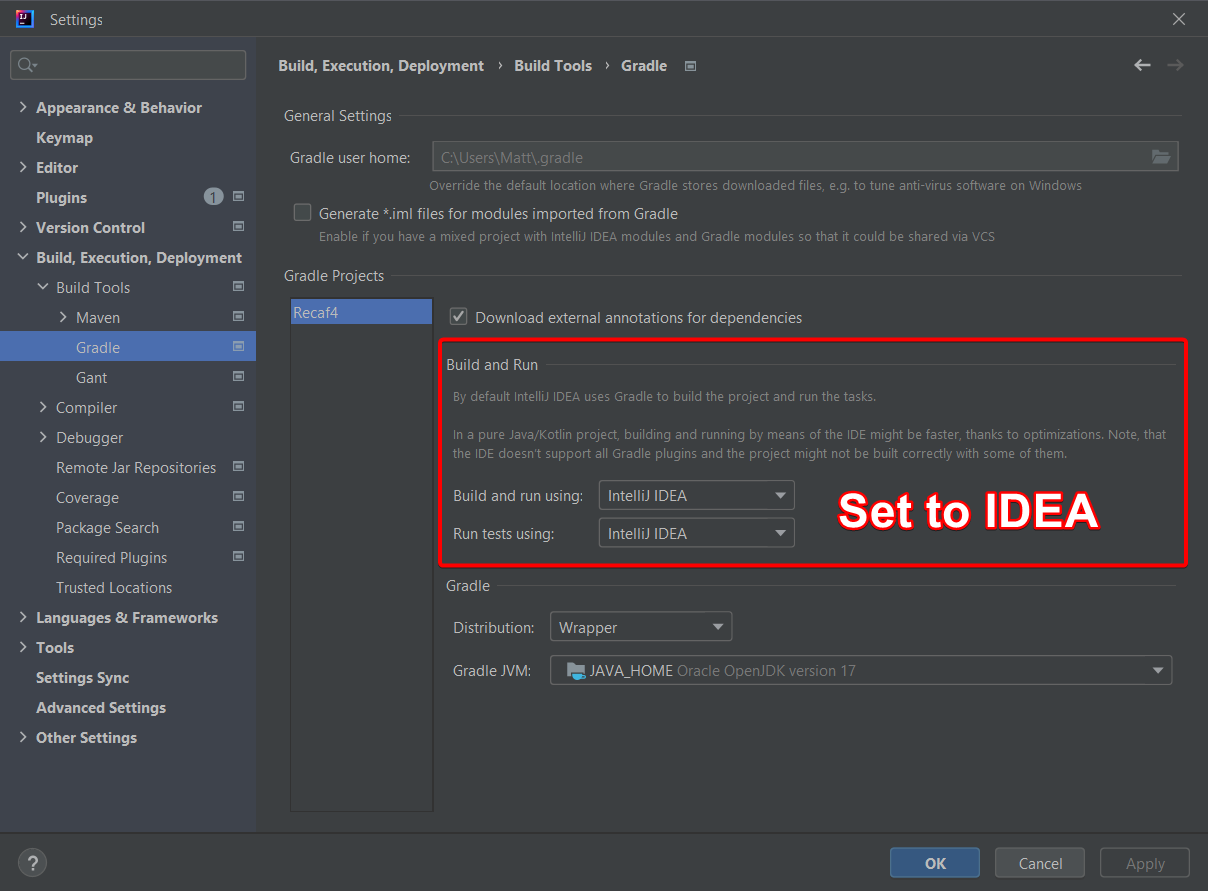
Changing the Gradle settings to build using IDEA instead of Gradle speeds things up a lot. Additionally you can change what Java version the Gradle daemon is run with here. Its usually best to set it to match the project SDK rather than pull from JAVA_HOME
Hotswapping code in IntelliJ
IntelliJ allows you to swap out the code of method bodies while running the application in the debugger. Normally this requires a project-wide build, but with the "Single Hotswap" plugin, you can cut that down to only recompiling the affected class. This makes it very easy to iterate on a feature or bug fix without having to constantly restart Recaf.
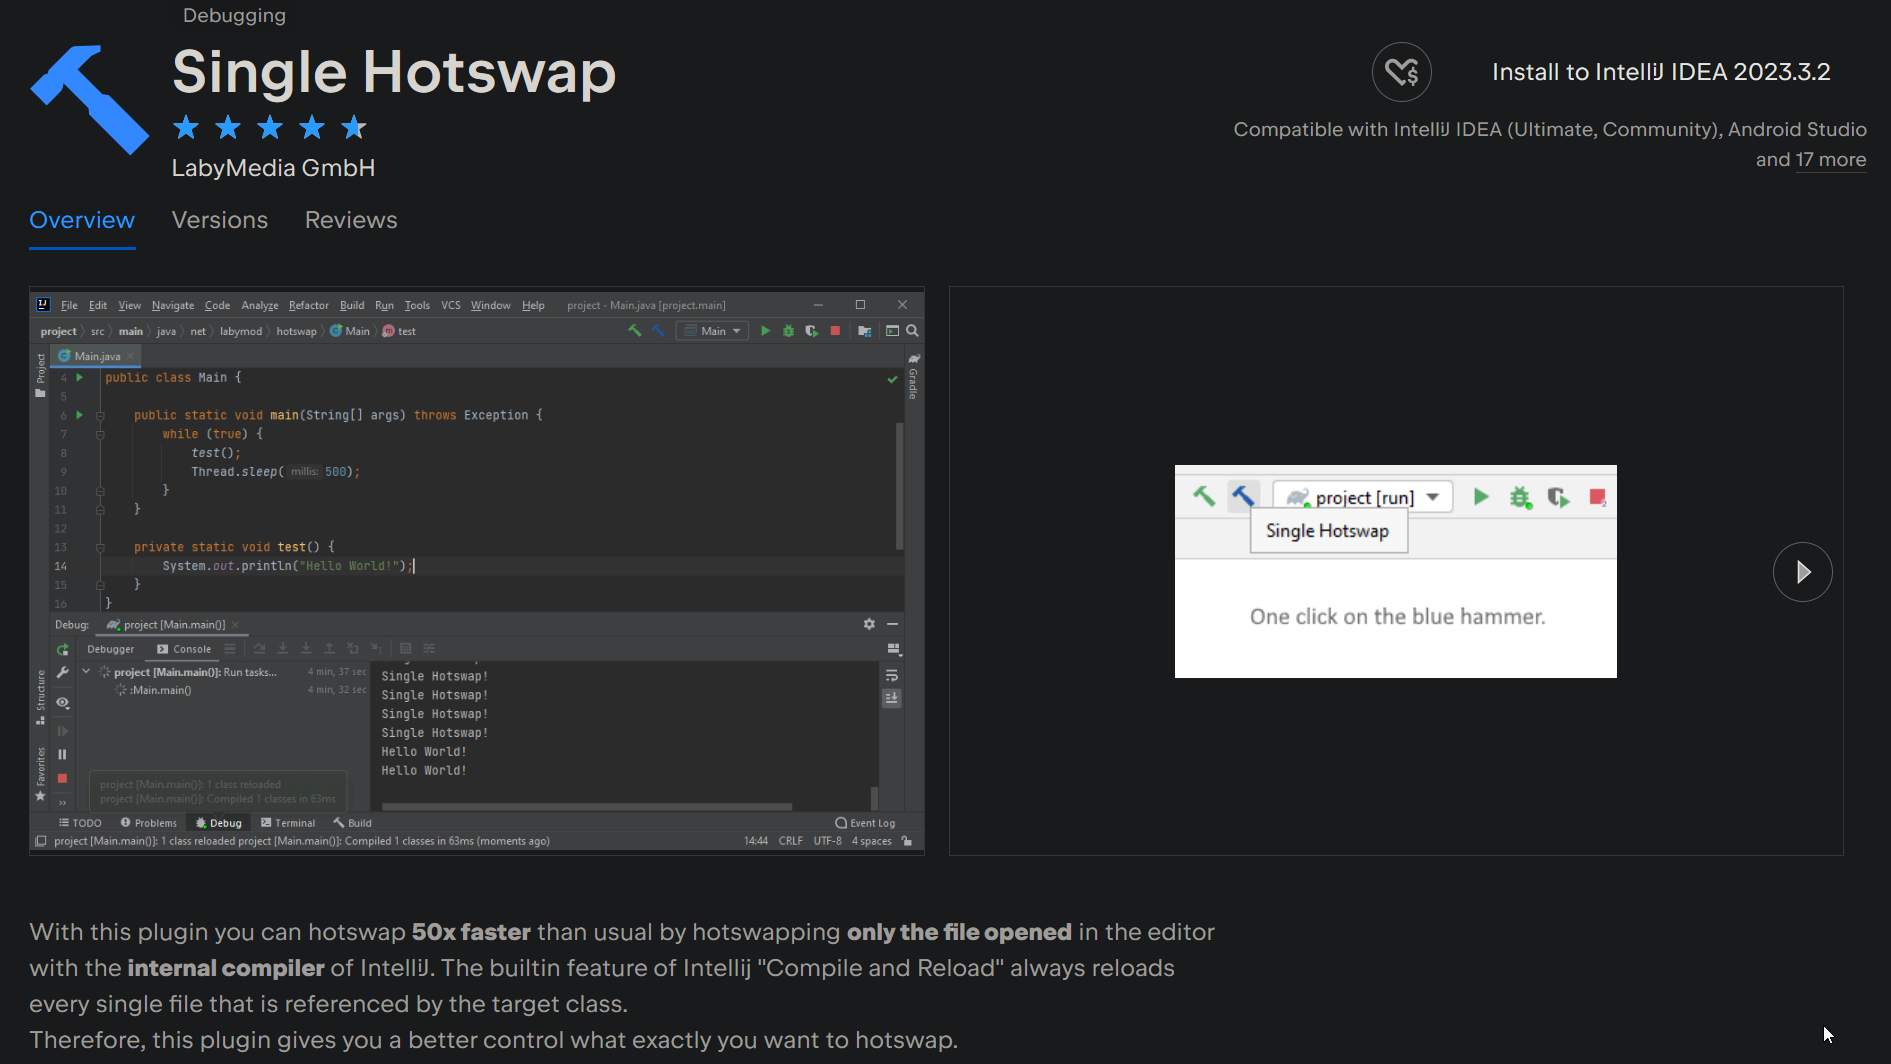
The single-hotswap plugin for IntelliJ makes hot-reloading code much faster.
Running
Running Recaf
Directly from Gradle / Terminal
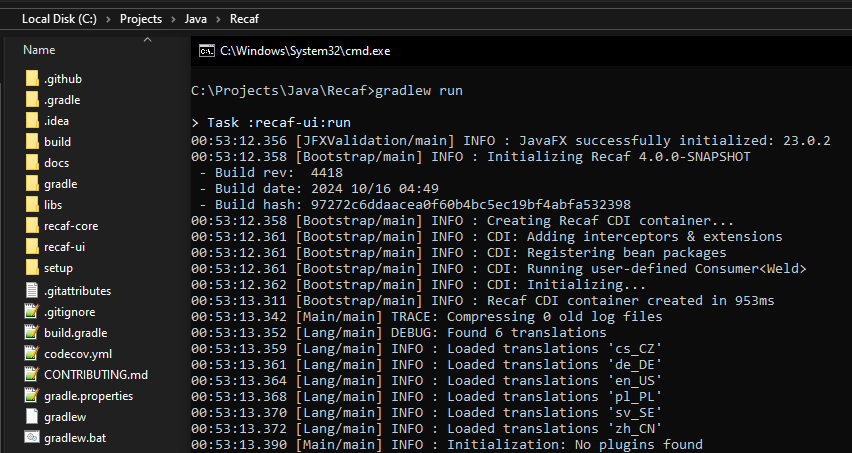
Windows terminal using the "gradlew run" command to run Recaf.
Use gradlew run. This will build Recaf if you haven't already done so, then launch the UI.
Directly from IntelliJ
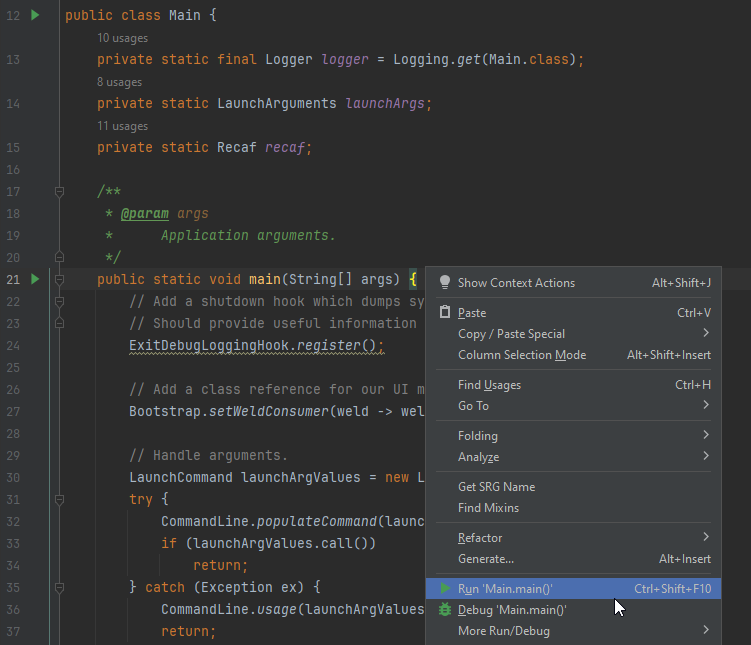
Context menu showing the 'run' option in the Recaf main class.
Create an application run configuration with either:
software.coley.recaf.UIMain(Inrecaf-uimodule)software.coley.recaf.Main(Inrecaf-coremodule, you will need to change the config module fromrecaf-coretorecaf-ui)
You can do this simply by opening that class in IntelliJ, right clicking to open a context menu anywhere in the code, and selecting the "Run" option with the green ▶️ icon.
Using Recaf as a command-line application
Recaf offers a number of command-line arguments (outlined in LaunchCommand). The main intended use for these is automation of tasks and loading input at startup.
| Argument | Description | Example |
|---|---|---|
-i or --input | Input to load into a workspace on startup. | -i game.jar |
-s or --script | Script to run on startup. | -s LoadContent.java |
-h or --headless | Flag to skip over initializing the UI. Should be paired with -i or -s. | -h -s GenerateReport.java |
When using --input the target file is any file that you want to open in Recaf (The same way you would do so via the file menu, or by drag-and-drop).
When using --script the target file is a Recaf script file.
- If you use
--inputwith--scriptthen the script will be run after the workspace is loaded from the given input.
When using --headless it is assumed you are either going to:
- Use
--scriptto automate some task without needing to launch any user interface. - Use
--idleto keep Recaf running idle in the background, generally only useful if you have a plugin that allows remote interfacing like a MCP server.
Important libraries
A brief overview of the major dependencies Recaf uses in each module.
Core
JVM Bytecode Manipulation: Recaf uses ASM and CafeDude to parse bytecode. Most operations will be based on ASM since heavily abstracts away the class file format, making what would otherwise be tedious work simple. CafeDude is used for lower level operations and patching classes that are not compliant with ASM.
Android to Java Conversion: Recaf uses dex-translator to map the Dalvik bytecode of classes into JVM bytecode. This process is a bit lossy, but allows the use of JVM tooling (like the different decompilers) on Android content.
Android Dalvik Bytecode Manipulation: We are currently investigating on how to handle Dalvik manipulation.
ZIP Files: Recaf uses LL-Java-Zip to read ZIP files. The behavior of LL-Java-Zip is configurable and can mirror interpreting archives in different ways. This is important for Java reverse engineering since the JVM itself has some odd parsing quirks that most other libraries do not mirror. More information about this can be read on the LL-Java-Zip project page.
Source Parsing: Recaf uses SourceSolver to parse Java source code. The reasons for using our own solution over other more mainstream parsing libraries are that:
- The AST model is error resilient. This is important since code Recaf is decompiling may not always yield perfectly correct Java code, especially with more intense forms of obfuscation. The ability to ignore invalid sections of the source while maintaining the ability to interact with recognizable portions is very valuable.
- The AST model parses very fast and context resolution is equally as fast. We do not want to use solutions that create noticeable lag in Recaf's user interface.
- We own the project, so we can fix bugs and create new releases whenever we want. Other parser projects vary in the rate of their release cycles.
CDI: Recaf uses Weld as its CDI implementation. You can read the CDI article for more information.
UI
JavaFX: Recaf uses JavaFX as its UI framework. The observable property model it uses makes managing live updates to UI components when backing data is changed easy. Additionally, it is styled via CSS which makes customizing the UI for Recaf-specific operations much more simple as opposed to something like Swing.
AtlantaFX: Recaf uses AtlantaFX to handle common theming.
Ikonli: Recaf uses Ikonli for scalable icons. Specifically the Carbon pack.
Docking: Recaf uses BentoFX for handling dockable containers/tabs across all open windows.
CDI
Recaf as an application is a CDI container. This facilitates dependency injection throughout the application.
Context before jumping into CDI
If you are unfamiliar with dependency injection (DI) and DI frameworks, watch this video. Its a great explainer of "why?" you would want to use DI by going over an example project. There is no mention of specific frameworks as its mainly going over the concepts behind DI.
What is CDI though?
CDI is Contexts and Dependency Injection for Java EE. If that sounds confusing here's what that actually means in practice. When a class implements one of Recaf's service interfaces we need a way to access that implementation so that the feature can be used. CDI uses annotations to determine when to allocate new instances of these implementations. We only use two in Recaf:
@ApplicationScoped: This implementation is lazily allocated once and used for the entire duration of the application.@Dependent: This implementation is not cached, so a new instance is provided every time upon request. You can think of it as being "scopeless".
When creating a class in Recaf, you can supply these implementations in a constructor that takes in parameters for all the needed types, and is annotated with @Inject. This means you will not be using the constructor yourself. You will let CDI allocate it for you. Your new class can then also be used the same way via @Inject annotated constructors.
What does CDI look like in Recaf?
Let's assume a simple case. We'll create an interface outlining some behavior, like compiling some code. We will create a single implementation class and mark it as @ApplicationScoped.
interface Compiler {
    byte[] build(String src);
}

@ApplicationScoped
class CompilerImpl implements Compiler {
    @Override
    Sbyte[] build(String src) { ... }
}
Then in our UI we can create a class that injects the base Compiler type. We do not need to know any implementation details. Because we have only one implementation the CDI container knows the grab an instance of CompilerImpl and pass it along to our constructor annotated with @Inject.
@Dependent
class CompilerGui {
    TextArea textEditor = ...

    // There is only one implementation of 'Compiler' which is 'CompilerImpl'
    @Inject CompilerGui(Compiler compiler) { this.compiler = compiler; }

    // called when user wants to save (CTRL + S)
    void onSaveRequest() {
        byte[] code = compiler.build(textEditor.getText());
    }
}
In this example, can I inject
Compilerinto multiple places?
Yes. Because the implementation CompilerImpl is ApplicationScoped the same instance will be used wherever you inject it into. Do recall, ApplicationScoped essentially means the class is a singleton.
What happens if there are multiple implemetations of
Compiler?
If you use @Inject CompilerGui(Compiler compiler) with more than one available Compiler implementation, the injection will throw an exception. You need to qualify which one you want to use. While CDI comes with the ability to use annotations to differentiate between implementations, it is best to create a new sub-class/interface for each implementation and then use those in your @Inject constructor.
What if I want to inject or rquest a value later and not immediately in the constructor?
CDI comes with the type Instance<T> which serves this purpose. It implements Supplier<T> which allows you do to T value = instance.get(). In Recaf because we only ever use @ApplicationScoped and @Dependent this is really only useful for things marked as @Dependant.
@Dependent
class Foo {
	// ...
}

@ApplicationScoped
class FooManager {
    private final Instance<Foo> fooProvider;

    @Inject
    FooManager(Instance<Foo> fooProvider) {
        // We do not request the creation of Foo yet.
        this.fooProvider = fooProvider;
    }

    @Nonnull
    T createFoo() {
        // Now we request the creation of Foo.
        // Since 'Foo' in this example is dependent, each returned value is a new instance.
        return fooProvider.get();
    }
}
What if I want multiple implementations? Can I get all of them at once?
Recaf has multiple decompiler implementations built in. Lets look at a simplified version of how that works. Instead of declaring a parameter of Decompiler which takes one value, we use Instance<Decompiler> which can be used both a producer of a single value and as an Iterable<T> allowing us to loop over all known implementations of the Decompiler interface.
@ApplicationScoped
class DecompileManager {
    @Inject DecompileManager(Instance<Decompiler> implementations) {
        for (Decompiler implementation : implementations)
            registerDecompiler(implementation);
    }
}
From here, we can define methods in DecompileManager to manage which decompile we want to use. Then in the UI, we @Inject this DecompileManager and use that to interact with Decompiler instances rather than directly doing so.
Can I mix what scopes I inject into a constructor?
I'd just like to point out, what you can and should do is not always a perfect match. As a general rule of thumb, what you inject as a parameter should be wider in scope than what the current class is defined as. Here's a table for reference.
| I have a... | I want to inject a... | Should I do that? |
|---|---|---|
ApplicationScoped class | ApplicationScoped parameter | ✔️ Yes |
ApplicationScoped class | Dependent parameter | ⚠️ Only if you understand that the value won't be shared if you inject the type somewhere else as well. Each injection location will be given a different value. |
Dependent class | ApplicationScoped parameter | ✔️ Yes |
Dependent class | Dependent parameter | ✔️ Yes |
This table is for directly injecting types. If you have a Dependent type you can do Instance<Foo> like in the example above.
What if I need a value dynamically, and getting values from the constructor isn't good enough?
Firstly, reconsider if you're designing things effectively if this is a problem for you. Recall that you can use Instance<T> to essentially inject a producer of T. In situations where providing values to constructors is not feasible, the Recaf class provides methods for accessing CDI managed types.
Instance<T> instance(Class<T>): Gives you aSupplier<T>/Iterable<T>for the requested typeT. You can useSupplier.get()to grab a single instance ofT, or useIterable.iterator()to iterate over multiple instances ofTif more than one implementation exists.T get(Class<T>): Gives you a single instance of the requested typeT.- Some produced values are meant to be kept around forever, like when we use it to register decompilers or other feature implementations. However, there are some cases where produced values are temporary. For these cases make sure to call
instance.destory(...)on the produced value when it is no longer in use. CDI will keep a reference to anything it deems in scope. This is especially noticeable if the in produced instance is produced within an application-scope and holds references to large objects (Like a largebyte[]). Destroying the produced values prevents memory leaks.
How do I know which scope to use when making new services?
Services that are effectively singletons will be @ApplicationScoped.
Components acting only as views and wrappers to other components can mirror their dependencies' scope, or use @Dependent since its not the view that really matters, but the data backing it.
Launching Recaf
When Recaf is launched, the Bootstrap class is used to initialize an instance of Recaf. The Bootstrap class creates a CDI container that is configured to automatically discover implementations of the services outlined in the api module. Once this process is completed, the newly made CDI container is wrapped in a Recaf instance which lasts for the duration of the application.
Why are so many UI classes @Dependent scoped?
There are multiple reasons.
1. On principle, they should not model/track data by themselves
For things like interactive controls that the user sees, they should not ever track data by themselves. If a control cannot be tossed in the garbage without adverse side effects, it is poorly designed. These controls provide visual access to the data within the Recaf instance (Like workspace contents), nothing more.
This is briefly mentioned before when discussing "how do I know which scope to use?".
2. CDI cannot create proxies of classes with final methods, which UI classes often define
UI classes like JavaFX's Menu often have methods marked as final to prevent extensions to override certain behavior. The Menu class's List<T> getItems() is one of these methods. This prevents any Menu type being marked as a scope like @ApplicationScoped since our CDI implementation heavily relies on proxies for scope management. When a class is @Dependent that means it effectively has no scope, so there is no need to wrap it in a proxy.
When are components created?
CDI instantiates components when they are first used. If you declare an @ApplicationScoped component, but it is never used anywhere, it will never be initialized.
If you want or need something to be initialized immediately when Recaf launches add the extra annotation @EagerInitialization. Any component that has this will be initialized at the moment defined by the value() in EagerInitialization. This annotation can only be used in conjunction with @ApplicationScoped.
There are two options:
IMMEDIATE: The component is initialized as soon as possible.AFTER_UI_INIT: The component is initialized after the UI platform is initialized.
Be aware that any component annotated with this annotation forces all of its dependency components to also be initialized eagerly.
Why do we not have a scope for workspace-associated things?
We used to, but the main issue is that the features they provided could only be used by other @WorkspaceScoped or @Dependent components. That makes sense at first, but there are larger design implications that you should consider. What if you have a component that must be @ApplicationScoped and you need to use a feature that is locked behind a @WorkspaceScoped component? You would need to create an Instance<T> of that service then do instance.get() when you observe a workspace being opened. That pattern is rather ugly and requires more CDI knowledge than is necessary for basic plugin development. Without the existence of @WorkspaceScoped plugins can safely inject anything listed in the service lists without thinking about the inner workings of CDI at all.
Modules
Core
This recaf-core module is where all features and data-models are defined.
UI
The recaf-ui module is where the JavaFX UI integration with the recaf-core module is implemented.
The workspace
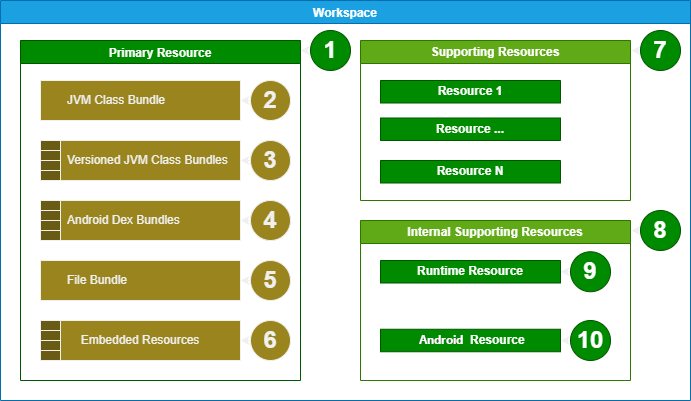
A visual layout of the workspace model
Legend
- The primary resource is the input that is targeted for editing. If you drag and drop a single JAR file into Recaf, then this will represent that JAR file. The representation is broken down into pieces...
- The JVM class bundle contains all the
.classfiles in the input that are not treated specially by the JVM. - JAR files allow you to have multiple versions of the same class for different JVM versions via "Multi-release JAR". This is a map of JVM version numbers to bundles of classes associated with that specific version.
- Android's APK files may contain multiple containers of classes known as DEX files. This is a mapping of each DEX file to the classes contained within it.
- The file bundle contains all other regular files that are not ZIP archives.
- ZIP archives are represented as embedded resources, allowing a ZIP in a ZIP, or JAR in a JAR, to be navigable within Recaf.
- Workspaces can have multiple inputs. These additional inputs can be used to enhance performance of some services such as inheritance graphing, recompilation, and SSVM virtualization just to name a few. These supporting resources are not intended to be editable and are just there to "support" services as described before.
- Recaf adds a few of its own supporting resources, but manages them separately from the supporting resources list.
- The runtime resource allows Recaf to access classes in the current JVM process like
java.lang.String. - The android resource allows Recaf to access classes in the Android runtime. It is automatically loaded when a resource with DEX files is detected.
Creating workspaces
To create a Workspace instance you will almost always be using the BasicWorkspace implementation. You can pass along either:
- A single
WorkspaceResourcefor the primary resource. - A single
WorkspaceResourcefor the primary resource, plusCollection<WorkspaceResource>for the supporting resources.
To create a WorkspaceResource you can use the ResourceImporter service, which allows you to read content from a variety of inputs.
Loading workspaces
There are multiple ways to load workspaces internally. Depending on your intent you'll want to do it differently.
For loading from Path values in a UI context, use PathLoadingManager. It will handle loading the content from the path in a background thread, and gives you a simple consumer type to handle IO problems.
Otherwise, you can use WorkspaceManager directly to call setCurrent(Workspace).
Exporting workspaces
You can create an instance of WorkspaceExportOptions and configure them to suite your needs. The options allow you to change:
- The compression scheme of contents.
MATCH_ORIGINALwhich will only compress items if they were originally compressed when read.SMARTwhich will only compress items if compression yields a smaller output than a non-compressed item. Very small files may become larger with compression due to the overhead of the compression scheme's dictionary.ALWAYSwhich always compresses items.NEVERwhich never compresses items.
- The output type, being a file or directory.
- The path to write to.
- The option to bundle contents of supporting resources into the exported output.
- The option to create ZIP file directory entries, if the output type is
FILE. This creates empty entries in the output of ZIP/JAR files detailing directory paths. Some tools may use this data, but its not required for most circumstances.
The configured options instance can be re-used to export contents with the same configuration multiple times. To export a workspace do options.create() to create a WorkspaceExporter which then allows you to pass a Workspace instance.
Listeners
The WorkspaceManager allows you to register listeners for multiple workspace events.
WorkspaceOpenListener: When a new workspace is opened within the manager.WorkspaceCloseListener: When a prior workspace is closed within the manager.WorkspaceModificationListener: When the active workspace's model is changed (Supporting resource added/removed)
Accessing classes/files in the workspace
Classes and files reside within the WorkspaceResource items in a Workspace. You can access the resources directly like so:
// Content the user intends to edit
WorkspaceResource resource = workspace.getPrimaryResource();

// Content to support editing, but is not editable
List<WorkspaceResource> resources = workspace.getSupportingResources();

// All content in the workspace, which may include internally managed
// supporting resources if desired. Typically 'false'.
List<WorkspaceResource> resources = workspace.getAllResources(includeInternal);
As described in the workspace model above, resources have multiple "bundles" that contain content. The groups exist to facilitate modeling a variety of potential input types that Recaf supports. Bundles that represent classes share a common type ClassBundle and then are broken down further into JvmClassBundle and AndroidClassBundle where relevant. Bundles that represent files are only ever FileBundle.
// Contains JVM classes
JvmClassBundle bundle = resource.getJvmClassBundle();

// Contains JVM classes, grouped by the version of Java targeted by each class
NavigableMap<Integer, VersionedJvmClassBundle> bundles = resource.getVersionedJvmClassBundles();

// Contains Android classes, grouped by the name of each DEX file
Map<String, AndroidClassBundle> bundles = resource.getAndroidClassBundles();

// Contains files
FileBundle bundle = resource.getFileBundle();

// Contains files that represent archives, with a model of the archive contents
Map<String, WorkspaceFileResource> embeddedResources = resource.getEmbeddedResources();
These bundles are Map<String, T> and Iterable<T> where T is the content type.
JvmClassBundle classBundle = resource.getJvmClassBundle();
FileBundle fileBundle = resource.getFileBundle();

// Get JVM class by name (remember to null check)
JvmClassInfo exampleClass = classBundle.get("com/example/Example");

// Looping over bundles
for (JvmClassInfo classInfo : classBundle)
    ...
for (FileInfo fileInfo : fileBundle)
    ...

// There are also stream operations to easily iterate over multiple bundles at once.
resource.classBundleStream()
         .flatMap(Bundle::stream)
         .forEach(classInfo -> {
             // All classes in all bundles that hold 'ClassInfo' values
             // including JvmClassBundle and AndroidClassBundle instances
         });
Workspace PathNodes
There are a lot of portions of Recaf that need to have some way to point to classes and files in the workspace. However, providing just the name of the class or file could be ambiguous if different bundles in the workspace contain entries of the same name. To address this Recaf has a PathNode type (with many child types) outlining locations in a Workspace with increasing granularity. For instance, a PathNode to a ClassInfo will specify which Bundle contains that class.
Here is a tree model of the current PathNode types.
WorkspacePathNodeResourcePathNodeBundlePathNodeDirectoryPathNodeClassPathNodeClassMemberPathNodeAnnotationPathNodeLocalVariablePathNodeJvmInstructionPathNode/AndroidInstructionPathNodeThrowsPathNodeCatchPathNode
InnerClassPathNodeAnnotationPathNode
AnnotationPathNode
FilePathNodeLineNumberPathNode
Finding specific classes/files in the workspace
The Workspace interface defines some find operations allowing for simple name look-ups of classes and files.
| Method | Usage |
|---|---|
ResourcePathNode findResource(WorkspaceResource resource) | Finds the path to the given Resource in the workspace. Mainly useful for getting a PathNode to embedded resources without having to do the traversal yourself to construct the path. |
ClassPathNode findClass(String internalName) | Finds the first available ClassInfo by the given name, and wraps it in a ClassPathNode. |
ClassPathNode findJvmClass(String internalName) | Finds the first available JvmClassInfo by the given name, and wraps it in a ClassPathNode. |
ClassPathNode findLatestVersionedJvmClass(String internalName) | Finds the most up-to-date JvmClassInfo from all available versioned bundles, wrapping it in a ClassPathNode. |
ClassPathNode findVersionedJvmClass(String internalName, int version) | Finds the first available JvmClassInfo matching the given version (Floored to next available older version), and wraps it in a ClassPathNode |
ClassPathNode findAndroidClass(String internalName) | Finds the first available AndroidClassInfo by the given name, and wraps it in a ClassPathNode. |
DirectoryPathNode findPackage(String name) | Finds the first available ClassInfo defined in the given package, or any sub-package, then wraps the path in a DirectoryPathNode. |
SortedSet<ClassPathNode> findClasses(Predicate<ClassInfo> filter) | Collects all ClassInfo values in the workspace that match the given predicate, and wraps each in a ClassPathNode. The returned set ordering for paths is alphabetic order. |
SortedSet<ClassPathNode> findJvmClasses(Predicate<JvmClassInfo> filter) | Collects all JvmClassInfo values in the workspace that match the given predicate, and wraps each in a ClassPathNode. The returned set ordering for paths is alphabetic order. |
SortedSet<ClassPathNode> findAndroidClasses(Predicate<AndroidClassInfo> filter) | Collects all AndroidClassInfo values in the workspace that match the given predicate, and wraps each in a ClassPathNode. The returned set ordering for paths is alphabetic order. |
FilePathNode findFile(String filePath) | Finds any available FileInfo by the given name, and wraps it in a FilePathNode. |
SortedSet<FilePathNode> findFiles(Predicate<FileInfo> filter) | Collects all FileInfo values in the workspace that match the given predicate, and wraps each in a FilePathNode. The returned set ordering for paths is alphabetic order. |
Plugins & Scripts
- Plugins - Plugins are containers which can integrate with any of Recaf's services, can be loaded/unloaded, and are started when Recaf opens by default.
- Scripts - Scripts are small one-shot actions that can be as simple or complex as you want, so long as it all fits in a single Java source file. They're basically small plugins that are only run when the user requests them to.
- Setup for making plugins & scripts - Resources and information on how to make plugins and scripts
Plugins
What is a plugin?
A plugin is a JAR file that contains one or more classes with exactly one of them implementing software.coley.recaf.plugin.Plugin. When Recaf launches it looks in the plugins directory for JAR files that contain these plugin classes. It will then attempt to load and initialize them. Because a plugin is distributed as a JAR file a plugin developer can create complex logic and organize it easily across multiple classes in the JAR.
Using services
Plugins can use services by annotating the class with @Dependent and annotating the constructor with @Inject. Here is an example:
import jakarta.enterprise.context.Dependent;
import jakarta.inject.Inject;
import software.coley.recaf.plugin.*;
import software.coley.recaf.services.workspace.WorkspaceManager;

// Dependent is a CDI annotation which loosely translates to being un-scoped.
// Plugin instances are managed by Recaf so the scope is bound to when plugins are loaded in practice.
@Dependent
@PluginInformation(id = "##ID##", version = "##VERSION##", name = "##NAME##", description = "##DESC##")
class MyPlugin implements Plugin {
    private final WorkspaceManager workspaceManager;

    // Example, injecting the 'WorkspaceManager' service
    @Inject
    public MyPlugin(WorkspaceManager workspaceManager) {
        this.workspaceManager = workspaceManager;
    }

    @Override
    public void onEnable() { ... }

    @Override
    public void onDisable() { ... }
}
For the list of available services, see the service lists.
CDI within Plugins
Plugins are capable of injecting Recaf's services in the plugin's constructor. Plugins themselves are only capable of being @Dependent scoped and cannot declare any injectable components themselves. For instance, if you want to create a new JvmDecompiler implementation that pulls in another Recaf service, you need to inject that service into the plugin's constructor and pass it to the JvmDecompiler implementation manually.
The reason for this is that once the CDI container is initialized at startup it cannot be modified. We can inject new classes with services already in the container, but nothing new can be added at runtime.
Plugins and JavaFX
Plugins are loaded before JavaFX initializes. If your plugin has code that works with JavaFX classes or modifies Recaf's UI then you need to wrap that code in a FxThreadUtil.run(() -> { ... }) call.
You can still inject most UI services directly like MainMenuProvider, but when calling its methods you have to be careful. There may be some services or injectable components that are a bit more finicky and will require Instance<ThingIWantToInject> instead to work around this, where you call instance.get() inside the FxThreadUtil.run(() -> { ... }) call to get the instance when JavaFX has been initialized.
Scripts
What is a script?
A script is a single Java source file that is executed by users whenever they choose. They can be written as a full class to support similar capabilities to plugins such as service injection, or in a short-hand that offers automatic imports of most common utility classes, but no access to services.
Full class script
A full class script is just a regular class that defines a non-static void run(). The run() method is called whenever the user executes the script.
// ==Metadata==
// @name Hello world
// @description Prints hello world
// @version 1.0.0
// @author Author
// ==/Metadata==

class MyScript {
    // must define 'void run()'
    void run() {
        System.out.println("hello");
    }
}
You can access any of Recaf's services by declaring a constructor annotated with @Inject. More information on this is located further down the page.
Shorthand script
A shorthand script lets you write your logic without needing to declare a class and run() method. These shorthand scripts are given a variable reference to the current workspace, and a SLF4J logger. You can access the current workspace as workspace and the logger as log.
// ==Metadata==
// @name What is open?
// @description Prints what kinda workspace is open
// @version 1.0.0
// @author Author
// ==/Metadata==

String name = "(empty)";
if (workspace != null)
    name = workspace.getClass().getSimpleName();
log.info("Workspace = {}", name);
Another example working with the provided workspace:
// Print out all enum names in the current workspace, if one is open.
if (workspace == null) return;
workspace.findClasses(Accessed::hasEnumModifier).stream()
    .map(c -> c.getValue().getName())
    .forEach(name -> log.info("Enum: {}", name));
Using services
Scripts in the simple form do not use services. Scripts using the full class form will be able to use services.
// ==Metadata==
// @name Content loader
// @description Script to load content from a pre-set path.
// @version 1.0.0
// @author Col-E
// ==/Metadata==

import jakarta.enterprise.context.Dependent;
import jakarta.inject.Inject;
import org.slf4j.Logger;
import software.coley.recaf.analytics.logging.Logging;
import software.coley.recaf.info.JvmClassInfo;
import software.coley.recaf.services.workspace.WorkspaceManager;
import software.coley.recaf.services.workspace.io.ResourceImporter;
import software.coley.recaf.workspace.model.BasicWorkspace;
import software.coley.recaf.workspace.model.Workspace;
import software.coley.recaf.workspace.model.resource.WorkspaceResource;
import java.nio.file.Paths;

@Dependent
public class LoadContentScript {
    private static final Logger logger = Logging.get("load-script");
    private final ResourceImporter importer;
    private final WorkspaceManager workspaceManager;

    // We're injecting the importer to load 'WorkspaceResource' instances from paths on our system
    // then we use the workspace manager to set the current workspace to the loaded content.
    @Inject
    public LoadContentScript(ResourceImporter importer, WorkspaceManager workspaceManager) {
        this.importer = importer;
        this.workspaceManager = workspaceManager;
    }

    // Scripts following the class model must define a 'void run()'
    public void run() {
        String path = "C:/Samples/Test.jar";
        try {
            // Load resource from path, wrap it in a basic workspace
            WorkspaceResource resource = importer.importResource(Paths.get(path));
            Workspace workspace = new BasicWorkspace(resource);

            // Assign the workspace so the UI displays its content
            workspaceManager.setCurrent(workspace);
        } catch (Exception ex) {
            logger.error("Failed to read content from '{}' - {}", path, ex.getMessage());
        }
    }
}
For the list of available services, see the service lists.
Setup for making plugins & scripts
For plugins
When writing plugins you need a development environment to compile against Recaf's API. You can find a template project for creating plugins on GitHub at Recaf-Plugins/Recaf-4x-plugin-workspace. Information on setting up the project can be found in the readme. The plugin workspace also is set up to provide an easy way to quickly run Recaf with your plugin without having to manually build and copy the resulting jar to the Recaf plugins directory via gradlew runRecaf.
For scripts
When writing scripts it is strongly recommended to create them in a development environment with Recaf on the classpath (in source or binary form). Technically speaking you could make a script with just a simple text editor, but when you write Java its really ideal if you do so in an IDE like IntelliJ. You can use the same plugin workspace template project to create scripts. Instead of building a plugin, just copy the source of your script to Recaf's plugin folder when you're done. Alternatively, you can follow the same idea but instead of using the plugin workspace project you can use the actual Recaf project.
Services
As Recaf is driven by CDI, almost all of its features are defined as @Inject-able service classes.
API
These are the services defined in the core module.
- AggregateMappingManager
- AndroidAnalysisService
- AntiReversalAnalysisService
- AreaAnalysisService
- AssemblerPipelineManager
- AstService
- AttachManager
- CallGraphService
- CommentManager
- ConfigManager
- DecompileManager
- EntryAnalysisService
- FileMetadataAnalysisService
- GsonProvider
- InfoImporter
- InheritanceGraphService
- JavacCompiler
- MappingApplierService
- MappingFormatManager
- MappingGenerator
- MappingListeners
- NameGeneratorProviders
- PatchApplier
- PatchProvider
- PhantomGenerator
- PluginManager
- ResourceImporter
- ScriptEngine
- ScriptManager
- SearchService
- SimilarityMappingService
- SimilaritySearchService
- SnippetManager
- TransformationApplierService
- TransformationManager
- WorkspaceManager
- WorkspaceProcessingService
UI
The ui module defines a number of new service types dedicated to UI behavior.
- Actions
- CellConfigurationService (Wraps these services)
- ConfigComponentManager
- ConfigIconManager
- DockingManager
- FileTypeSyntaxAssociationService
- NavigationManager
- PathExportingManager
- PathLoadingManager
- ResourceSummaryService
- WindowFactory
- WindowManager
- WindowStyling
AggregateMappingManager
The aggregate mapping manager maintains an AggregatedMappings instance (which extends IntermediateMappings) representing the sum of all mapping operations applied to the current workspace.
Getting the aggregate mappings
To do feature A you do XYZ, here is a sample.
@Inject AggregateMappingManager aggManager;

// Get the mappings on-demand
// Will be 'null' if no workspace is open
AggregatedMappings mappings = aggManager.getAggregatedMappings();

// Register a listener to be notified of changes
aggManager.addAggregatedMappingsListener(mappings -> {
    // Called when any workspace mapping are applied
});
AstService
The AST service allows you to:
- Parse Java source code into an AST model
- Resolve what is at a given offset in the source code based on the AST model
- Transform Java source to apply name mappings
Parsing Java source
To parse Java source you need a Parser (See: SourceSolver).
// Create a new parser instance
Parser parser = astService.newParser();

// Or use the shared parser used by other Recaf services
parser = astService.getSharedJavaParser();
Once you have a parser, you can turn it into a CompilationUnitModel (The AST model) via astService.parseJava(parser, src) where src is a String containing your Java source code.
CompilationUnitModel model = astService.parseJava(parser, src)
Resolving content in Java sources
Once you have a CompilationUnitModel you'll create a ResolverAdapter which can be used later to determine what kind of content is at a given text offset.
// The single arguument 'newJavaResolver' will create a resolver using type information loaded from the current open workspace.
ResolverAdapter resolver = astService.newJavaResolver(model);

// Get the text offset of a method call in the original 'String src'
int target = src.indexOf("someMethodCall(");
AstResolveResult result = resolver.resolveThenAdapt(target);

// Skip if a result was not yielded.
if (result == null) return;

// You can operate on if the content at the given offset is a declaration in the source code, or a reference to another declaration.
// It operates in the same way that right clicking in Recaf does (this is the backend for that actually).
//  - "private int example" --> offset of "example" --> Declaration of the field "example"
//  - "src.isEmpty()" --------> offset of "isEmpty" --> Reference to the method "isEmpty"
if (result.isDeclaration()) {
    // ...
} else {
    // ...
}

// Regardless of whether the result is a declaration or reference, you can operate on the path to the declaration.
PathNode<?> path = result.path();
Transforming name mappings
Assuming you have the parsed CompilationUnitModel, a Mappings instance with some entries, and a Resolver instance (Satisfied by ResolverAdapter seen above) you can generate Java source code with name mapping applied. Generally you should be doing mappings on the bytecode, but this is an option.
Mappings mappings = // ... (load or generate mappings however you please)
String mappedSrc = astService.applyMappings(model, resolver, mappings);
AttachManager
The attach manager allows you to:
- Inspect what JVM processes are running on the current machine
- Get value of
System.getProperties() of the remote JVM - Get the name of the remote JVM's starting main class (Entry point)
- Get JMX bean information from the remote JVM
- Register listeners for when new JVM processes start
- Get value of
- Connect to these JVM processes and represent their content as a
WorkspaceRemote
Inspecting available JVMs
The Attach API lists available JVM's via VirtualMachine.list(). AttachManager builds on top of that, offering easier access to each available JVM's properties, starting main class, and JMX beans.
By default, Recaf does not scan the system for running JVM's unless the attach window is open. The refresh rate for scans is once per second. When a new JVM is found Recaf queries it for the information listed above and caches the results. These operations typically involve a bit of tedious error handling and managing the connection state to the remote JVM, but now all you need is just a single call to one of AttachManager's getters.
Example: Manual scans & printing discovered JVMs
// Register listener to print the number of new/old VM's on the system
//  - Each parameter is Set<VirtualMachineDescriptor>
attachManager.addPostScanListener((added, removed) -> {
    logger.info("Update: {} new instances, {} instances were closed",
        added.size(), removed.size());
});
// Scan for new JVMs every second
Executors.newScheduledThreadPool(1)
    .scheduleAtFixedRate(attachManager::scan, 0, 1, TimeUnit.SECONDS);
Example: Get information of a remote JVM
// The 'descriptor' is a VirtualMachineDescriptor, which we can listen for new values of
// by looking at the example above.
int pid = attachManager.getVirtualMachinePid(descriptor);
Properties remoteProperties = attachManager.getVirtualMachineProperties(descriptor);
String mainClass = attachManager.getVirtualMachineMainClass(descriptor);
Example: Access JMX bean information of a remote JVM
// Recaf has a wrapper type for the JMX connection which grants one-liner access to common beans.
JmxBeanServerConnection jmxConnection = attachManager.getJmxServerConnection(descriptor);

// Available beans
MBeanInfo beanClassLoading = jmxConnection.getClassloadingBeanInfo();
MBeanInfo beanCompilation = jmxConnection.getCompilationBeanInfo();
MBeanInfo beanOperatingSystem = jmxConnection.getOperatingSystemBeanInfo();
MBeanInfo beanRuntime = jmxConnection.getRuntimeBeanInfo();
MBeanInfo beanThread = jmxConnection.getThreadBeanInfo();
MBeanInfo beanOperatingSystem = jmxConnection.getOperatingSystemBeanInfo();
MBeanInfo beanOperatingSystem = jmxConnection.getOperatingSystemBeanInfo();

// Iterating over bean contents
MBeanAttributeInfo[] attributes = beanRuntime.getAttributes();
try {
    for (MBeanAttributeInfo attribute : attributes) {
        String name = attribute.getName();
        String description = attribute.getDescription();
        Object value = beanInfo.getAttributeValue(jmxConnection, attribute);
        logger.info("{} : {} == {}", name, description, value);
    }
} catch (Exception ex) {
    logger.error("Failed to retrieve attribute values", ex);
}
Connecting to remote JVMs
To interact with remote JVMs instrumentation capabilities Recaf initializes a small TCP server in the remote JVM using Instrumentation Server. The WorkspaceRemoteVmResource type wraps the client instance that interacts with this server. To connect to the remote server you need to call connect() on the created WorkspaceRemoteVmResource value.
// Once we create a remote resource, we call 'connect' to activate the remote server in the process.
// For 'WorkspaceRemoteVmResource' usage, see the section under the workspace model category.
WorkspaceRemoteVmResource vmResource = attachManager.createRemoteResource(descriptor);
vmResource.connect();

// Can set the current workspace to load the remote VM in the UI.
workspaceManager.setCurrent(new BasicWorkspace(vmResource));
CallGraphService
The CallGraphService allows you to create CallGraph instances, which model the flow of method calls through the workspace.
Getting a CallGraph instance
The CallGraph type can be created for any arbitrary Workspace. By default the graph will not populate until you call CallGraph#initialize. This service will always keep a shared copy of the call graph for the current workspace.
// You can make a new graph from any workspace.
CallGraph graph = callGraphService.newCallGraph(workspace);

// Remember to call the "initialize" method.
graph.initialize();

// For large workspaces you may want to delegate this to run async and wait on the graph to be ready (see below).
CompletableFuture.runAsync(graph::initialize);

// Or get the current (shared) graph for the current workspace if one is open in the workspace manager.
// It will auto-initialize in the background. You will want to wait for the graph to be ready before use (see below).
graph = callGraphService.getCurrentWorkspaceGraph(); // Can be 'null' if no workspace is open.
Graph readiness
The call graph is populated in the background when a workspace is loaded and is not immediately ready for use. Before you attempt to use graph operations check the value of the graph's ObservableBoolean isReady() method. You can register a listener on the ObservableBoolean to operate immediately once it is ready.
ObservableBoolean ready = graph.isReady();

// Use a listener to wait until the graph is ready for use
ready.addChangeListener((ob, old, current) -> {
	if (current) {
		// do things
	}
});

// Or use a sleep loop, or any other blocking mechanism
while (!ready.getValue()) {
	Thread.sleep(100);
}
Getting an entry point
The graph is has its vertices bundled by which class defines each method. So to get your entry-point vertex in the graph you need the ClassInfo reference of the class defining the method you want to look at.
// Given this example
class Foo {
    public static void main(String[] args) { System.out.println("hello"); }
}

// Get the class reference
ClassPathNode clsPath = workspace.findJvmClass("com/example/Foo");
if (clsPath == null) return;
ClassInfo cls = clsPath.getValue();

// Get the methods container for the class
ClassMethodsContainer containerMain = graph.getClassMethodsContainer(cls);

// Get the method in the container by name/descriptor
MethodVertex mainVertex = containerMain.getVertex("main", "([Ljava/lang/String;)V");
Navigating the graph
The MethodVertex has methods for:
- Giving current information about the method definition
MethodRef getMethod()- HoldsStringvalues outlining the declared method and its defining class. Always present.MethodMember getResolvedMethod()- Holds workspace references to the declared method, may benullif the declaring class type and/or method couldn't be found in the workspace.
- Getting methods that this definition calls to
Collection<MethodVertex> getCalls()
- Getting methods that call this definition
Collection<MethodVertex> getCallers()
Following the example from before, we should see that the only call from main is PrintStream.println(String).
for (MethodVertex call : mainVertex.getCalls()) { // Only one value
    MethodRef ref = call.getMethod();
    String owner = ref.owner(); // Will be 'java/io/PrintStream'
    String name = ref.name(); // Will be 'println'
    String desc = ref.desc(); // Will be '(Ljava/lang/String;)V'
}
Similarly if you looked up the vertex for PrintStream.println(String) and checked getCallers() you would find Foo.main(String[]).
CommentManager
The comment manager allows you to:
- Access all comments within a
WorkspaceviaWorkspaceComments- Look up comment information on a class, field or method via
PathNode - Iterate over commented classes as
ClassComments - Add, update, or remove comments utilizing
ClassComments
- Look up comment information on a class, field or method via
- Create listeners which are notified when:
- New comment containers (per class) are created
- Comments are updated
Comments are displayed in the UI by injecting them into the decompilation process. Before a class is sent to the decompiler, it is intercepted and unique annotations are inserted at commented locations. After the decompiler yields output the unique annotations are replaced with the comments they are associated with. The comments are stored in the Recaf directory, no modifications are made to the contents of the Workspace when adding/editing/removing comments.
Comments added to items in a workspace are stored externally from the workspace in the Recaf directory.
Getting the desired WorkspaceComments
Recaf can store comments across multiple Workspace instances. So how do you get the comments from the one you want?
Assuming Recaf has a Workspace already opened and you want the comments of the current workspace:
// Will be 'null' if no workspace is open in Recaf
WorkspaceComments workspaceComments = commentManager.getCurrentWorkspaceComments();
If you have a Workspace instance you want to get the comments of:
Workspace workspace = ... // Get or create a workspace here
WorkspaceComments workspaceComments = commentManager.getOrCreateWorkspaceComments(workspace);
Note: Comments in relationship to a
Workspaceare stored by a unique identifier associated with theWorkspace. The identifier is pulled from the workspace's primary resource.
WorkspaceResourceinstances loaded from file paths use the file path as the unique ID.WorkspaceResourceinstances loaded from directory paths use the directory path as the unique ID.WorkspaceResourceinstances loaded from a remove agent connection use the remote VM's identifier as the unique ID.
Getting an existing comment
For classes:
ClassPathNode classPath = workspace.findClass("com/example/Foo");

// Option 1: Lookup via generic PathNode
String comment = workspaceComments.getComment(classPath);

// Option 2: Lookup via ClassPathNode
String comment = workspaceComments.getClassComment(classPath);

// Option 3: Lookup the container of the class, then its comment
ClassComments classComments = workspaceComments.getClassComments(classPath);
if (classComments != null)
    String comment = classComments.getClassComment();
For fields and methods:
ClassPathNode classPath = workspace.findClass("com/example/Foo");
ClassMemberPathNode memberPath = preMappingPath.child("stringField", "Ljava/lang/String;");

// Option 1: Lookup via generic PathNode
String comment = workspaceComments.getComment(memberPath);

// Option 2: Lookup the container of the class, then its comment
ClassComments classComments = workspaceComments.getClassComments(classPath);
if (classComments != null) {
    String comment = classComments.getMethodComment(memberPath.getValue());
    // You can also pass strings for the name/descriptor
    String comment = getMethodComment("stringField", "Ljava/lang/String;");
}
Getting all existing comments
A ClassComments by itself does not expose a reference to the ClassPathNode it is associated with. The instances created by the comment manager during runtime do keep a reference though, so using instanceof DelegatingClassComments will allow you to get the associated ClassPathNode and in turn iterate over the class's fields and methods.
WorkspaceComments workspaceComments = commentManager.getCurrentWorkspaceComments();
for (ClassComments classComments : workspaceComments) {
    String classComment = classComments.getClassComment();
    // This subtype of class comment container records the associated class path.
    if (classComments instanceof DelegatingClassComments delegatingClassComments) {
        ClassPathNode classPath = delegatingClassComments.getPath();
        // We can iterate over the fields/methods held by the path's class
        ClassInfo classInfo = classPath.getValue();
        for (FieldMember field : classInfo.getFields()) {
            String fieldComment = classComments.getFieldComment(field);
        }
        for (MethodMember method : classInfo.getMethods()) {
            String fieldComment = classComments.getMethodComment(method);
        }
    }
}
Adding / editing / removing comments
Adding and modifying comments is done by set methods on a ClassComments instance. Comments can be removed by passing null as the comment parameter.
ClassPathNode classPath = workspace.findClass("com/example/Foo");
ClassComments classComments = workspaceComments.getOrCreateClassComments(classPath);

// Adding a comment to the class
classComments.setClassComment("class comment");

// Removing the comment
classComments.setClassComment(null);

// Adding a comment to a field in the class
classComments.setFieldComment("stringField", "Ljava/lang/String;", "Field comment");

// Adding a comment to a method in the class
classComments.setMethodComment("getStringField", "()Ljava/lang/String;", "Method comment");
Listening for new comments
If you want to track where comments are being made, you can register a CommentUpdateListener:
commentManager.addCommentListener(new CommentUpdateListener() {
    // Only implementing the class comment method, the same idea can
    // be applied to the field and method listener calls.
    @Override
    public void onClassCommentUpdated(@Nonnull ClassPathNode path, @Nullable String comment) {
        if (comment == null)
            logger.info("Comment removed on class '{}'", path.getValue().getName());
        else
            logger.info("Comment updated on class '{}'", path.getValue().getName());
    }
});
ConfigManager
The config manager allows you to:
- Iterate over all
ConfigContainerinstances across Recaf - Register and unregister your own
ConfigContainervalues- Useful for plugin developers who want to expose config values in the UI
- Register and unregister listeners which are notified when new
ConfigContainervalues are registered and unregistered. - Create, update, remove "profiles" to allow quickly changing all config values for different use cases
Iterating over registered containers
for (ConfigContainer container : configManager.getContainers())
   logger.info("Container group={}, id={}", container.getGroup(), container.getId());
Registering and unregistering new containers
To add content to the config window create a ConfigContainer instance with some ConfigValue values and register it in the config manager. The config window is configured to listen to new containers and add them to the UI.
// If you have your own class to represent config values,
//  you will probably want to extend from 'BasicConfigContainer' and add values
//  in the class's constructor via 'addValue(ConfigValue);'
//  You can reference most existing config classes for examples of this setup.
ConfigContainer container = ...
configManager.registerContainer(container);
configManager.unregisterContainer(container);
When creating a ConfigContainer class, it generally would be easiest to extend BasicConfigContainer and then use the addValue(ConfigValue) method.
public class MyThingConfig extends BasicConfigContainer {
    private final ObservableString value = new ObservableString(null);

    @Inject
    public MyConfig() {
        // Third party plugins should use 'EXTERNAL' as their group.
        // This special group is treated differently in the config window UI,
        // such that the ID's specified are text literals, and not translation keys.
        super(ConfigGroups.EXTERNAL, "My thing config");

        // Add values
        addValue(new BasicConfigValue<>("My value", String.class, value));
    }

    public ObservableString getValue() {
        return value;
    }
}
Internal services within Recaf define their configs as ApplicationScoped so that they are discoverable by the manager when the manager is initialized. This allows all services to feed their configs into the system when the application launches.
Listening for new containers
configManager.addManagedConfigListener(new ManagedConfigListener() {
    @Override
    public void onRegister(@Nonnull ConfigContainer container) {
        logger.info("Registered container: {} with {} values",
                container.getGroupAndId(), container.getValues().size());
    }
    @Override
    public void onUnregister(@Nonnull ConfigContainer container) {
        logger.info("Unregistered container: {} with {} values",
                container.getGroupAndId(), container.getValues().size());
    }
});
Working with profiles
// Profiles can be saved by passing a String (saved locally in the Recaf directory)
// or a Path (saved in any arbitrary location)
configManager.exportProfile("profile-name");
configManager.exportProfileTo(Paths.get("D:/external-profile.zip"));

// Same idea applies for importing profiles.
configManager.importProfile("profile-name");
configManager.importProfileFrom(Paths.get("D:/external-profile.zip"));

// Local profiles can be checked for & deleted by name.
if (configManager.hasProfile("profile-name"))
    configManager.deleteProfile("profile-name");

// The names of local profiles can also be iterated.
List<String> names = configManager.getProfileNames();
ContextMenuProviderService
The context menu provider service allows you to inject custom contents into context menus for content in the workspace such as classes, fields, methods, etc. This allows plugins to display whatever they want in the menus shown when a user right clicks on these contents within Recaf.
Registering custom context menu adapters
The service has a dozen addX and removeX methods for context menu adapters of various types (classes, fields, methods, etc). Most can be implemented as lambdas, though this does prevent you from later removing the adapter.
// Most adapters are single-method-interfaces and can be expressed as lambdas.
MethodContextMenuAdapter adapter = (menu, source, workspace, resource, bundle, declaringClass, method) -> {
   menu.getItems().add(new MenuItem("Custom item for: " + method.getName()));
};

// Add / remove the adapter
ctxMenuService.addMethodContextMenuAdapter(adapter);
ctxMenuService.removeMethodContextMenuAdapter(adapter);
Another example for classes, which are a bit more complex since they differentiate between JVM and Android classes.
// Classes are a bit special because they differentiate between JVM and Android classes.
// You can of course just pipe both into a method with more generic argument types (see below)
ClassContextMenuAdapter adapter = new ClassContextMenuAdapter() {
   @Override
   public void adaptJvmClassMenu(@Nonnull ContextMenu menu,
                                 @Nonnull ContextSource source,
                                 @Nonnull Workspace workspace,
                                 @Nonnull WorkspaceResource resource,
                                 @Nonnull JvmClassBundle bundle,
                                 @Nonnull JvmClassInfo info) {
      common(menu, source, workspace, resource, bundle, info);
   }
   @Override
   public void adaptAndroidClassMenu(@Nonnull ContextMenu menu,
                                     @Nonnull ContextSource source,
                                     @Nonnull Workspace workspace,
                                     @Nonnull WorkspaceResource resource,
                                     @Nonnull AndroidClassBundle bundle,
                                     @Nonnull AndroidClassInfo info) {
      common(menu, source, workspace, resource, bundle, info);
   }
   private void common(@Nonnull ContextMenu menu,
                       @Nonnull ContextSource source,
                       @Nonnull Workspace workspace,
                       @Nonnull WorkspaceResource resource,
                       @Nonnull ClassBundle<?> bundle,
                       @Nonnull ClassInfo info) {
      // More generic types, can do common logic between JVM and Android content here
   }
};

// Add / remove the adapter
ctxMenuService.addClassContextMenuAdapter(adapter);
ctxMenuService.removeClassContextMenuAdapter(adapter);
DecompilerManager
The decompile manager allows you to:
- Decompile a
JvmClassInfoorAndroidClassInfowith:- The current preferred JVM or Android decompiler
- A provided decompiler
- Register and unregister additional decompilers
- Pre-process classes before they are decompiled
- Post-process output from decompilers
Using the decompile calls in this manager will schedule the tasks in a shared thread-pool. Calling the decompile methods on the Decompiler instances directly is a blocking operation. If you want to decompile many items it would be best to take advantage of the manager due to the pool usage. Additionally, decompiling via the manager will facilitate the caching of decompilation results and globally specified filters.
Choosing a decompiler
There are a number of ways to grab a Decompiler instance. The operations are the same for JVM and Android implementations.
// Currently configured target decompiler
JvmDecompiler decompiler = decompilerManager.getTargetJvmDecompiler();

// Specific decompiler by name
JvmDecompiler decompiler = decompilerManager.getJvmDecompiler("cfr");

// Any decompiler matching some condition, falling back to the target decompiler
JvmDecompiler decompiler = decompilerManager.getJvmDecompilers().stream()
                .filter(d -> d.getName().equals("procyon"))
                .findFirst().orElse(decompilerManager.getTargetJvmDecompiler());
Decompiling a class
If you want to pass a specific decompiler, get an instance and pass it to the decompile functions provided by DecompilerManager:
decompile(Workspace, JvmClassInfo)- Uses the target decompiler (specified in the config)decompile(JvmDecompiler, Workspace, JvmClassInfo)- Uses the specified decompiler passed to the method
JvmDecompiler decompiler = ...;

// Handle result when it's done.
decompilerManager.decompile(decompiler, workspace, classToDecompile)
        .whenComplete((result, throwable) -> {
            // Throwable thrown when unhandled exception occurs.
        });

// Or, block until result is given, then handle it in the same thread.
// Though at this point, you should really just invoke the decompile method on the
// decompiler itself rather than incorrectly use the pooled methods provided by
// the decompile manager.
DecompileResult result = decompilerManager.decompile(decompiler, workspace, classToDecompile)
    .get(1, TimeUnit.SECONDS);
Pre-processing decompiler input
The decompiler manager allows you to register filters for inputs fed to decompilers. This allows you to modify the contents of classes in any arbitrary way prior to decompilation, without actually making a change to the class in the workspace.
Here is an example where we strip out all debug information (Generics, local variable names, etc):
JvmBytecodeFilter debugRemovingFilter = (workspace, classInfo, bytecode) -> {
    // The contents we return here will be what is fed to the decompiler, instead of the original class present in the workspace.
    ClassWriter writer = new ClassWriter(0);
    classInfo.getClassReader().accept(writer, ClassReader.SKIP_DEBUG);
    return writer.toByteArray();
};

// The filter can be added/removed to/from all decompilers by using the decompile manager.
decompilerManager.addJvmBytecodeFilter(debugRemovingFilter);
decompilerManager.removeJvmBytecodeFilter(debugRemovingFilter);

// If you want to only apply the filter to one decompiler, you can do that as well.
decompiler.addJvmBytecodeFilter(debugRemovingFilter);
decompiler.removeJvmBytecodeFilter(debugRemovingFilter);
Post-processing decompiler output
Similar to pre-processing, the output of decompilation can be filtered via the decompiler manager's filters. They operate on the String output of decompilers.
OutputTextFilter tabConversionFilter = (workspace, classInfo, code) -> {
    return code.replace("    ", "\t");
};

// Add/remove to/from all decompilers
decompilerManager.addOutputTextFilter(tabConversionFilter);
decompilerManager.removeOutputTextFilter(tabConversionFilter);

// Add/remove to/from a single decompiler
decompiler.addOutputTextFilter(tabConversionFilter);
decompiler.removeOutputTextFilter(tabConversionFilter);
DockingManager
The docking manager allows you to:
- Get the underlying
Bentoinstance - Get the root bento container that holds the docking container hierarchy
- Get the primary bento container that holds open
Navigablecontents (Where classes and other files get opened by default) - Easily create new
Dockableinstance
Getting Bento
Its just a getter. That being said, the Bento instance has a lot you can do with it. It has its own event bus (Which you can add listeners to), search API, and hooks for creating UI elements. See BentoFX for additional usage.
Bento bento = dockManager.getBento();
Getting root/primary containers
The root container is the container that houses all others in the initial Recaf window.
DockContainerRootBranch root = dockManager.getRoot();
The primary container is the container that houses Dockable items represening classes and files you open. Its the initial space they will open in when interacting with them.
DockContainerLeaf primary = dockManager.getPrimaryDockingContainer();
Creating dockables
Dockables are the bento model for open tabs. The docking manager provides a number of helper methods for creating common sorts of dockables.
GsonProvider
The Gson provider manages a shared Gson instance and allows services and plugins to register custom JSON serialization support. This serves multiple purposes:
- JSON formatting is shared across services that use it for serialization
- Services can register custom serialization for private types (See
KeybindingConfigfor an example of this) - Plugins that register custom config containers with
ConfigManagercan register support for their own custom types.
Registering custom serialization
The Gson provider offers methods that allows registering the following:
TypeAdapter- For handling serialization and deserialization of a type.InstanceCreator- For assisting construction of types that do not provide no-arg constructors.JsonSerializer- For specifying serialization support only.JsonDeserializer- For specifying deserialization support only.
For more details on how to use each of the given types, see the Gson JavaDocs.
TypeAdapter:
gsonProvider.addTypeAdapter(ExampleType.class, new TypeAdapter<>() {
    @Override
    public void write(JsonWriter out, ExampleType value) throws IOException {
        // Manual serialization of 'value'  goes here using 'out'
    }
    @Override
    public ExampleType read(JsonReader in) throws IOException {
        // Manual deserialization of the type from 'in' goes here
        return new ExampleType(...);
    }
});
InstanceCreator:
gsonProvider.addTypeInstanceCreator(ExampleType.class, type -> new ExampleType(...));
JsonSerializer:
gsonProvider.addTypeSerializer(ExampleType.class, (src, typeOfSrc, context) -> {
    // Manual serialization of 'T src' into a 'JsonElement' return value goes here
    return new JsonObject();
});
JsonDeserializer:
gsonProvider.addTypeDeserializer(ExampleType.class, (json, typeOfT, context) -> {
    // Manual deserialization of (JsonElement json) goes here
    return new ExampleType(...);
});
IconProviderService
The icon provider service allows you to get and override icons shown for workspace contents like classes, fields, methods, etc.
Getting icons
Icons are fetched lazily by IconProvider instances. Each workspace content type has its own provider you can get by passing in parameters to reconstruct a PathNode to the respective content. In the case of a bundle, that would be the Workspace, WorkspaceResource, and Bundle.
IconProvider provider = iconService.getBundleIconProvider(workspace, resource, bundle);
Replacing icons
To replace icons for different sorts of contents, use setXOverride in the service for any content type of X.
// Example overriding bundle icons
iconService.setBundleIconProviderOverride(new BundleIconProviderFactory() {
    @Override
    @Nonnull
    public IconProvider getBundleIconProvider(@Nonnull Workspace workspace,
                                              @Nonnull WorkspaceResource resource,
                                              @Nonnull Bundle<? extends Info> bundle) {
        // Icon providers lazily provide icons (As JavaFX 'Node' instances)
        // and are generally defined as lambdas like this.
        return () -> new FontIconView(CarbonIcons.SHOPPING_BAG, Color.LIME);
    }
});
InfoImporter
The info importer can import a Info from a ByteSource. Since Info defines isClass/asClass and isFile/asFile you can determine what sub-type the item is through those methods, or instanceof checks.
Examples
Reading a class file:
// Wrap input in ByteSource.
byte[] classBytes = Files.readAllBytes(Paths.get("HelloWorld.class"));
ByteSource source = ByteSources.wrap(classBytes);

// Parse into an info object.
Info read = importer.readInfo("HelloWorld", source);

// Cast to 'JvmClassInfo' with 'asX' methods
JvmClassInfo classInfo = read.asClass().asJvmClass();

// Or use instanceof
if (read instanceof JvmClassInfo classInfo) {
	// ...
}
Reading a generic file and doing an action based off the type of content it is (Like text/images/video/audio/etc):
// Wrap input in ByteSource.
byte[] textRaw = Files.readAllBytes(Paths.get("Unknown.dat"));
ByteSource source = ByteSources.wrap(textRaw);

// Parse into an info object.
Info read = importer.readInfo("Unknown.dat", source);

// Do action based on file type.
FileInfo readFile = read.asFile();
if (readFile.isTextFile()) {
	TextFileInfo textFile = readFile.asTextFile();
	String text = textFile.getText();
	// ...
} else if (readFile.isVideoFile()) {
	VideoFileInfo videoFile = readFile.asVideoFile();
	// ...
}
InheritanceGraphService
The InheritanceGraphService allows you to create InheritanceGraph instances, which model the parent/child relations between classes and interfaces in the workspace.
Getting an InheritanceGraph instance
The InheritanceGraph type can be created for any arbitrary Workspace. This service will always keep a shared copy of the inheritance graph for the current workspace.
// You can make a new graph from any workspace.
InheritanceGraph graph = inheritGraphService.newInheritanceGraph(workspace);

// Or get the current (shared) graph for the current workspace if one is open in the workspace manager.
graph = inheritGraphService.getCurrentWorkspaceGraph(); // Can be 'null' if no workspace is open.

// If you want the current workspace, but will settle for making a new graph if a current workspace
// is not open you can use the 'getOrCreate' variant. It will never return 'null' and usually
// give you the current workspace graph.
graph = inheritGraphService.getOrCreateInheritanceGraph(workspace);
Parents and children
We will use the following classes for the following examples:
interface Edible {}
interface Red {}
class Apple implements Edible, Red {}
class AppleWithWorm extends Apple {}
class Grape implements Edible {}
classDiagram

class Edible {
	<<interface>>
}
class Red {
	<<interface>>
}
class Apple {
	<<class>>
}
class AppleWithWorm {
	<<class>>
}
class Grape {
	<<class>>
}

Edible <|-- Grape
Edible <|-- Apple
Apple *-- AppleWithWorm
Red <|-- Apple
Accessing parent types
You can access direct parents with getParents() which returns a Set<InheritanceVertex>, or parents() which returns a Stream<InheritanceVertex>. Direct parents include the class's super-type and any interfaces implemented directly by the class. For example AppleWithWorm will implement Edible and Red but these are not direct parents since those are not declared on the class definition.
You can access all parents with getAllParents() which returns a Set<InheritanceVertex>, or allParents() which returns a Stream<InheritanceVertex>.
InheritanceVertex apple = graph.getVertex("Apple");
InheritanceVertex wormApple = graph.getVertex("AppleWithWorm");
InheritanceVertex red = graph.getVertex("Red");

// Get children as a set of graph vertices
//   The set 'appleParents' will have 2 elements: Edible, Red
//   The set 'wormAppleParents' will have 1 element: Apple
//   The set 'wormAppleAllParents' will have 3 element: Apple, Edible, Red
//   The set 'redParents' will be empty
Set<InheritanceVertex> appleParents = apple.getParents();
Set<InheritanceVertex> wormAppleParents = wormApple.getParents();
Set<InheritanceVertex> wormAppleAllParents = wormApple.getAllParents();
Set<InheritanceVertex> redParents = red.getParents();

// Alternative: Stream<InheritanceVertex>
wormApple.parents();
wormApple.allParents();
Accessing child types
You can access direct children with getChildren() which returns a Set<InheritanceVertex>, or children() which returns a Stream<InheritanceVertex>. Direct children are just the reverse order of direct parents as described above.
You can access all children with getAllChildren() which returns a Set<InheritanceVertex>, or allChildren() which returns a Stream<InheritanceVertex>.
InheritanceVertex apple = graph.getVertex("Apple");
InheritanceVertex wormApple = graph.getVertex("AppleWithWorm");
InheritanceVertex red = graph.getVertex("Red");

// Get children as a set of graph vertices
//   The set 'appleChildren' will have 1 element: AppleWithWorm
//   The set 'wormChildren' will be empty
//   The set 'redChildren' will have 1 element: Apple
//   The set 'redAllChildren' will have 2 elements: Apple, AppleWithWorm
Set<InheritanceVertex> appleChildren = apple.getChildren();
Set<InheritanceVertex> wormChildren = wormApple.getChildren();
Set<InheritanceVertex> redChildren = red.getChildren();
Set<InheritanceVertex> redAllChildren = red.getAllChildren();

// Alternative: Stream<InheritanceVertex>
apple.children();
apple.allChildren();
Accessing complete type hierarchy (parents and children)
You can access direct children & parents with getAllDirectVertices() which combines the results of getChildren() and getParents().
You can access all related vertices with getFamily(boolean includeObject) which will is an recursive calling of getAllDirectVerticies(). If you pass true it will include all types that are not edge-cases described below in the edge-case section. You will probably only ever pass false to getFamily(...).
// Direct will contain: Edible, Red, AppleWithWorm
Set<InheritanceVertex> appleDirects = apple.getAllDirectVertices();

// Family will contain: Edible, Red, AppleWithWorm, Apple (itself), Grape
//  - Grape will be included because of the shared parent Edible
Set<InheritanceVertex> appleFamily = apple.getFamily(false);
Edge case: Classes without super-types
All classes must define a super-type. Each time you define a new class it will implictly extend java/lang/Object unless it is an enum which then it will extend java/lang/Enum which extends java/lang/Object. There are only a few exceptions to these rules.
Module classes, denoted by their name module-info do not define super-types. Their super-type index in the class file points to index 0 which is an edge case treated as null in this situation.
The Object class also has no super-type, for obvious enough reasons.
The inheritance graph accommodates for these edge cases. It may be useful information for you to know regardless.
Edge case: Cyclic inheritance from obfuscators
Some obfuscators may create classes that are unused in the application logic, but exist solely to screw with analysis tools. Consider the following example:
class A extends B {}
class B extends A {}
classDiagram
A *-- B
B *-- A
This code will not compile, but there is nothing stopping an obfuscator from creating these classes. If an analysis tool naively tries to find all parents of A it will look at B then A again, then B and you have yourself an infinite loop.
The inheritance graph tracks what types in a hierarchy have already been visited and short-circuits hierarchy searches in paths where it finds cycles.
Getting the common type of two classes
You can get the common type of any two classes by passing their names to InheritanceGraph's getCommon(String a, String b) method.
// common will be 'Edible'
String common = graph.getCommon("Apple", "Grape");
classDiagram
class Edible {
	<<interface>>
}
class Apple {
	<<class>>
}
class Grape {
	<<class>>
}

note for Edible "Common parent of Apple and Grape"

Edible <|-- Apple
Edible <|-- Grape
Checking if a type is assignable from another
Java's java.lang.Class has an isAssignableFrom(Class) method which the inheritance graph mirrors.
// Will return true since both Apple/Grape implement Edible
graph.isAssignableFrom("Edible", "Apple");
graph.isAssignableFrom("Edible", "Grape");

// The inverse Will return false
graph.isAssignableFrom("Apple", "Edible");
graph.isAssignableFrom("Grape", "Edible");
JavacCompiler
The javac compiler is just a service wrapping the standard JDK javac API with some quality of life improvements. All the arguments for the compiler are created through the JavacArgumentsBuilder type.
Examples
The following samples can be used within this sample script:
@Dependent
public class CompilerScript {
    private final JavacCompiler javac;

    @Inject
    public CompilerScript(JavacCompiler javac) {
        this.javac = javac;
    }

    public void run() {
        // code goes here
    }
}
Compiling "Hello World"
The most common case, taking some source code and compiling it. You are required to specify the name of the class being compiled as an internal name (Example: com/example/Foo) and the source. Any extra arguments are optional.
// Compile a 'hello world' application
JavacArguments arguments = new JavacArgumentsBuilder()
        .withClassName("HelloWorld")
        .withClassSource("""
                public class HelloWorld {
                    public static void main(String[] args) {
                        System.out.println("Hello world");
                    }
                }""")
        .build();

// Run compiler and handle results
CompilerResult result = javac.compile(arguments, null, null);
if (result.wasSuccess()) {
    CompileMap compilations = result.getCompilations();
    compilations.forEach((name, bytecode) -> {
        // Do something with name/bytecode pair
    });
}
Handling compiler feedback/errors
Compiler feedback is accessible from the returned CompilerResult as List<CompilerDiagnostic> getDiagnostics().
result.getDiagnostics().forEach(diagnostic -> {
    if (diagnostic.level() != CompilerDiagnostic.Level.ERROR) return;
    System.err.println(diagnostic.line() + ":" + diagnostic.column() + " --> " + diagnostic.message());
});
Changing the compiled bytecode target version
Adapting the setup from before, you can change the target bytecode version via withVersionTarget(int). This takes the release version of Java you wish to target. This is equivalent to javac --release N where N i the version. Because this uses the JDK environment you ran Recaf with the supported versions here are tied to what javac supports.
// Compile a 'hello world' application against Java 11
int version = 11;
JavacArguments arguments = new JavacArgumentsBuilder()
        .withVersionTarget(version)
        .withClassName("HelloWorld")
        .withClassSource("""
                public class HelloWorld {
                    public static void main(String[] args) {
                        System.out.println("Hello world");
                    }
                }""")
        .build();
Downsampling the compiled bytecode instead of directly targeting it
Alternatively you may want to downsample compiled code instead of targeting that version from within the compiler. This allows you to use new language features while still targeting older versions of Java.
// Compile a 'hello world' application but downsample it to an older version
JavacArguments arguments = new JavacArgumentsBuilder()
        .withDownsampleTarget(8) // Downsample to Java 8
        .withClassName("HelloWorld")
        .withClassSource("""
                public class HelloWorld {
                    public static void main(String[] args) {
                        System.out.println(message());
                    }

                    private static String message() {
                        int r = new java.util.Random().nextInt(5);

                        // Using switch expressions, which do not exist in Java 8
                        return switch (r) {
                            case 0 -> "Zero";
                            case 1 -> "One";
                            case 2 -> "Two";
                            default -> "Three or more";
                        };
                 }
                }""")
        .build();
Compiling code with references to classes in the Workspace
All you need to do is call compile(JavacArguments arguments, Workspace workspace, JavacListener listener) with a non-null Workspace instance. This will automatically include it as a classpath entry, allowing you to compile code referencing types defined in the workspace.
There is also compile(JavacArguments arguments, Workspace workspace, List<WorkspaceResource> supplementaryResources, JavacListener listener) which allows you to supply extra classpath data without adding it to the workspace.
Compiling code with debug info enabled
You can enable compiling with debug information by specifying true to the debug with operations in the arguments builder.
JavacArguments arguments = new JavacArgumentsBuilder()
        .withDebugLineNumbers(true)
        .withDebugSourceName(true)
        .withDebugVariables(true)
Loading and executing the compiled code
The CompileMap you get out of the CompilerResult is an implementation of Map<String, byte[]>. You can thus use the compilation map directly in a utility like ClassDefiner. Using the hello world classes from the above examples:
CompileMap compilations = result.getCompilations();
ClassDefiner definer = new ClassDefiner(compilations);
try {
    Class<?> helloWorld = definer.findClass("HelloWorld");
    Method main = helloWorld.getDeclaredMethod("main", String[].class);
    main.invoke(null, (Object) new String[0]);
} catch (Exception ex) {
    ex.printStackTrace();
}
MappingApplierService
The mapping applier service takes in a Mappings instance and applies it to a Workspace, or a sub-set of specific classes in a Workspace.
Targeting mappings in a workspace
Mappings can be applied to any Workspace. You will either pass a workspace reference to the applier service, or use convenience method for an applier in the currently open workspace.
// Applier in an arbitrary workspace
Workspace workspace = ...
MappingApplier applier = mappingApplierService.inWorkspace(workspace);

// Applier in the current workspace (assuming one is open)
// If no workspace is open, this applier will be 'null'
MappingApplier applier = mappingApplierService.inCurrentWorkspace();
Mapping the whole workspace
To apply mappings to the workspace (affecting classes in the primary resource) pass any Mappings of your choice to applyToPrimaryResource(Mappings).
Mappings mappings = ...

// Create the results containing the mapped output
MappingResults results = applier.applyToPrimaryResource(mappings);
Mapping specific classes
To apply mappings to just a few specific classes, use applyToClasses(Mappings, WorkspaceResource, JvmClassBundle, Collection<JvmClassInfo>).
// Example inputs
Mappings mappings = ...
WorkspaceResource resource = ...
JvmClassBundle bundle = ... // A bundle in the resource
List<JvmClassInfo> classesToMap = ... // Classes in the bundle

// Create the results containing the mapped output
MappingResults results = applier.applyToClasses(mappings, resource, bundle, classesToMap);
Operating on the results
The MappingsResults you get from MappingsApplier contains a summary of:
- The mappings used
- The classes that will be affected
- The paths to classes in their existing state
- The paths to classes in their post-mapping state
To apply the results call apply().
// Optional: Inspect the results
// =============================
// Names of affected classes: pre-mapped name --> post-mapped name
//  - If the class was updated because it contains a mapped reference but was itself not mapped
//    then the key/value are equal
Map<String, String> mappedClasses = results.getMappedClasses();
// Map of pre-mapped names to paths into the workspace of the class
Map<String, ClassPathNode> preMappingPaths = results.getPreMappingPaths();
// Map of post-mapped names to paths into the workspace at the location they
// would appear at after applying the results.
Map<String, ClassPathNode> postMappingPaths = results.getPostMappingPaths();

// Apply the mapping results (updates the workspace)
results.apply();
MappingFormatManager
The mapping format manager tracks recognized mapping formats, allowing you to:
- Iterate over the names of formats supported
- Create instances of
MappingFileFormatbased on the supported format name- Used to parse mapping files into Recaf's
IntermediateMappingsmodel, which can be used in a variety of other mapping APIs.
- Used to parse mapping files into Recaf's
- Register new mapping file formats
Iterating over recognized formats
To find out the types of mapping files Recaf supports, invoke getMappingFileFormats() to get a Set<String> of the supported file format names.
// The names in the returned set can be used to create instances of mapping file formats
Set<String> formats = mappingFormatManager.getMappingFileFormats();
Creating MappingFileFormat instances
To create an instance of a MappingFileFormat, invoke createFormatInstance(String) with the name of the supported file format.
// Read contents of file
String fabricMappingContents = Files.readString(Paths.get("yarn-1.18.2+build.2-tiny"));

// Create the mapping format for some recognized type, then parse the mapping file's contents
MappingFileFormat format = mappingFormatManager.createFormatInstance("Tiny-V1");
IntermediateMappings parsedMappings = format.parse(fabricMappingContents);

// Do something with your parsed mappings
Registering new MappingFileFormat instances
To register a new kind of mapping file format, invoke registerFormat(String, Supplier<MappingFileFormat>). The name argument should match the MappingFileFormat.implementationName() of the registered format implementation.
Given this example implementation of a MappingFileFormat:
import jakarta.annotation.Nonnull;
import software.coley.recaf.services.mapping.format.AbstractMappingFileFormat;
import software.coley.recaf.services.mapping.format.InvalidMappingException;

public class ExampleFormat extends AbstractMappingFileFormat {
    public ExampleFormat() {
        super("CustomFormat", /* supportFieldTypeDifferentiation */ true,  /* supportVariableTypeDifferentiation */ true);
    }

    @Nonnull
    @Override
    public IntermediateMappings parse(@Nonnull String mappingsText) throws InvalidMappingException {
        IntermediateMappings mappings = new IntermediateMappings();

        String[] lines = mappingsText.split("\n");
        for (String line : lines) {
            // 0     1               2
            // class obfuscated-name clean-name
            if (line.startsWith("class\t")) {
                String[] columns = line.split("\t");
                String obfuscatedName = columns[1];
                String cleanName = columns[2];

                // Add class mapping to output
                mappings.addClass(obfuscatedName, cleanName);
            }

            // 0      1                          2               3               4
            // member obfuscated-declaring-class obfuscated-name obfuscated-desc clean-name
            if (line.startsWith("member\t")) {
                String[] columns = line.split("\t");
                String obfuscatedDeclaringClass = columns[1];
                String obfuscatedDesc = columns[3]; // If 'supportFieldTypeDifferentiation == false' then this would be null
                String obfuscatedName = columns[2];
                String cleanName = columns[4];

                // Add field mapping to output
                if (obfuscatedDesc.charAt(0) == '(')
                    mappings.addMethod(obfuscatedDeclaringClass, obfuscatedDesc, obfuscatedName, cleanName);
                else
                    mappings.addField(obfuscatedDeclaringClass, obfuscatedDesc, obfuscatedName, cleanName);
            }
        }

        return mappings;
    }
}
It should be registered with:
mappingFormatManager.registerFormat("CustomFormat", ExampleFormat::new);
MappingGenerator
The mapping generator allows you to generate Mappings for a Workspace based on configurable inputs:
- Filter what classes, fields, and methods should be included in the generated output mappings via a chain of
NameGeneratorFilteritems - Control the naming scheme of classes, fields, and methods via an implementation of
NameGenerator
Filtering what to generate mappings for
What we generate mappings for is controlled by a linked-list of NameGeneratorFilter items. Each item in the chain can generalized to "include this" or "exclude this". Here is an example:
@Inject
StringPredicateProvider strMatchProvider;

// [Access blacklist 'public, protected'] --> [Class whitelist 'com/example/']
//  Any non-public/protected class/field/method in 'com/example' will have a name generated
IncludeClassesFilter includeClasses = new IncludeClassesFilter(null /* tail of linked list */, strMatchProvider.newStartsWithPredicate("com/example/"));
ExcludeModifiersNameFilter excludePublicProtected = new ExcludeModifiersNameFilter(includeClasses, Arrays.asList(Opcodes.ACC_PUBLIC | Opcodes.ACC_PROTECTED), true, true, true);

// Use 'excludePublicProtected' as the 'NameGeneratorFilter' to pass as your filter - It is the head of the linked list.
You can use any of the existing NameGeneratorFilter implementations in the software.coley.recaf.services.mapping.gen.filter package, or make your own.
Controlling the naming scheme
There are a few simple implementations of NameGenerator which can be used as-is, but for more advanced control you'll probably want to make your own. The interface outlines one method for naming each kind of item. Here is a simple implementation:
NameGenerator nameGenerator = new NameGenerator() {
    @Nonnull
    @Override
    public String mapClass(@Nonnull ClassInfo info) {
        return "mapped/Class" + Math.abs(info.getName().hashCode());
    }

    @Nonnull
    @Override
    public String mapField(@Nonnull ClassInfo owner, @Nonnull FieldMember field) {
        return "mappedField" + Math.abs(owner.getName().hashCode() + info.getName().hashCode());
    }

    @Nonnull
    @Override
    public String mapMethod(@Nonnull ClassInfo owner, @Nonnull MethodMember method) {
        return "mappedMethod" + Math.abs(owner.getName().hashCode() + info.getName().hashCode());
    }

    @Nonnull
    @Override
    public String mapVariable(@Nonnull ClassInfo owner, @Nonnull MethodMember declaringMethod, @Nonnull LocalVariable variable) {
        return "mappedVar" + variable.getIndex();
    }
};
Generating the output Mappings
Once you have a NameGenerator and NameGeneratorFilter pass them along to generate(Workspace, WorkspaceResource, InheritanceGraph, NameGenerator, NameGeneratorFilter). The method takes in the Workspace and the WorkspaceResource containing classes you want to generate mappings for. The WorkspaceResouerce will almost always be the workspace's primary resource.
@Inject
InheritanceGraph inheritanceGraph; // You need the inheritance graph associated with the workspace.

Mappings mappings = mappingGenerator.generate(workspace, resource, inheritanceGraph, nameGenerator, filter);
MappingListeners
The mapping listeners service allows you to listen to when mappings are applied to any Workspace.
Listening to mapping operations
Just call addMappingApplicationListener(MappingApplicationListener) with your listener implementation.
Here is an example implementation with some comments explaining the contents of the mapping results model:
class ExampleMappingListener implements MappingApplicationListener {
    @Override
    public void onPreApply(@Nonnull Workspace workspace, @Nonnull MappingResults mappingResults) {
        // The mappings that were used to create the results
        Mappings mappings = mappingResults.getMappings();

        // All names of classes *affected* by mappings can be iterated over.
        //
        // If a class was not renamed, but had contents inside it that point to renamed content
        // it will be included in this map and the key/value will be equal.
        // Otherwise, the post-map-name will be the class's renamed name.
        mappingResults.getMappedClasses().forEach((preMapName, postMapName) -> {
            ClassPathNode preMappingPath = mappingResults.getPreMappingPath(preMapName);
            ClassPathNode postMappingPath = mappingResults.getPostMappingPath(postMapName);

            // The 'results' model already has the contents of classes after mapping is applied.
            // They just have not been copied back into the workspace yet.
            ClassInfo preMappedClass = preMappingPath.getValue();
            ClassInfo postMappedClass = postMappingPath.getValue();
        });
    }

    @Override
    public void onPostApply(@Nonnull Workspace workspace, @Nonnull MappingResults mappingResults) {
        // The results model is the same as the 'onPreApply' but the workspace has now been
        // updated to replace old classes with the updated instances.
    }
}
NameGeneratorProviders
The NameGeneratorProviders service allows you to:
- See which
NameGeneratorProviderare available - Register your own
NameGeneratorProvider
Get current name providers
// Read-only map of generator ids to generator provider instances
Map<String, NameGeneratorProvider<?>> providers = nameGeneratorProviders.getProviders();
Registering a new NameGeneratorProvider
// AbstractNameGeneratorProvider implements most things for you.
// All that you need to do is pass a unique 'id' in the constructor and implement 'createGenerator()'
nameGeneratorProviders.registerProvider(new AbstractNameGeneratorProvider<>("my-unique-id") {
    @Nonnull
    @Override
    public NameGenerator createGenerator() {
        // Create your name generator here
    }
});
NavigationManager
The nagivation manager allows you to:
- Lookup
DockableUI wrappers forNavigableUI content - Add listeners to intercept addition/removal of
Navigablecontent from the UI- Move operations fire a removal then addition
Looking up dockables
The Dockable type represents a docking tab shown in the UI that holds some content. In this case the only kind of content that can be looked up is Navigable content. A Navigable UI element is one that represents something in the Workspace referencable by a PathNode. This would include classes, files, etc.
Dockable dockable = navManager.lookupDockable(myNavigable);
if (dockable != null) {
    // TODO: Do things with the dockable
}
Listening to navigable changes
Listening to when Navigable content lets you track what kinds of content is being displayed in Recaf.
addNavigableAddListener(navigable -> {
    // You may want to react based on what kind of content is being added.
    if (navigable.getPath() instanceof ClassPathNode cp) {
        // TODO: Operate on removed navigable
    }

    // Another option for checking the content type, do an instanceof on the navigable.
    if (navigable instanceof ClassNavigable cn) {
        // ...
    } else if (navigable instanceof FileNavigable fn) {
        // ...
    }
});
addNavigableRemoveListener(navigable -> {
    // TODO: Operate on removed navigable
});
PatchApplier
The patch applier applies WorkspacePatch values to a given Workspace.
Generating patches
See PatchProvider:
- For auto-creating patches based on changes made in an existing
Workspace - For loading patches from JSON
You could also manually construct the WorkspacePatch instance yourself.
Applying patches
// Optional feedback interface implementation for receiving details about patch failures.
// Can be 'null' to ignore feedback.
PatchFeedback feedback = new PatchFeedback() {
    @Override
    public void onAssemblerErrorsObserved(@Nonnull List<Error> errors) {
        // assembler patch has failed, patch process abandoned
    }
    @Override
    public void onIncompletePathObserved(@Nonnull PathNode<?> path) {
        // patch had path that was invalid, patch process abandoned
    }
};

// If the patch was applied, we return 'true'
// If errors were seen, the patch is abandoned and we return 'false'
boolean success = patchApplier.apply(patch, feedback);
PatchProvider
The patch provider facilitates the creation of WorkspacePatch instances.
Generating patches from changes in a workspace
A patch that represents all the changes made to a workspace (Removing files, editing classes, etc) can be made by calling createPath(Workspace).
Workspace workspace = ...
// Some changes to the workspace are made...
// Generate a patch that represents the changes
WorkspacePatch patch = patchProvider.createPatch(workspace);
Reading/writing patches from JSON
Patches can be persisted to a JSON representation via serializePatch(WorkspacePatch) and deserializePatch(Workspace, String).
// Given a 'WorkspacePatch' transform it into JSON.
String serializedJson = patchProvider.serializePatch(patch);

// Given some JSON transform it back into a patch.
// We pass along the workspace that this patch will be applied to.
WorkspacePatch deserializePatch = patchProvider.deserializePatch(workspace, serializedJson);
Applying patches
See PatchApplier
PathExportingManager
The path exporting manager facilitates exporting various workspace types to files, prompting the user to provide locations to save to
Exporting the current workspace
The currently open workspace can be exported to a user-provided path like so:
try { pathExportingManager.exportCurrent(); }
catch (IllegalStateException ex) { /* no workspace open */ }
Exporting a specific workspace
Any workspace instance can also be exported:
// Delegates to export(workspace, "workspace", true)
pathExportingManager.export(workspace);

// Prompts the user to:
// - Alert them if the workspace has no changes recorded in it (seeL alertWhenEmpty)
// - Provide a location to save the workspace to (if you loaded a jar, you should probably provide a location like "export.jar")
boolean alertWhenEmpty = false;
String description = "some files"; // Used in logger output so that we see "exported 'some files' to %PATH%"
pathExportingManager.export(workspace, description, alertWhenEmpty);
Exporting a specific class/file
Specific Info types like JvmClassInfo and FileInfo can also be exported to user-provided paths:
pathExportingManager.export(classInfo);
pathExportingManager.export(fileInfo);
PathLoadingManager
The path loading manager controls loading Workspace instances in the UI. It has the following capabilities:
- Register listeners that intercept the
java.nio.Pathlocations to user inputs before theWorkspaceis constructed from the paths. - Asynchronously open a workspace from a
java.nio.Pathplus supporting resources from a list ofjava.nio.Pathvalues. - Asynchronously append supporting resources to a workspace from a list of
java.nio.Pathvalues.
Intercepting user input paths
Registering a listener can allow you to see what file paths a user is requesting to load into Recaf.
private final PathLoadingManager loadManager;

// ...

loadManager.addPreLoadListener((primaryPath, supportingPaths) -> {
    if (supportingPaths.isEmpty())
        logger.info("Loading workspace from {}", primaryPath);
    else
        logger.info("Loading workspace from {} + [{}]", primaryPath,
            supportingPaths.stream().map(Path::toString).collect(Collectors.joining(", ")));
});
Loading workspace content into Recaf asynchronously
As opposed to directly using WorkspaceManager this class handles things asynchronously since its intended for use in the UI. Here's how you can load a file as a workspace:
private final PathLoadingManager loadManager;\

// ...

Path path = Paths.get("input.jar");
List<Path> supportingPaths = Arrays.asList(Paths.get("library-1.jar"), Paths.get("library-2.jar"));
CompletableFuture<Workspace> future = loadManager.asyncNewWorkspace(path, supportingPaths,
        error -> logger.warn("Failed to load from '{}'", path));
Adding to the current workspace:
Workspace workspace = workspaceManager.getCurrent();
List<Path> supportingPaths = Arrays.asList(Paths.get("library-1.jar"), Paths.get("library-2.jar"));
CompletableFuture<List<WorkspaceResource>> future = asyncAddSupportingResourcesToWorkspace(workspace, supportingPaths,
        error -> logger.warn("Failed to append {}", supportingPaths.stream()
            .map(Path::toString)
            .collect(Collectors.joining(", "))));
PhantomGenerator
The phantom generator service allows you to create phantoms for:
- Entire workspaces at a time
- One or more specific classes from a workspace
Generating phantoms
For generating phantoms for all primary classes in a workspace:
@Inject
PhantomGenerator phantomGenerator;

@Inject
Workspace workspace; // Injected in this example to pull in the 'current' workspace, but it can be any arbitrary workspace

// Most common use case is to then append the phantoms to the workspace
// so they can be used to suplement other services operating off of the current workspace.
GeneratedPhantomWorkspaceResource phantomResource = phantomGenerator.createPhantomsForWorkspace(workspace);
workspace.addSupportingResource(phantomResource)
For generating phantoms for just a few classes:
List<JvmClassInfo> classes = workspace.findJvmClasses(c -> c.getName().startsWith("com/example")).stream()
     .map(path -> path.getValue().asJvmClass())
     .toList();

// Phantoms in the output will only be generated to satisfy missing references in the 'classes' we pass.
GeneratedPhantomWorkspaceResource phantomResource = phantomGenerator.createPhantomsForClasses(workspace, classes);
ResourceImporter
The resource importer can import a WorkspaceResource from a variety of inputs such as:
ByteSource- Delegates to some data-source providing content as abyte[]File- Can point to a file, or directoryPath- Can point to a file, or directoryURL- Can point to any content source that can be streamed from.URI- Can point to any content source that can be streamed from.
Reading from different content types
When providing content from an in-memory source, ByteSource can be used:
// Any content that can be represented in 'byte[]' can be wrapped into a 'ByteSource'
byte[] helloBytes = "Hello".getBytes(StandardCharsets.UTF_8);
ByteSource source = ByteSources.wrap(helloBytes);
WorkspaceResource resource = importer.importResource(source);

// The utility class 'ByteSources' has a number of helpful methods, example paths:
Path path = Paths.get("test.jar");
ByteSource source = ByteSources.forPath(path);
WorkspaceResource resource = importer.importResource(source);

// The utility class 'ZipCreationUtils' also may be useful if you want to easily
//  bundle multiple items together into one source.
// It can make a ZIP from a Map<String, byte[]> or from individual items by using
//  a builder pattern via 'ZipCreationUtils.builder()'.cocc
String name = "com/example/Demo";
byte[] bytes = ...
Map<String, byte[]> map = new LinkedHashMap<>();
map.put(name + ".class", bytes);
map.put(JarFileInfo.MULTI_RELEASE_PREFIX + "9/" + name + ".class", bytes);
map.put(JarFileInfo.MULTI_RELEASE_PREFIX + "10/" + name + ".class", bytes);
map.put(JarFileInfo.MULTI_RELEASE_PREFIX + "11/" + name + ".class", bytes);
byte[] zipBytes = ZipCreationUtils.createZip(map);
ByteSource zipSource = ByteSources.wrap(zipBytes);
WorkspaceResource resource = importer.importResource(zipSource);
When providing content from an on-disk source, using a File or Path reference can be used:
// NIO Path
Path path = Paths.get("test.jar");
WorkspaceResource resource = importer.importResource(path);

// Old IO File
File file = new File("test.jar");
WorkspaceResource resource = importer.importResource(file);
When providing content from a URL/URI, content can be either on-disk or remote. So long as streaming for the URL scheme is supported:
// URI from local file
URI uri = File.createTempFile("prefix", "test.zip").toURI();
WorkspaceResource resource = importer.importResource(uri);

// URL from a remote file
URL url = new URL("https://example.com/example.zip");
WorkspaceResource resource = importer.importResource(url);
ScriptEngine
The script engine is a service used to:
- Run single Java files as Recaf scripts.
- Compile single Java files, without running them, and yielding the
java.lang.Classof the generated script.
Running scripts
Calling run(String) will asynchronously compile and run the passed script contents. As documented in the scripting section, these can be as short or long as you desire. Here are some examples of varying complexity:
@Inject
ScriptEngine engine;

// A simple one-liner
engine.run("System.setProperty(\"foo\", \"bar\");").thenAccept(result -> {
    if (result.wasSuccess())
        System.out.println(System.getPropert("foo")); // Will print "bar"
});

// Recaf's script system allows you to also define full classes. Any method 'void run()' will be executed.
// It also supports injection of any of Recaf's services.
String code = """
		public class Test implements Runnable {
			@Inject
			JavacCompiler compiler;

			@Override
			public void run() {
				System.out.println("hello: " + compiler);
				if (compiler == null) throw new IllegalStateException();
			}
		}
    	""";
engine.run(code).thenAccept(result -> {
    // At this point we printed 'hello: JavacCompiler@71841' or whatever the instance hash is at the moment.
});
Compiling scripts
If you wish to get the java.lang.Class of the generated script without immediately running it, you can use compile(String) to asynchronously get the compiled class.
engine.compile("System.setProperty(\"foo\", \"bar\");").thenAccept(result -> {
    if (result.wasSuccess()) {
        Class<?> scriptClass = result.cls();
        // Do what you want with the class
    }
});
ScriptManager
The script manager tracks recognized scripts in the Recaf scripts directory. It can also be used to parse arbitrary java.nio.Path items into ScriptFile instances.
Local scripts
In the Recaf root directory a sub-directory named scripts is watched for changes. Any files found in this directory will be checked for being valid scripts and recorded in this manager if they match. You can access these scripts and even listen for when scripts are added and removed via getScriptFiles() which returns an ObservableCollection of ScriptFiles.
// Iterating over the currently known scripts
for (ScriptFile script : scriptManager.getScriptFiles()) {
    // ...
}

// Listening for changes in local scripts
scriptManager.getScriptFiles().addChangeListener((ob, oldScriptList, newScriptList) -> {
    // The files changed between the old and new list instances
    List<ScriptFile> disjoint = Lists.disjoint(oldScriptList, newScriptList);
});
Reading files as scripts
To parse a script from a file path call read(Path):
ScriptFile script = scriptManager.read(Paths.get("Example.java"));
String content = script.source();
String metadataName = script.name(); // Meta-data not specified in the script file will yield an empty string
String metadataDesc = script.description();
String metadataVersion = script.version();
String metadataAuthor = script.author();
String metadataCustom = script.getTagValue("custom");
See the scripting section for more information about the contents of script files.
SearchService
The search service allows you to search workspaces:
- For strings, numbers, and references to classes and/or members
- With the ability to cancel the search early
- With the ability to control which classes and files are searched in
- With the ability to control what results are included in the final output
Query model
All searches are built from Query instances. There are three types of queries:
AndroidClassQueryJvmClassQueryFileQuery
Each implementation creates a SearchVisitor that handles searching of individual items in the Workspace. Things like string, number, and reference searches all implement each of these query types that they are relevant for. For example the reference search only implements AndroidClassQuery and JvmClassQuery but string search implements all three since strings can appear in any of these places (classes and files).
Searching for common cases like strings, numbers, and references are already implemented as queries and take in predicates for matching content. The following examples assume the following services are injected:
@Inject
NumberPredicateProvider numMatchProvider;
@Inject
StringPredicateProvider strMatchProvider;
@Inject
SearchService searchService;
String querying
Results results = searchService.search(workspace, new StringQuery(strMatchProvider.newEqualPredicate("Hello world")));
Results results = searchService.search(workspace, new StringQuery(strMatchProvider.newStartsWithPredicate("Hello")));
Results results = searchService.search(workspace, new StringQuery(strMatchProvider.newEndsWithPredicate("world")));
All the available built-in predicates come from StringPredicateProvider, or you can provide your own predicate implementation.
Number querying
Results results = searchService.search(workspace, new NumberQuery(numMatchProvider.newEqualsPredicate(4)));
Results results = searchService.search(workspace, new NumberQuery(numMatchProvider.newAnyOfPredicate(6, 32, 256)));
Results results = searchService.search(workspace, new NumberQuery(numMatchProvider.newRangePredicate(0, 10)));
All the available built-in predicates come from NumberPredicateProvider, or you can provide your own predicate implementation.
Reference querying
Each aspect of a reference (declaring class, name, descriptor) are their own string predicates. You pass null to any of these predicates to match anything for that given aspect. A simple example to find System.out.println() calls would look like:
Results results = searchService.search(workspace, new ReferenceQuery(
         strMatchProvider.newEqualPredicate("java/lang/System"),     // declaring class predicate
         strMatchProvider.newEqualPredicate("out"),                  // reference name predicate
         strMatchProvider.newEqualPredicate("Ljava/io/PrintStream;") // reference descriptor predicate
));
If you want to find all references to a given package you could do something like this:
Results results = searchService.search(workspace, new ReferenceQuery(
         strMatchProvider.newStartsWithPredicate("com/example/"),
         null, // match any field/method name
         null, // match any field/method descriptor
));
Declaration querying
The same ideas from reference querying apply here, but the results are the locations of declared members rather than the locations of references to the members.
Here is an example of a search that would find a FooService.getInput() declaration in a workspace:
Results results = searchService.search(workspace, new DeclarationQuery(
         strMatchProvider.newEqualPredicate("com/example/FooService"),     // declaring class predicate
         strMatchProvider.newEqualPredicate("getInput"),                  // reference name predicate
         strMatchProvider.newEqualPredicate("Ljava/lang/String;") // reference descriptor predicate
));
If you want to find all member declarations that return a specific type you could do something like this:
Results results = searchService.search(workspace, new ReferenceQuery(
         null, // match any class name
         strMatchProvider.newEndsWithPredicate(")Lcom/example/FooService;"),
         null, // match any field/method descriptor
));
Feedback handler
Passing a feedback handler to the search(...) methods allows you to control what classes and files are searched in by implementing the doVisitClass(ClassInfo) and doVisitFile(FileInfo) methods. Here is a basic example which limits the search to only classes in a given package:
// All methods in the feedback interface default to visit everything, and include all results.
// You can override the 'boolean visitX' methods to control the searching of content within the passed classes/files.
class SkipClassesInPackage implements SearchFeedback {
    private final String pkg;

    SkipClassesInPackage(String pkg) { this.pkg = pkg; }

    @Override
    public boolean doVisitClass(@Nonnull ClassInfo cls) {
        // Skip if class does not exist in package
        return !cls.getName().startsWith(pkg);
    }
}
SearchFeedback skipping = new SkipClassesInPackage("com/example/");
To control the early abortion of a search you would implement hasRequestedCancellation() to return true after some point. A basic built in class can exists:
// There is a built-in cancellable search implementation.
CancellableSearchFeedback cancellable = new CancellableSearchFeedback();

// Aborts the current search that this feedback is associated with.
cancellable.cancel();
To limit which results are included in the final Results of the search(...) call, implementdoAcceptResult(Result<?>) to return false for results you want to discard. Since the Result contains a PathNode reference to where the match was made at, its probably what you'll want to operate on to implement your own filtering. Here is an example which limits the final Results to include only one item per class:
// This is a silly example, but we really just want to show off how you'd implement this, not how to make a real-world implementation.
class OnlyOneResultPerClass implements SearchFeedback {
    private Set<String> includedClassNames = new HashSet<>();

    @Override
    public boolean doAcceptResult(@Nonnull Result<?> result) {
        PathNode<?> pathToValue = result.getPath();

        // Get the class value in the path to the value.
        // If the path points to something more specific like a instruction in a method, then
        // this will be the class that defines te method with that instruction in it.
        ClassInfo classPathValue = pathToValue.getValueOfType(ClassInfo.class);
        if (classPathValue != null && !includedClassNames.add(classPathValue.getName())) {
            // If we've already seen a result from this class, skip all the remaining results
            // so that there is only one result per class.
            return false;
        }

        // Keep the result in the output
        return true;
    }
}
SnippetManager
The snippet manager is used to store common snippets of assembler text that users can copy and paste into the assembler UI.
Snippets
Snippets are a simple record with three components:
name- The name, also used as the key for snippet manager operations.description- The optional explanation of what the snippet is for. If no such value is given this should be an empty string.content- The actual snippet body
Getting current snippets
// Snapshot of existing snippets
List<Snippet> snippets = snippetManager.getSnippets();

// Getting a snippet by name
Snippet example = snippetManager.getByName("example");
Registering / unregistering snippets
// Create and register 'System.out.println("Hello")'
String content = """
        getstatic java/lang/System.out Ljava/io/PrintStream;
        ldc "hello"
        invokevirtual java/io/PrintStream.println (Ljava/lang/String;)V
        """;
snippetManager.putSnippet(new Snippet("hello", "prints 'hello'", content));

// Unregistering it
snippetManager.removeSnippet("hello");
Listening to the creation/removal/modification of snippets
SnippetListener listener = new SnippetListener() {
	@Override
	public void onSnippetAdded(@Nonnull Snippet snippet) {
		System.out.println("NEW: " + snippet.name());
	}
	@Override
	public void onSnippetModified(@Nonnull Snippet old, @Nonnull Snippet current) {
		System.out.println("MOD: " + old.name());
	}
	@Override
	public void onSnippetRemoved(@Nonnull Snippet snippet) {
		System.out.println("DEL: " + snippet.name());
	}
};
snippetManager.addSnippetListener(listener);
snippetManager.removeSnippetListener(listener);
TextProviderService
The text provider service allows you to override text shown for workspace contents like classes, fields, methods, etc.
Getting text
Text is computed lazily by TextProvider instances. Each workspace content type has its own provider you can get by passing in parameters to reconstruct a PathNode to the respective content. In the case of a bundle, that would be the Workspace, WorkspaceResource, and Bundle.
TextProvider provider = textService.getBundleTextProvider(workspace, resource, bundle);
TransformationApplierService
The transformation applier service allows you to take transformers registered in the TransformationManager and apply them to the current workspace, or any arbitrary workspace.
Creating a transformation applier
// Will be null if there is no current workspace open
TransformationApplier applier = transformationApplierService.newApplierForCurrentWorkspace();

// If you want to repeat transformers multiple times, you can set a maximum pass count.
// This can be useful in some heavily obfuscated code where transformers can't get the work done in one pass.
// This count is a maximum; if transformers have nothing left to do, the process will not waste effort doing redundant passes.
applier.setMaxPasses(5);

// Will never be 'null' so long as the workspace variable is also not 'null'
// - The downside is that dependent features like the inheritance graph (for frame computation needed in some transformers)
//   will have to be generated each time you call this method since the applier will need access to that service for this workspace
//   that is not the "current" workspace.
// - If you happen to pass the "current" workspace as a parameter then this will delegate to the
//   more optimal 'newApplierForCurrentWorkspace()' method.
Workspace workspace = ...
TransformationApplier applier = transformationApplierService.newApplier(workspaqce);
Applying transformations
// Specify a list of transformers you want to apply.
List<Class<? extends JvmClassTransformer>> jvmTransformers = List.of(...);

// Optional: Feedback mechanism (an interface you implement) allows you to:
// - Cancel transformations at arbitrary times
// - Filter which classes get transformed
TransformationFeedback feedback = ...

applier.transformJvm(jvmTransformers); // To apply to all JVM classes in the workspace
applier.transformJvm(jvmTransformers, feedback); // To apply to classes matched by the feedback mechanism, and allow cancellation

// If the List<...> declaration is a big verbose you can inline it, and everything will play nice.
applier.transformJvm(List.of(...));
Transformation Feedback
The TransformationFeedback interface lets you control which classes get transformed, cancel a transformation in-progress, and be notified of transformation progress. If you do not provide a feedback instance, a no-op implementation will be used which allows transformation of all classes.
TransformationManager
The transformation manager allows registering of different transformer types for class processing operations.
Example Transformer
public class MyTransformer implements JvmClassTransformer {
    /** Optional, can delete if you do not need any one-time setup logic */
    @Override
    public void setup(@Nonnull JvmTransformerContext context, @Nonnull Workspace workspace) {
        // Transformation setup here
        //  - Pulling values from the context
        //  - Checking contents of the workspace
        //  - Etc.
    }

    /** Used to transform the classes */
    @Override
    public void transform(@Nonnull JvmTransformerContext context, @Nonnull Workspace workspace,
                          @Nonnull WorkspaceResource resource, @Nonnull JvmClassBundle bundle,
                          @Nonnull JvmClassInfo initialClassState) throws TransformationException {
        if (exampleOfRawEdit) {
            // IMPORTANT: Use this method to get the bytecode, and DO NOT use the direct 'initialClassState.getBytecode()'!
            // The context will store updated bytecode across multiple transformations, so if you use the direct
            // bytecode from the 'ClassInfo' you risk losing all previous transform operations.
            byte[] modifiedBytecode = context.getBytecode(bundle, initialClassState);

            // TODO: Make changes to 'modifiedBytecode' here

            // Save modified bytecode into the context.
            context.setBytecode(bundle, initialClassState, modifiedBytecode);
        } else if (exampleOfAsmTreeEdit) {
            // IMPORTANT: The same note as above applies here, but with ASM's ClassNode.
            ClassNode node = context.getNode(bundle, initialClassState);

            // TODO: Make changes to 'node' here

            // Save modified class-node (and its respective bytecode) into the context.
            context.setNode(bundle, initialClassState, node);

            // If the changes are significant and require recomputing stack-frames, calling this will ensure
            // this process is done for you automatically after all transformers are applied.
            context.setRecomputeFrames(initialClassState.getName());
        }
    }

    /** Unique name of this transformer */
    @Nonnull
    @Override
    public String name() {
        return "My cool transformer";
    }

    /** Any dependencies this transformer relies on. Some transformers are used for analysis and store data
     *  that can be accessed later, and depending on those transformers ensures the data is accessible when
     *  this transformer is invoked. */
    @Nonnull
    @Override
    public Set<Class<? extends ClassTransformer>> dependencies() {
        // Optional method, you can delete this if you have no dependencies.
        // But if you do use dependencies, you can get instances of them via 'context.getJvmTransformer(OtherTransformer.class)'
        // in the 'setup' and 'transform' methods above.
        return Collections.emptySet();
    }

    /** Any recommended transformers that should be run before this one, though not strictly required. */
    @Nonnull
    @Override
    public Set<Class<? extends ClassTransformer>> recommendedPredecessors() {
        // Optional method, mainly used as a suggestion to users in the UI.
        return Collections.emptySet();
    }

    /** Any recommended transformers that should be run after this one, though not strictly required. */
    @Nonnull
    @Override
    public Set<Class<? extends ClassTransformer>> recommendedSuccessors() {
        // Optional method, mainly used as a suggestion to users in the UI.
        return Collections.emptySet();
    }
}
Registering transformers
// Registering and unregistering
processingService.registerJvmClassTransformer(MyTransformer.class, () -> new MyTransformer());
processingService.unregisterJvmClassTransformer(MyTransformer.class);
Transformer Context
The transformer context is a utility that is shared between all transformers when being executed. It is used to:
- Allow transformers to enhance stack analysis by providing custom
GetFieldLookup,GetStaticLookup,InvokeVirtualLookupandInvokeStaticLookupinstances - Allow transformers to access instances of other transformers
- Track the updated state of transformed classes
- Track mappings to apply at the end of transformer execution
- Track any classes to remove at the end of transformer execution
WorkspaceManager
The attach manager allows you to:
- Access the current workspace
- Set the current workspace
- Add listeners to be notified of:
- New workspaces being opened
- Workspaces being closed
- Changes to existing workspaces (The model, not the content) being made
Accessing the current workspace
The current workspace is accessed via getCurrent().
// The return value is never 'null' - if no workspace is open you get a 'EmptyWorkspace'
Workspace workspace = workspaceManager.getCurrent();
Setting the workspace
Assigning a workspace is done via setWorkspace(Workspace). You can "unset" or close a workspace by passing null or by calling closeCurrent().
Workspace workspace = // ..
workspaceManager.setWorkspace(workspace);

// These two calls behave the same
workspaceManager.closeCurrent();
workspaceManager.setWorkspace(null);
In case the case where a WorkspaceCloseCondition has been registered the request to close a workspace can be blocked. Consider that when you are using the GUI and you close a file you are asked "Are you sure?" before closing the workspace. To ensure any potential cause of closing the workspace is handled this is achieved by a registering a WorkspaceCloseCondition in the UI which requires answering the prompt before allowing the close to occur.
While it is not recommended you can circumvent such conditions by using setCurrentIgnoringConditions(Workspace) instead of setWorkspace(Workspace).
Listening for new workspaces
Register a WorkspaceOpenListener.
workspaceManager.addWorkspaceOpenListener(workspace -> {
    // Operate on newly opened workspace
});
Listening to workspace closures
Register a WorkspaceCloseListener. Mostly useful for read-only handling such as logging.
workspaceManager.addWorkspaceCloseListener(workspace -> {
    // Operate on closed workspace
});
Similarly you can have a WorkspaceCloseCondition if you want to listen to and prevent workspace closures.
workspaceManager.addWorkspaceCloseCondition(workspace -> {
    // Returning 'false' will prevent a workspace from being closed.
    if (shouldPreventClosure(workspace)) return false;

    return true;
});
Listening to workspace structure modifications
Normally you would add a WorkspaceModificationListener on a specific Workspace but in the WorkspaceManager you can add a "default" WorkspaceModificationListener which is added to all newly opened workspaces.
workspaceManager.addDefaultWorkspaceModificationListeners(new WorkspaceModificationListener() {
    @Override
    public void onAddLibrary(@Nonnull Workspace workspace, @Nonnull WorkspaceResource library) {
        // Supporting library added to workspace
    }
    @Override
    public void onRemoveLibrary(@Nonnull Workspace workspace, @Nonnull WorkspaceResource library) {
        // Supporting library removed from workspace
    }
});
WorkspaceProcessingService
The workspace processing service allows registering custom WorkspaceProcessor. These processors take in a Workspace parameter and can do anything. They are applied to any workspace that gets opened via the WorkspaceManager.Generally these are intended to do lightweight operations such as the ThrowablePropertyAssigningProcessor which adds the ThrowableProperty to appropriate ClassInfo values in the workspace. For things more along the lines of bytecode manipulation you will want to check out the TransformationManager and TransformationApplierService.
Registering processors
class MyProcessor implements WorkspaceProcessor {
    @Override
    public void processWorkspace(@Nonnull Workspace workspace) {
        // Processing goes here
    }
}

// Registering and unregistering
processingService.register(MyProcessor.class, () -> new MyProcessor());
processingService.unregister(MyProcessor.class);
Utilities
There are quite a few utility classes in Recaf that all serve as independent units or holders of various static utility methods.
Core util groups
UI util groups
- None
Android
A collection of android utilities.
- AndroidRes
- AndroidXmlUtil
- DexIOUtil
ASM Visitors
A collection of ASM visitors for various class transformations.
- AnnotationArrayVisitor
- BogusNameRemovingVisitor
- ClassAnnotationInsertingVisitor
- ClassAnnotationRemovingVisitor
- ClassHollowingVisitor
- DuplicateAnnotationRemovingVisitor
- FieldAnnotationInsertingVisitor
- FieldAnnotationRemovingVisitor
- FieldInsertingVisitor
- FieldReplacingVisitor
- IllegalAnnotationRemovingVisitor
- IllegalSignatureRemovingVisitor
- IndexCountingMethodVisitor
- LongAnnotationRemovingVisitor
- MemberCopyingVisitor
- MemberFilteringVisitor
- MemberRemovingVisitor
- MemberStubAddingVisitor
- MethodAnnotationInsertingVisitor
- MethodAnnotationRemovingVisitor
- MethodInsertingVisitor
- MethodNoopingVisitor
- MethodReplacingVisitor
- SignatureRemovingVisitor
- SyntheticRemovingVisitor
- VariableRemovingClassVisitor
- VariableRemovingMethodVisitor
IO
A collection of IO utilities.
- ByteHeaderUtil
- ByteSource
- ByteArraySource
- ByteBufferSource
- LocalFileHeaderSource
- MemorySegmentDataSource
- PathByteSource
- ByteSourceConsumer
- ByteSourceElement
- ByteSources
- IOUtil
- ModulesIOUtil
- ResourceUtil
- SelfReferenceUtil
- ShortcutUtil
- UnsafeIO
- ZipCreationUtils
Threading
A collection of threading utilities.
- CountDown
- ExecutorServiceDelegate
- PhasingExecutorService
- ScheduledExecutorServiceDelegate
- ThreadPoolFactory
- ThreadUtil
Misc
A collection of unsorted utilities.
- AccessFlag
- AccessPatcher
- BlwUtil
- CancelSignal
- ClassDefiner
- ClassLoaderInternals
- ClasspathUtil
- CollectionUtil
- DesktopUtil
- DevDetection
- EscapeUtil
- Handles
- InternalPath
- JavaVersion
- JigsawUtil
- Keywords
- LookupUtil
- MemoizedFunctions
- MultiMap
- MultiMapBuilder
- NumberUtil
- PlatformType
- ReflectUtil
- RegexUtil
- Streams
- StringDiff
- StringUtil
- TestEnvironment
- Types
- UnsafeUtil
ClassDefiner
The ClassDefiner is a utility extending ClassLoader which takes in one or more classes as a Map<String, byte[]> and defines them at runtime.
- Keys are the class name format you'd use for
Class.forName(String)and thus would look likejava.lang.String. - Values are the raw bytes of the class file.
Usage
String name = "com/example/StringMapper"; // Internal name format
String sourceName = name.replace('/', '.'); // Source name format

// Example code to generate an interface
ClassWriter cw = new ClassWriter(0);
cw.visit(V1_8, ACC_PUBLIC | ACC_INTERFACE, name, "java/lang/Object", null, null);
cw.visitMethod(ACC_PUBLIC, "map", "(Ljava/lang/String;)Ljava/lang/String;", null, null);
cw.visitEnd();
byte[] bytes = cw.toByteArray();

// Definer with a single class
ClassDefiner cd = new ClassDefiner(sourceName, bytes);

// Definer with a map of entries
ClassDefiner cd = new ClassDefiner(Map.of(sourceName, bytes));

// Loading the class
Class<?> cls = definer.findClass(sourceName);
Miscellaneous
Developer articles that don't really fit anywhere else.
How to improve test cases
Tests serve a variety of purposes.
- Validate a feature does what it is supposed to.
- Validate changes to a feature do not break its expected supported usage.
But there are some additional things you can write in your test cases that may be useful.
- Validate a feature fails gracefully when given invalid inputs.
- Validate a feature works, even when given as many edge-cases as possible, as opposed to "common" input data.
How can you quickly tell what circumstances are covered by test cases though? The obvious option is to read the test cases and figure that out yourself. Ideally, the names of tests are descriptive enough to limit the amount of required reading for that. But there are additional options such as looking at test coverage and checking for branches that are not covered by tests.
Checking code coverage
You can check what branches in the source are covered by running the tests via gradlew test and then build the coverage report via gradlew buildJacocoAggregate. All tests are configured to log coverage data via JaCoCo, and the buildJacocoAggregate task generates a report consolidating coverage from all tests in all modules into a single report. You can access the report in ./build/aggregate/.
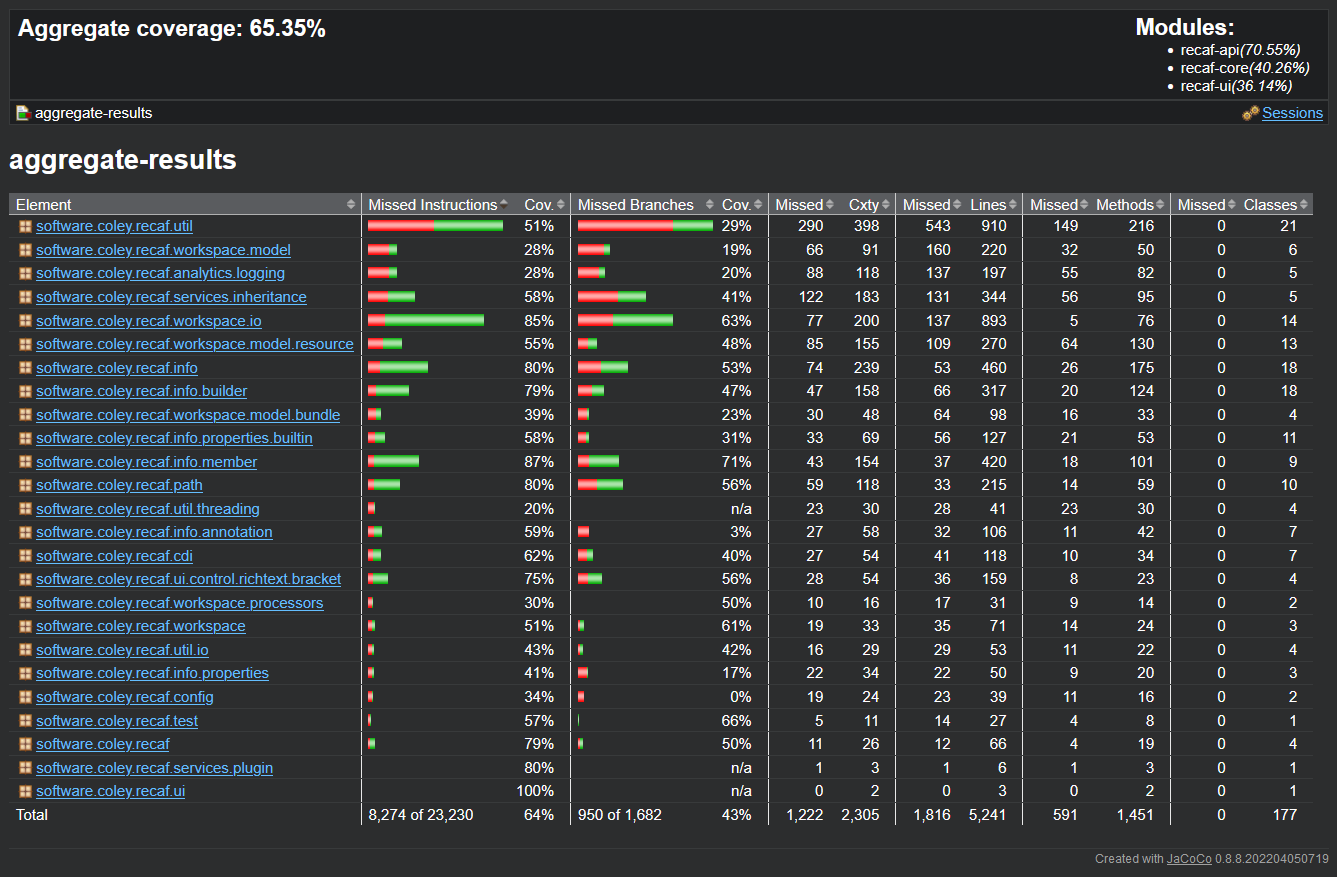
The main index page of the report shows a table of package's coverage
The main index page in the HTML report is a table showing which packages have the best code coverage. You can click on the packages to get data on each class in the package.
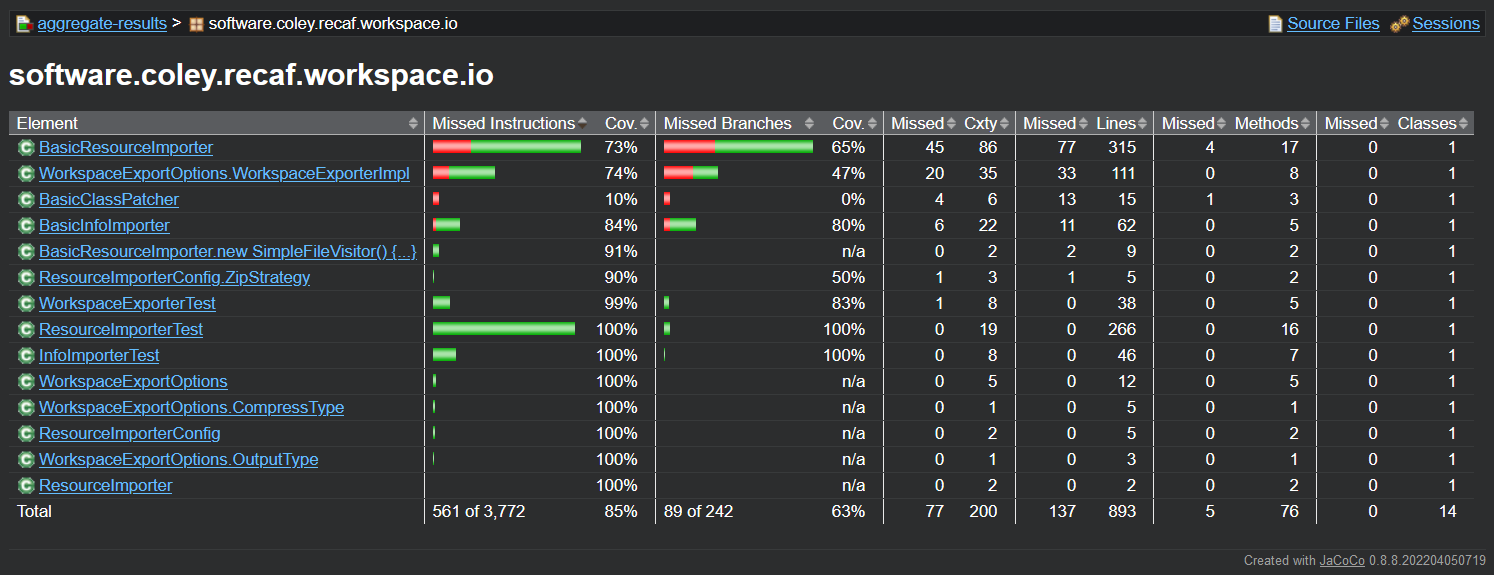
The table of a package's coverage shows per-class stats
Clicking on a class shows per-method coverage.
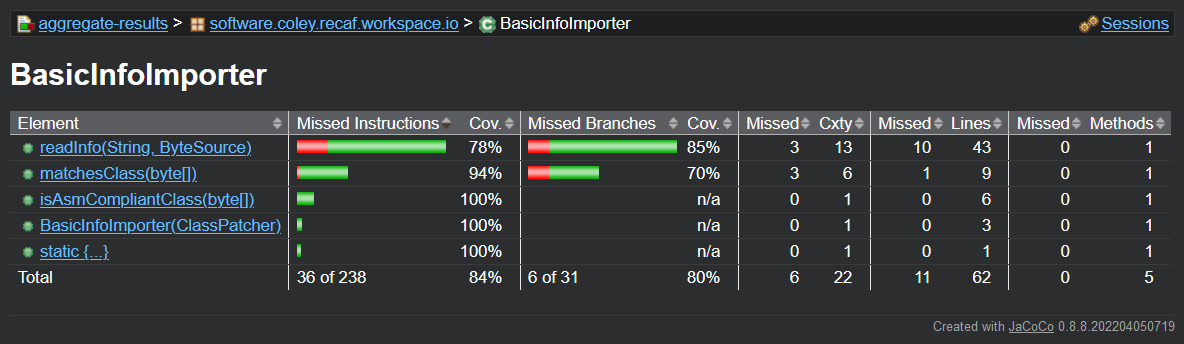
The table of a class's coverage shows per-method stats
Clicking on a method finally shows you the actual class source code, with information on coverage showed as line indicators. Clicking/hovering on them will reveal information like "1 out of 2 branches covered".
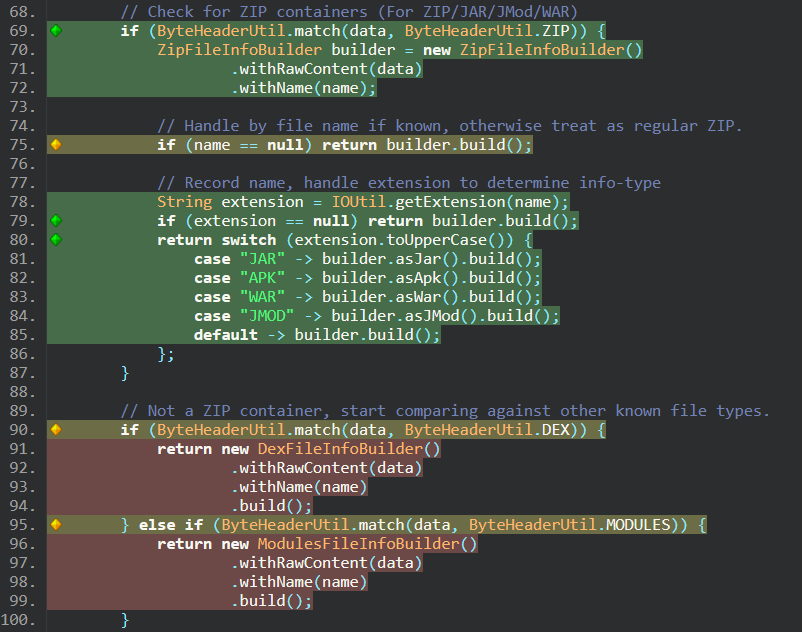
Green means all branches are covered. Yellow means some were covered. Red means the code was missed.
Naturally the more code that is covered the better. So using these reports to figure out where coverage is missing from really helps.
Why not use the built-in IntelliJ code-coverage feature when running unit tests?
Unfortunately, IntelliJ's code coverage support refuses to run if you attempt to run tests across multiple modules. Its been an open ticket since 2022 with no observed movement. You can use it if you test one module like recaf-core then another such as recaf-ui one after another, but you cannot combine those results together. If you just want to improve coverage over the recaf-core module then this is not an issue and you can use it to get accurate coverage data shown inline in the IDE.
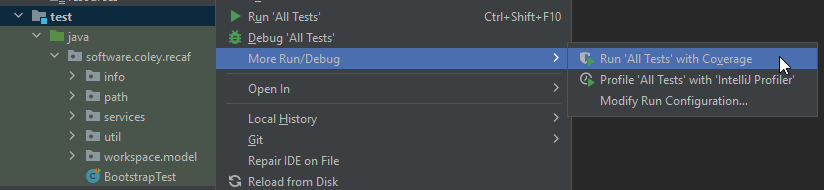
Running a single module's tests in IntelliJ with code-coverage enabled.
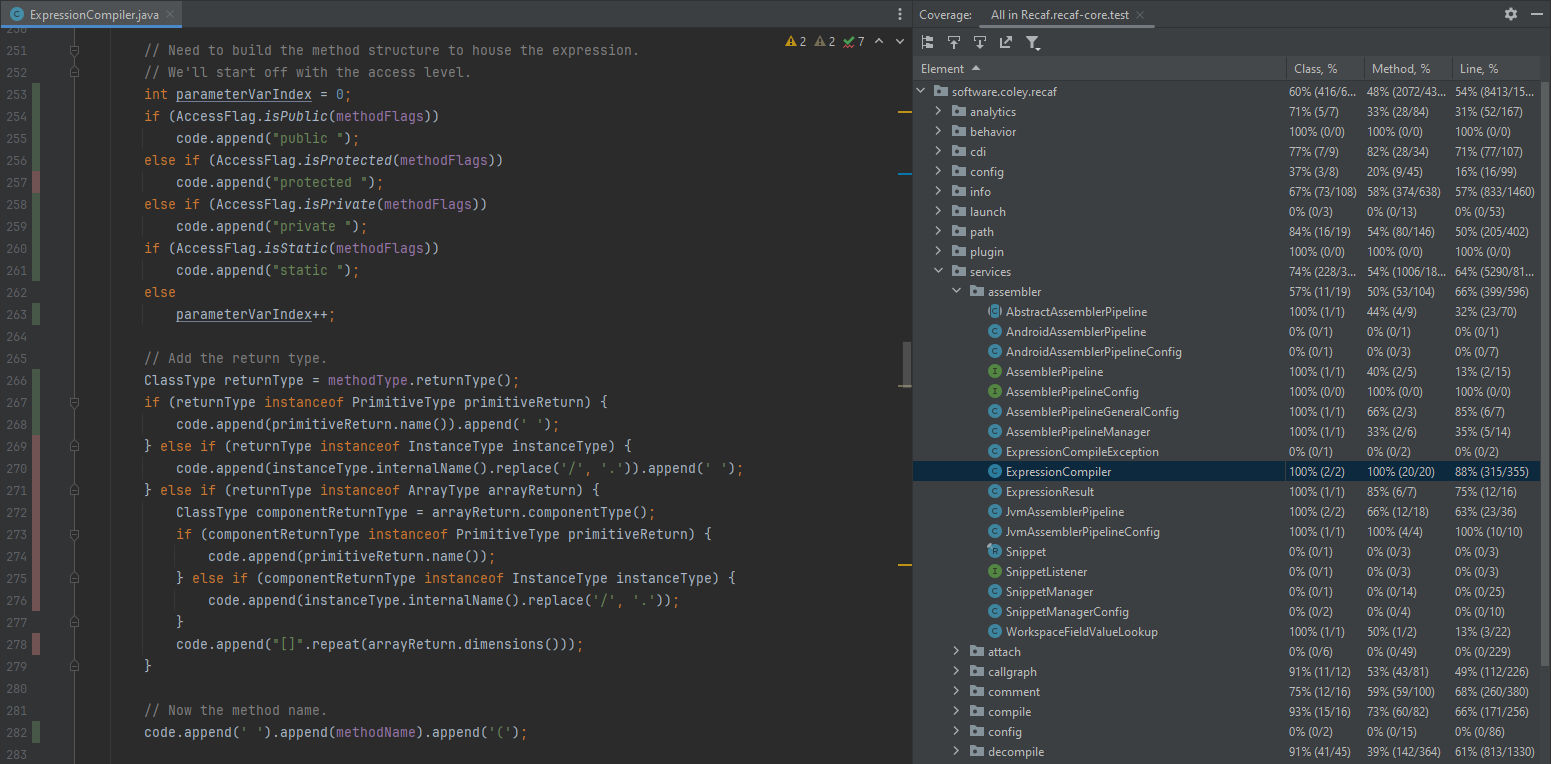
The results of running tests with code-coverage show a table of packages/classes and how much of the methods/lines are covered. In the code display, lines are colored to show which have been fully covered, partially covered, and completely missed during the test execution.
Checking code coverage online
If you want to see the current code coverage statistics and color-coded source without running the tests locally you can check out the latest codecov.io/Col-E/Recaf report. Do note that the way that CodeCov measures is slightly different than how JaCoCo measures coverage so the numbers may not match, but should generally be in the same ballpark.
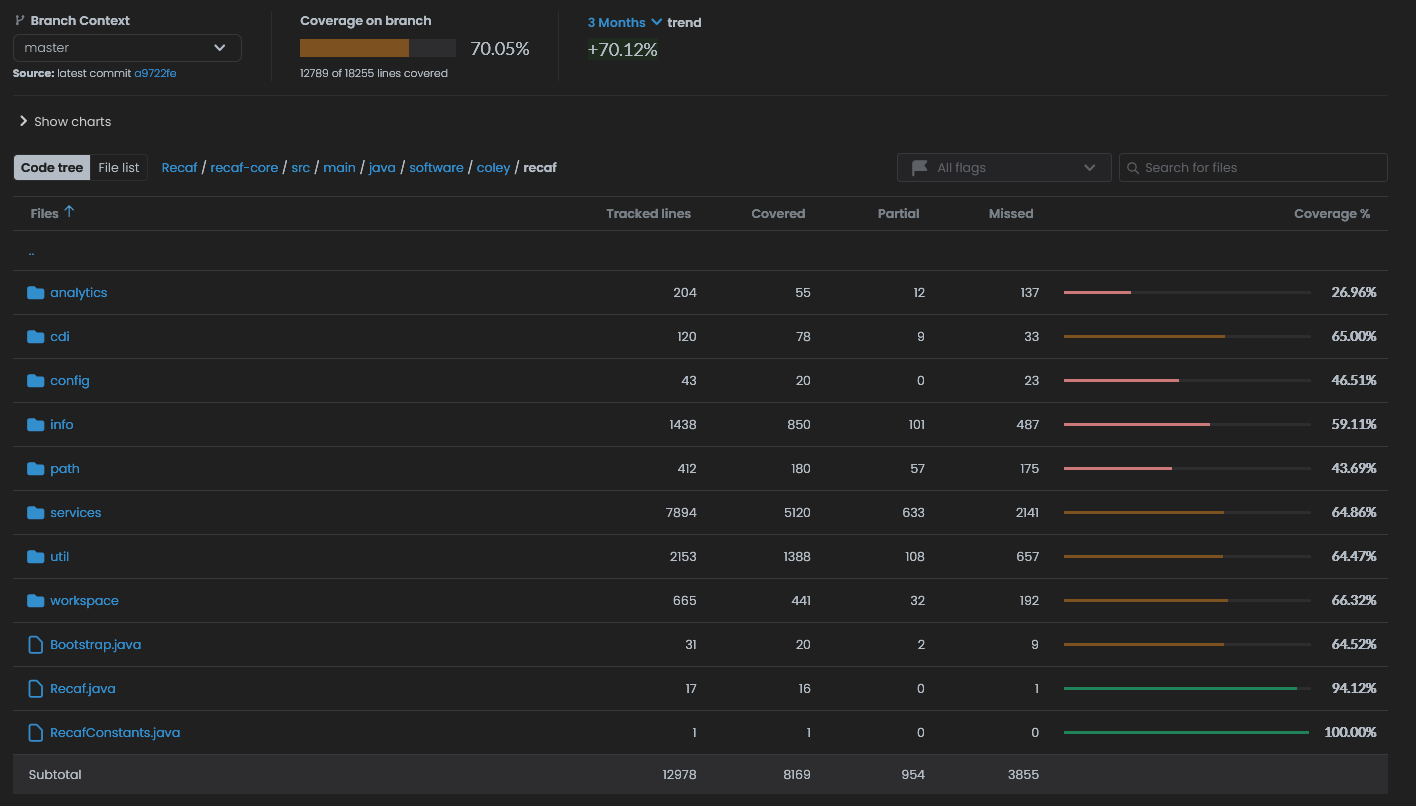
Screenshot of the code-coverage summary from October 2024. Recaf has a reported average of 70% code coverage across the project.
Configuring annotations in IntelliJ
To cut down on the number of problems with NullPointerException nullability annotations are heavily used in Recaf's source. With an IDE's support this can catch problems early on.
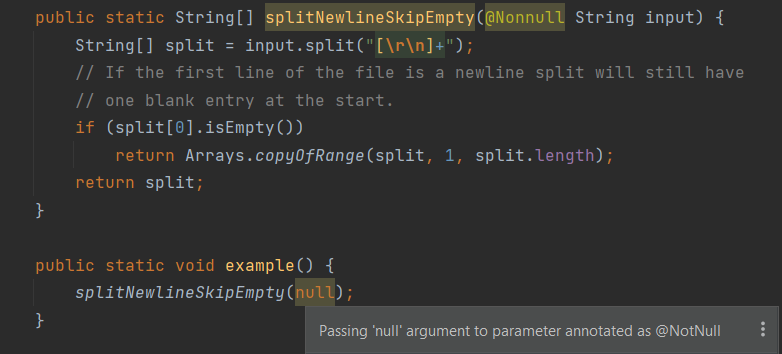
Explicit nulls passed to method with parameters marked as Nonnull display warnings.
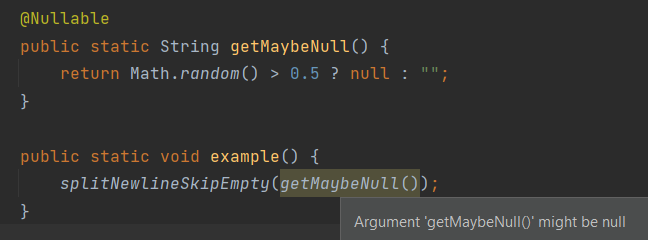
The Nullable annotation isn't needed here, but is useful for documentation purposes. Even without it IntelliJ will warn that the call to the call to splitNewlineSkipEmpty may be taking in a possible null value.
You'll want to make it so that @Nonnull and @Nullable are recognized by IntelliJ. The settings you'll want to change are highlighted here.
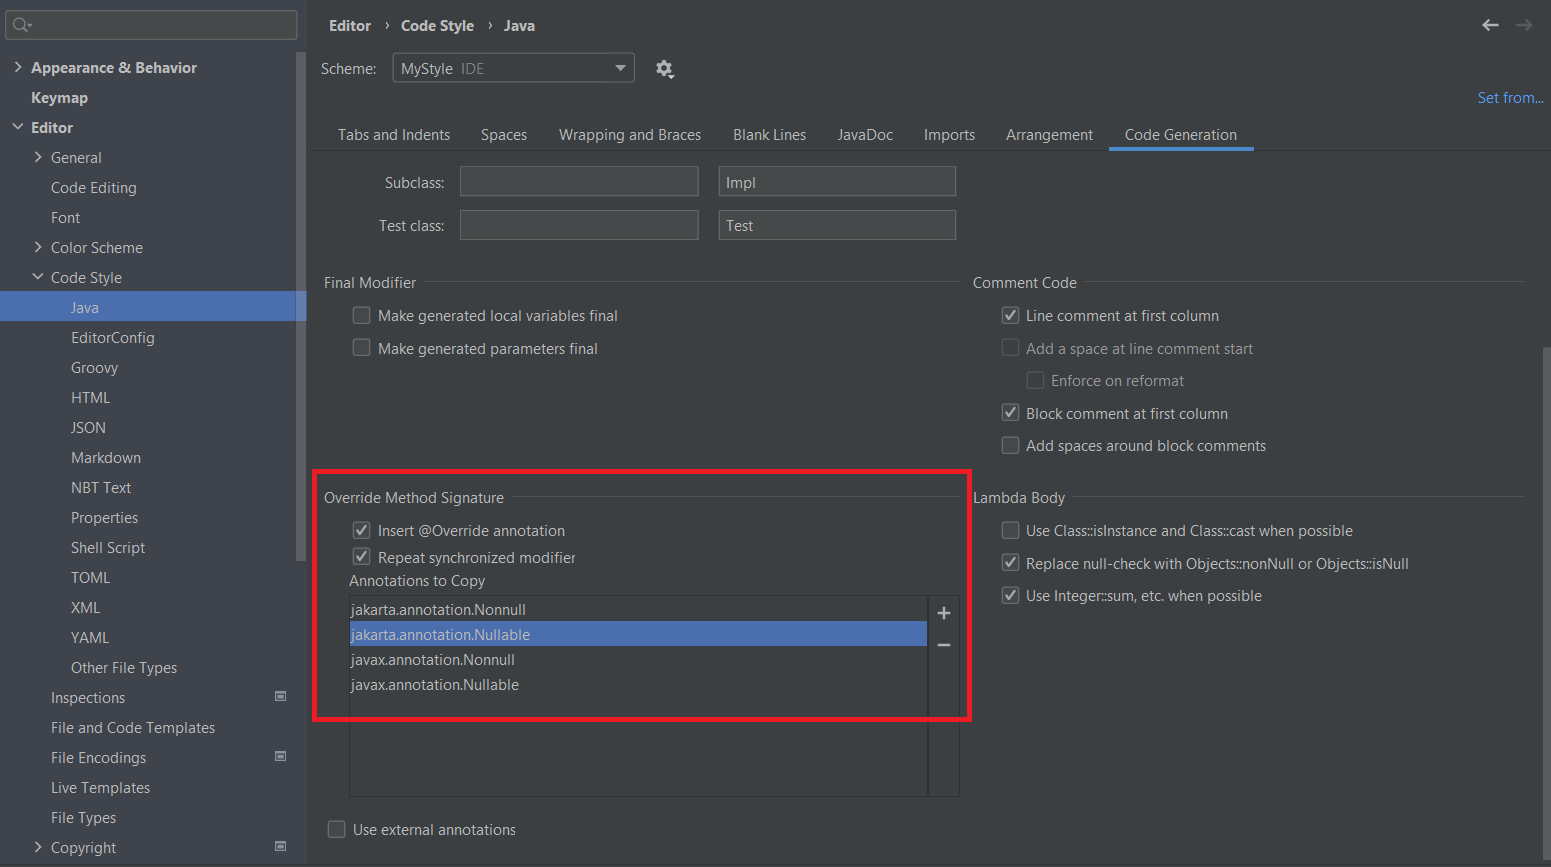
This first image makes it so that method overrides/implementations with missing annotations from their parent types show a warning, and allow you to automatically insert these missing annotations. Plus, when you use IntelliJ to automatically implement methods from a abstract class or interface these interfaces will be copied for you.

This second image makes it so the Jakarta Nonnull and Nullable annotations used in the project are recognized by IntelliJ. This allows us to have a basic system for tracking nullability. You'll also want to ensure the default annotation is the Jakarta one after you add it to the list.
Methods that can return null or parameters that may be null should be marked with Nullable. Any time one of these is used, it will warn you when you do not have an appropriate null check on a value.
Similarly, any method/parameter that should not be null should be marked with Nonnull. We use a plugin that generates null checks at compile time, so the contract for non-null is enforced at runtime.
Diagnosing improper JavaFX thread access
With JavaFX many operations are expected to be done on the application thread. This isn't strictly enforced by the library in most cases, but not doing so can lead to non-deterministic behaviors or even exceptions. Finding out where these occur just by looking at code isn't easy when projects get beyond a certain size, so to facilitate this we created JavaFX Access Agent. Its a Java agent that you add to your VM options when running Recaf that logs where improper thread access occurs. The agent is configured in Recaf's Main.java to print to std-err.
Getting the agent
The agent can be downloaded on the GitHub project's releases page or on Maven Central.
Setup
In IntelliJ you can create a run config (See: ../arch/running.md) with custom VM options specified. In the VM input field you will add -javaagent:<path>=<package-list> where:
<path>is the path to the agent jar.<package-list>is a semicolon separated list of internal package names. For instance:software/;org/;com/;javafx/